Skip to content

Month: December 2008

Gravatar with JavaFX

Gravatar is easy way to put global recognized avatar images into any Internet application. Gravatar would stands for globally recognized avatar.

Below,  the Java class that I got from the Gravatar Java reference. Here is a static class called md5 that applies a MD5Sum algorithm over a string. Is a little complex code but all behavior keeps encapsulated and who uses it don’t need to know how it works. Just gives a string and receives a encrypted string. Those two codes are also a good example of how calling Java classes inside a JavaFX code.

package gravatarexample;

import java.security.MessageDigest;
import java.io.UnsupportedEncodingException;
import java.security.NoSuchAlgorithmException;

public class MD5 {
   public static String toHex(String message) {
      try {
         MessageDigest md = MessageDigest.getInstance("MD5");
         byte array[] = md.digest(message.getBytes("CP1252"));
         StringBuffer sb = new StringBuffer();
         for (int i = 0; i < array.length; ++i) {
            sb.append(Integer.toHexString((array[i]&0xFF)|0x100).substring(1, 3));
         }
         return sb.toString();
      } catch (NoSuchAlgorithmException e) {
      } catch (UnsupportedEncodingException e) {
      }
      return null;
   }
}

As a Java class in the same package, any JavaFX (or Java) code can call it without any problem. Just to keep the code more clear I’m importing it explicitly. Is this example I also create some Swing interface to give user the option to put his mail, adjust the image size and get a output direct link or html image tag.

package gravatarexample;

import gravatarexample.MD5;
import javafx.ext.swing.SwingButton;
import javafx.ext.swing.SwingSlider;
import javafx.ext.swing.SwingTextField;
import javafx.scene.image.Image;
import javafx.scene.image.ImageView;
import javafx.scene.layout.VBox;
import javafx.scene.Scene;
import javafx.stage.Stage;

var mail = "Email";
var key = "";

function gravatalize(mail:String, size: Integer): String {
   return "http://www.gravatar.com/avatar/{MD5.toHex(mail)}?s={size}"
}

var inputtxt = SwingTextField {
   columns: 20
   text: mail
}

var slider = SwingSlider {
   minimum: 10
   maximum: 128
   value: 100
   vertical: false
}

var button = SwingButton {
   text: "Get Gravatar"
   action: function() {
      key = gravatalize(inputtxt.text, slider.value);
      directoutput.text = key;
      htmloutput.text = "\"gravatar\"";
      photo.image = Image {
         backgroundLoading: true,
         url: key};
   }
}

var photo:ImageView = ImageView {
   image: null
}

var directoutput = SwingTextField {
   columns: 20
   text: "direct link image"

}

var htmloutput = SwingTextField {
   columns: 20
   text: "html tag image"
}

Stage {
   title: "Gravatar"
   width: 300
   height: 340
   scene: Scene {
      content: [
         VBox {
            spacing: 10
            content: [inputtxt, slider, button, directoutput, htmloutput, photo]
         },
      ]
   }
}

The string itself is assembled in the gravatalize function. You give a mail and it’s returns a Gravatar direct link to the image. There’s many cool ways to use together Gravatar and a JavaFX Internet application.

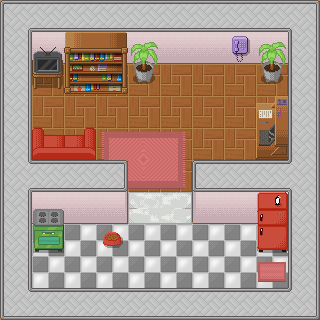
JavaFX, Simple Tile Set

Tile sets are a very simple way to draw scenarios with repeated elements. From simple to complex ones using a very low footprint.

First step, load the png file that stores the tileset into a Image. The file tiles.png shoud be in the same directory of the source code. I adjusted some tiles from those tile set I’ve blogged here before into a grid of 10×10 tiles.

Set of tiles, example

var tileset = Image {
   url: "{__DIR__}tiles.png"
}

Notice that each tile have 32 of height and 32 of width. We will assume this and use theses numbers when performing calculations to find a single tile in our tile set.

def w = 32;
def h = 32;

To display a Image in the screen we use a ImageView node. A ImageView can have a viewport property to create crop or zoom effect. A viewport is just a Rectangle2D, a object with position (minX and minY), height and width. If we want to display the first tile in the tileset we do

first tile

ImageView {
   image: tileset
   viewport: Rectangle2D{
      minX: 0, minY: 0, height: 32, width: 32
   }
}

Notice that the minX determines the column and minY the row in the tileset. The first row is 0*32, the second row is 1*32 and so on. If we want to display the tile at the second line and third column of the tileset we do

another_tile

ImageView {
   image: tileset
   viewport: Rectangle2D{
      minX: 2 * 32 , minY: 1*32, height: 32, width: 32
   }
}

Those properties in a Rectangle2D are for init and read only. So I created a list with all Rectangles I can need for use as a viewport.

def viewports = for (row in [0..9]) {
   for (col in [0..9]) {
       Rectangle2D{
           minX: col * w, minY: row * h, height: w, width: h
       }
   }
}

The scenario map is stored in another list. The first element of the list is 7, that is, the first tile in the scenario is the 7th tile from the tile set.

var map = [
    7,  3,  3,  3,  3,  3,  3,  3,  3,  8,
   19, 26, 40, 41, 24, 13, 13, 23, 24, 19,
   19, 36, 50, 51, 34,  2,  2,  2, 34, 19,
   19,  2,  2,  2,  2,  2,  2,  2, 25, 19,
   19, 57, 58, 44, 45, 46,  2,  2, 35, 19,
   27,  3,  3,  6, 55, 56,  5,  3,  3, 38,
   19, 60, 13, 16, 47, 48, 15, 13, 61, 19,
   19, 70,  1, 33,  1,  1,  1,  1, 71, 19,
   19,  1,  1,  1,  1,  1,  1,  1, 49, 19,
   17,  9,  9,  9,  9,  9,  9,  9,  9, 18,
];

Finally to create a scenario with 100 tiles, 10 per row and with 10 rows, in a list called tiles. Each iteration of this loop creates a ImageView. Each ImageView will store a single tile. We get the tile number in the map list and so use it to index the viewports list.

var tiles =  for (row in [0..9]) {
   for (col in [0..9]) {
      ImageView {
         x: col * w, y: row * h,
         viewport: bind viewports[map[row * 10 + col]]
         image: tileset
      }
   }
}

Additionally I added two things to transform this program also in a (extremely)  simple map editor. At each ImageView I added a callback for onMouseClicked event. When you click on a tile, it changes its map position, ie, the tile. The next tile for the left button and the last tile for any other button.

onMouseClicked: function( e: MouseEvent ):Void {
   var amount = if(e.button == MouseButton.PRIMARY) { 1 } else { -1 };
   map[row * 10 + col] = (map[row * 10 + col] + amount) mod 100;
}

The other thing is to print the map list when the program is over. There is the full program:

package tileeditor;

import javafx.stage.Stage;
import javafx.scene.Scene;
import javafx.scene.image.ImageView;
import javafx.scene.image.Image;
import javafx.scene.CustomNode;
import javafx.scene.Group;
import javafx.scene.Node;
import javafx.geometry.Rectangle2D;
import javafx.scene.input.MouseEvent;
import javafx.scene.input.MouseButton;

def w = 32;
def h = 32;

var map = [
    7,  3,  3,  3,  3,  3,  3,  3,  3,  8,
   19, 26, 40, 41, 24, 13, 13, 23, 24, 19,
   19, 36, 50, 51, 34,  2,  2,  2, 34, 19,
   19,  2,  2,  2,  2,  2,  2,  2, 25, 19,
   19, 57, 58, 44, 45, 46,  2,  2, 35, 19,
   27,  3,  3,  6, 55, 56,  5,  3,  3, 38,
   19, 60, 13, 16, 47, 48, 15, 13, 61, 19,
   19, 70,  1, 33,  1,  1,  1,  1, 71, 19,
   19,  1,  1,  1,  1,  1,  1,  1, 49, 19,
   17,  9,  9,  9,  9,  9,  9,  9,  9, 18,
];

var tileset = Image {
    url: "{__DIR__}tiles.png"
}

def viewports = for (row in [0..9]) {
   for (col in [0..9]) {
       Rectangle2D{
           minX: col * w, minY: row * h, height: w, width: h
       }
   }
}

var tiles =  for (row in [0..9]) {
   for (col in [0..9]) {
      ImageView {
         x: col * w, y: row * h,
         viewport: bind viewports[map[row * 10 + col]]
         image: tileset

         onMouseClicked: function( e: MouseEvent ):Void {
            var amount = if(e.button == MouseButton.PRIMARY) { 1 } else { -1 };
            map[row * 10 + col] = (map[row * 10 + col] + amount) mod 100;
         }
      }
   }
}

Stage {
    title: "JavaFX Simple Tile Editor"
    scene: Scene {
        content: [ tiles ]
    }
    onClose: function() {
        println(map);
    }
}

Here is the result for that map

tlemap javafx

And you can try it yourself in your browser. Play it online now.

Here is a video of it working

[youtube]lxuBEoItB5E[/youtube]

Downloads:

Possibilities

We are using just  a image that can handle 100 tiles, tiles.png with less than 30Kb. The map is also composed with 100 tiles. Each tile we can choose between 100 different tiles, so we can compose 10100 different maps (one googol10 ). Most of them are useless and without any sense, but some are cool. 🙂

SDN Brasil é lançado

SDN Brasil

Uma ótima notícia para quem depende de documentação em língua portuguesa.

O Brasil agora é um dos países a contar com um SDN, o Sun Developer Network, no endereço http://br.sun.com/developers/. É um portal que agrega informações e tutoriais de várias tecnologias relacionadas a Sun Microsystems. No momento o portal trás só os as chamadas dos tutoriais em português mas acredito que aos poucos mais documentação seja traduzida.

Outro ponto interessante é que os documentos estão sob licença Berkley, o que já facilita a tradução e adaptação dos artigos.

OpenSolaris 2008.11 Webinar

Rafael Vanoni no OSDevCon, foto do Jim Gris.
Rafael Vanoni no OSDevCon, foto do Jim Grisanzio.

Próxima terça-feira, dia 16, assistam ao vivo um webinar (seminário web)  através do Ellumite sobre novo OpenSolaris 2008.11. Quem vai conduzir o webinar é o Rafael Vanoni Polanczyk que foi Embaixador de Campus da Sun entre 2006-2007 e hoje trabalha no Kernel do OpenSolaris na Califórnia.

Dêem uma olhada nos horários e em maiores informações no site do evento dentro do OSUM.

C Gaussian Elimination Implementation

A simple gaussian elimination implemented in C.

To simplify, I hard coded the linear system

10 x1 + 2 x2 + 3 x3 + 4 x4 = 5
6 x1 + 17 x2 + 8 x3 + 9 x4 = 10
11 x1 + 12 x2 + 23 x3 + 14 x4 = 15
16 x1 + 17 x2 + 18 x3 + 29 x4 = 20

into the AB float matrix.

/* 
 * Description: Solve a hard coded linear system by gaussian elimination
 * Author: Silveira Neto
 * License: Public Domain
 */

#include 
#include 

#define ROWS 4
#define COLS 5

/**
 * Linear System, Ax = B
 *
 * 10*x1 +  2*x2 +  3*x3 +  4*x4 = 5
 *  6*x1 + 17*x2 +  8*x3 +  9*x4 = 10
 * 11*x1 + 12*x2 + 23*x3 + 14*x4 = 15
 * 16*x1 + 17*x2 + 18*x3 + 29*x4 = 20
 */
float AB[ROWS][COLS] = {
    {10,  2,  3,  4,  5},
    { 6, 17,  8,  9, 10},
    {11, 12, 23, 14, 15},
    {16, 17, 18, 29, 20}
};

/* Answer x from Ax=B */
float X[ROWS] = {0,0,0,0};

int main(int argc, char** argv) {
    int row, col, i;

    /* gaussian elimination */
    for (col=0; col

Before the gaugassian elimination, AB is

10  2  3  4  5
 6 17  8  9 10
11 12 23 14 15
16 17 18 29 20

and after it is

10.00000 0.00000 0.00000 0.00000 2.82486 
0.00000 15.80000 0.00000 0.00000 3.92768 
0.00000 0.00000 15.85443 0.00000 3.85164 
0.00000 0.00000 0.00000 14.13174 3.35329 

that corresponds to

10 x1 = 2.82486
15.80000 x2 = 3.92768
15.85443 x3 = 3.85164
14.13174 x4 = 3.35329

The solution vector is X = (x1, x2, x3, x4). We get it by X=B/A.

The program output, X, is

0.28249 0.24859 0.24294 0.23729

Benchmarking:
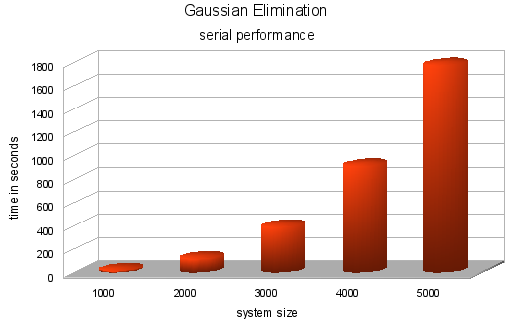
I'm this serial implementation over one node of our cluster, a machine with 4 processors (Intel Xeon 1.8 Ghz) and 1Gb RAM memory. I tried random systems from 1000 to 5000 variables and got the average time.

gaugassian elimination serial

JavaFX, how to create a rpg like game

JavaFX 1.0 is out and there are tons of new cool features, specially for game development.trans

I’ll show in this tutorial how to create a very simple demo that shows how to load imtrages, handle sprites, collisions and keyboard events that you can use to create a game with a old school rpg like vision.

For the background scenario I’m using the house that I drew and we’ll call as house.png.

That we load as a Image and place into a ImageView.

ImageView{
   image: Image {url: "{__DIR__}house.png"}
}

For the character I’m using the last character I drew, the nerdy guy.

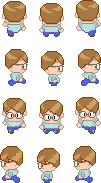
To make the animation easier, I spited it into 9 pieces:

down0.png, down1.png and down2.png

left0.png, left1.png and left2.png

right0.png, right1.png and righ2.png

up0.png, up1.png and up2.png

All images I’m using should be in the same directory of source code.

Let’s start loading the scenario and a single character sprite.

import javafx.stage.Stage;
import javafx.scene.Scene;
import javafx.scene.image.*;

Stage {
   title: "RPG-like demo", width: 424, height: 412
   visible: true
   scene: Scene{
      content: [
         ImageView{
         image: Image {url: "{__DIR__}house.png"} },
         ImageView{
            x: 320 y: 80
            image: Image {url: "{__DIR__}down1.png"}
         }
      ]
   }
}

Saved as Game.fx you can compile and run with in your terminal:

$ javafxc Game.fx

$ javafx Game

Hint: You can use NetBeans 6.5 JavaFX plugin to easier the JavaFX development.

To put animation on the character we load all sprites into four lists. Each list for each direction.

// sprites
def up    = for(i in [0..2]) { Image {url: "{__DIR__}up{i}.png"    } }
def right = for(i in [0..2]) { Image {url: "{__DIR__}right{i}.png" } }
def down  = for(i in [0..2]) { Image {url: "{__DIR__}down{i}.png"  } }
def left  = for(i in [0..2]) { Image {url: "{__DIR__}left{i}.png"  } }

And create vars to store the character position and frame of animation.

var frame = 0;
var posx = 320;
var posy = 80;

Also store the house background.

// house background
def house = ImageView{ image: Image {url: "{__DIR__}house.png"} };

I create booleans to store some key states and at each interval of time I see how they are and do something about. You can handle keyboard event with less code but I like this way because keep visual and game logics a little bit more separated.

// keyboard
var    upkey = false;
var rightkey = false;
var  downkey = false;
var  leftkey = false;

// player
var player = ImageView{
   x: bind posx y: bind posy
   image: Image {url: "{__DIR__}down1.png"}
   onKeyPressed: function(e:KeyEvent){
      if (e.code == KeyCode.VK_DOWN) {
      downkey = true;
      } else if (e.code == KeyCode.VK_UP) {
         upkey = true;
      }else if (e.code == KeyCode.VK_LEFT) {
         leftkey = true;
      }else if (e.code == KeyCode.VK_RIGHT) {
         rightkey = true;
      }
   } // onKeyPressed

   onKeyReleased: function(e: KeyEvent){
      if (e.code == KeyCode.VK_DOWN) {
         downkey = false;
      } else if (e.code == KeyCode.VK_UP) {
         upkey = false;
      }else if (e.code == KeyCode.VK_LEFT) {
         leftkey = false;
      }else if (e.code == KeyCode.VK_RIGHT) {
         rightkey = false;
      }
   } // onKeyReleased
}

See a video of the game working so far:

[youtube]Xv5z-9LGuOc[/youtube]

Now we will add collisions. In a previous post I showed some math behind bounding box game collisions. The good news are that you no longer need to worry about that. There are a lot of API improvements in JavaFX 1.0 that do all the hard work for you, specially the new classes on javafx.geometry package, Rectangle2D and Point2D.

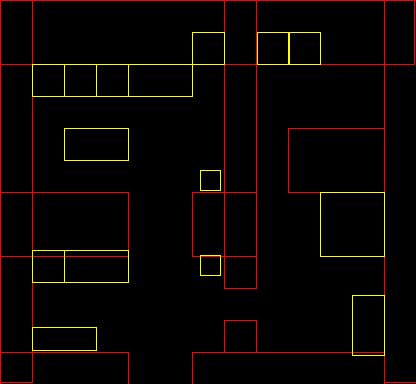
We create rectangles that represent the obstacles in the house.

// collidable obstacles
def obstacles = [
	Rectangle { x:   0 y:   0 width:  32 height: 382 stroke: Color.RED },
	Rectangle { x:   0 y:   0 width: 414 height:  64 stroke: Color.RED },
	Rectangle { x: 384 y:   0 width:  32 height: 382 stroke: Color.RED },
	Rectangle { x:   0 y: 192 width: 128 height:  64 stroke: Color.RED },
	Rectangle { x: 192 y: 192 width:  64 height:  64 stroke: Color.RED },
	Rectangle { x: 224 y:   0 width:  32 height: 288 stroke: Color.RED },
	Rectangle { x: 288 y: 128 width:  96 height:  64 stroke: Color.RED },
	Rectangle { x:   0 y: 352 width: 128 height:  32 stroke: Color.RED },
	Rectangle { x: 192 y: 352 width: 192 height:  32 stroke: Color.RED },
	Rectangle { x: 224 y: 320 width:  32 height:  32 stroke: Color.RED },
	Rectangle { x:  32 y:  64 width: 32 height: 32 stroke: Color.YELLOW },
	Rectangle { x:  64 y:  64 width: 32 height: 32 stroke: Color.YELLOW },
	Rectangle { x:  96 y:  64 width: 32 height: 32 stroke: Color.YELLOW },
	Rectangle { x: 128 y:  64 width: 64 height: 32 stroke: Color.YELLOW },
	Rectangle { x: 192 y:  32 width: 32 height: 32 stroke: Color.YELLOW },
	Rectangle { x:  64 y: 128 width: 64 height: 32 stroke: Color.YELLOW },
	Rectangle { x:  32 y: 250 width: 32 height: 32 stroke: Color.YELLOW },
	Rectangle { x:  64 y: 250 width: 64 height: 32 stroke: Color.YELLOW },
	Rectangle { x: 200 y: 255 width: 20 height: 20 stroke: Color.YELLOW },
	Rectangle { x: 200 y: 170 width: 20 height: 20 stroke: Color.YELLOW },
	Rectangle { x: 257 y:  32 width: 32 height: 32 stroke: Color.YELLOW },
	Rectangle { x: 288 y:  32 width: 32 height: 32 stroke: Color.YELLOW },
	Rectangle { x: 320 y: 192 width: 64 height: 64 stroke: Color.YELLOW },
	Rectangle { x: 352 y: 295 width: 32 height: 60 stroke: Color.YELLOW },
	Rectangle { x:  32 y: 327 width: 64 height: 23 stroke: Color.YELLOW },
];

We just have to change a little bit the game logics in order to handle collisions.

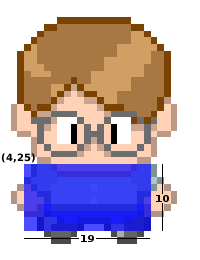
We define a bounding box around the player, it’s a rectangle from (4, 25) at the player coordinates system and with width 19 and height 10. The idea is to prospect where the player will be in the next step, see if it’s bouding box don’t collide with any obstacle and so pass it to the real game position.

// game logics
var gamelogics = Timeline {
   repeatCount: Timeline.INDEFINITE
   keyFrames: KeyFrame {
      time : 1s/8
      action: function() {
         var nextposx = posx;
         var nextposy = posy;
         if(downkey) {
            nextposy += 5;
            player.image = down[++frame mod 3];
         }
         if(upkey) {
            nextposy -= 5;
            player.image = up[++frame mod 3];
         }
         if(rightkey) {
            nextposx += 5;
            player.image = right[++frame mod 3];
         }
         if(leftkey) {
            nextposx -= 5;
            player.image = left[++frame mod 3];
         }
         for(obst in obstacles) {
            if(obst.boundsInLocal.intersects(nextposx + 4, nextposy + 25, 19, 10)) {
               return;
            }
         }
         posx = nextposx;
         posy = nextposy;
      }
   }
}

This is enough to do the trick but I also added a way to smoothly show the obstacles when pressing the space key.

[youtube]k-MHh6irvwE[/youtube]

Here is the complete source code.

package Game; 

import javafx.stage.Stage;
import javafx.scene.*;
import javafx.scene.image.*;
import javafx.scene.input.*;
import javafx.scene.paint.*;
import javafx.scene.shape.*;
import javafx.animation.*;

var frame = 0;
var posx = 320;
var posy = 80;

// sprites
def up    = for(i in [0..2]) { Image {url: "{__DIR__}up{i}.png"    } }
def right = for(i in [0..2]) { Image {url: "{__DIR__}right{i}.png" } }
def down  = for(i in [0..2]) { Image {url: "{__DIR__}down{i}.png"  } }
def left  = for(i in [0..2]) { Image {url: "{__DIR__}left{i}.png"  } }

// house background
def house = ImageView{ image: Image {url: "{__DIR__}house.png"} };

// keyboard
var    upkey = false;
var rightkey = false;
var  downkey = false;
var  leftkey = false;

// player
var player = ImageView{
   x: bind posx y: bind posy image: down[1]
   onKeyPressed: function(e:KeyEvent){
      if (e.code == KeyCode.VK_DOWN) {
         downkey = true;
      } else if (e.code == KeyCode.VK_UP) {
         upkey = true;
      }else if (e.code == KeyCode.VK_LEFT) {
         leftkey = true;
      }else if (e.code == KeyCode.VK_RIGHT) {
         rightkey = true;
      }

		if(e.code == KeyCode.VK_SPACE){
         if(fade==0.0){
         	fadein.playFromStart();
			}
			if(fade==1.0){
				fadeout.playFromStart();
			}
		}
   } // onKeyPressed

   onKeyReleased: function(e: KeyEvent){
      if (e.code == KeyCode.VK_DOWN) {
         downkey = false;
      } else if (e.code == KeyCode.VK_UP) {
         upkey = false;
      }else if (e.code == KeyCode.VK_LEFT) {
         leftkey = false;
      }else if (e.code == KeyCode.VK_RIGHT) {
         rightkey = false;
      }
   } // onKeyReleased
}

// collidable obstacles
def obstacles = [
	Rectangle { x:   0 y:   0 width:  32 height: 382 stroke: Color.RED },
	Rectangle { x:   0 y:   0 width: 414 height:  64 stroke: Color.RED },
	Rectangle { x: 384 y:   0 width:  32 height: 382 stroke: Color.RED },
	Rectangle { x:   0 y: 192 width: 128 height:  64 stroke: Color.RED },
	Rectangle { x: 192 y: 192 width:  64 height:  64 stroke: Color.RED },
	Rectangle { x: 224 y:   0 width:  32 height: 288 stroke: Color.RED },
	Rectangle { x: 288 y: 128 width:  96 height:  64 stroke: Color.RED },
	Rectangle { x:   0 y: 352 width: 128 height:  32 stroke: Color.RED },
	Rectangle { x: 192 y: 352 width: 192 height:  32 stroke: Color.RED },
	Rectangle { x: 224 y: 320 width:  32 height:  32 stroke: Color.RED },
	Rectangle { x:  32 y:  64 width: 32 height: 32 stroke: Color.YELLOW },
	Rectangle { x:  64 y:  64 width: 32 height: 32 stroke: Color.YELLOW },
	Rectangle { x:  96 y:  64 width: 32 height: 32 stroke: Color.YELLOW },
	Rectangle { x: 128 y:  64 width: 64 height: 32 stroke: Color.YELLOW },
	Rectangle { x: 192 y:  32 width: 32 height: 32 stroke: Color.YELLOW },
	Rectangle { x:  64 y: 128 width: 64 height: 32 stroke: Color.YELLOW },
	Rectangle { x:  32 y: 250 width: 32 height: 32 stroke: Color.YELLOW },
	Rectangle { x:  64 y: 250 width: 64 height: 32 stroke: Color.YELLOW },
	Rectangle { x: 200 y: 255 width: 20 height: 20 stroke: Color.YELLOW },
	Rectangle { x: 200 y: 170 width: 20 height: 20 stroke: Color.YELLOW },
	Rectangle { x: 257 y:  32 width: 32 height: 32 stroke: Color.YELLOW },
	Rectangle { x: 288 y:  32 width: 32 height: 32 stroke: Color.YELLOW },
	Rectangle { x: 320 y: 192 width: 64 height: 64 stroke: Color.YELLOW },
	Rectangle { x: 352 y: 295 width: 32 height: 60 stroke: Color.YELLOW },
	Rectangle { x:  32 y: 327 width: 64 height: 23 stroke: Color.YELLOW },
];

// game logics
var gamelogics = Timeline {
   repeatCount: Timeline.INDEFINITE
   keyFrames: KeyFrame {
      time : 1s/8
      action: function() {
         var nextposx = posx;
         var nextposy = posy;
         if(downkey) {
            nextposy += 5;
            player.image = down[++frame mod 3];
         }
         if(upkey) {
            nextposy -= 5;
            player.image = up[++frame mod 3];
         }
         if(rightkey) {
            nextposx += 5;
            player.image = right[++frame mod 3];
         }
         if(leftkey) {
            nextposx -= 5;
            player.image = left[++frame mod 3];
         }
         for(obst in obstacles) {
            if(obst.boundsInLocal.intersects(nextposx + 4, nextposy + 25, 19, 10)) {
               return;
            }
         }
         posx = nextposx;
         posy = nextposy;
      }
   }
}

gamelogics.play();

// obstacles view
var fade = 0.0;

var obstacleslayer = Group {
   opacity: bind fade
   content: [
      Rectangle { x:0 y:0 width:500 height: 500 fill: Color.BLACK },
      obstacles,
      Rectangle {
        x: bind posx + 4 y: bind posy + 25 width: 19 height: 10
        fill: Color.LIME
      }
   ]
}

var fadein = Timeline {
	keyFrames: [
   	at (0s) {fade => 0.0}
   	at (1s) {fade => 1.0}
   ]
}

var fadeout = Timeline {
	keyFrames: [
   	at (0s) {fade => 1.0}
   	at (1s) {fade => 0.0}
   ]
}

// game stage
Stage {
	title: "RPG-like demo", width: 424, height: 412
	visible: true
	scene: Scene{
      fill: Color.BLACK
		content: [house, player, obstacleslayer]
	}
}

Play Through Java Web Start

or click here to play via applet, inside your browser.

update: The applet version and Java Web Start versions should be working now.  The applet version on Linux seems to be having problems with the keyboard handling, use the Java Web Start version while I’m trying to fix it.

Downloads: