This is a short tutorial about some JavaFX elements like ellipses, circles, effects and gradients.
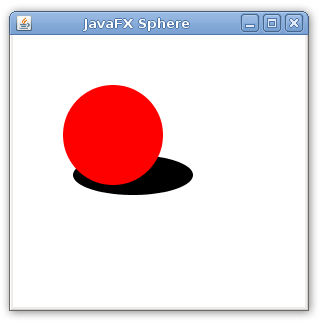
In the first code we are creating a frame with a ellipse with center in (120,140), 60 pixels of horizontal radius, 20 pixels of vertical radius and color black. We have also a circle with center in (100,100), 50 pixels of radius and color red. The idea is make this circle appears like a sphere and make the ellipse look like a shadow.
import javafx.application.*;
import javafx.scene.paint.*;
import javafx.scene.geometry.*;

Frame {
    title: "JavaFX Sphere", width: 300, height: 300, visible: true
    stage: Stage {
        content: [
            Ellipse {
                 centerX: 120, centerY: 140, radiusX: 60, radiusY: 20
                 fill: Color.BLACK
            },
            Circle { centerX: 100, centerY: 100, radius: 50, fill: Color.RED }
        ]
    }
}

Now we will just add two thing, a effect and a radial gradient.
First we’ll just add javafx.scene.effect.* to our import list and just call the gaussian blur effect in our ellipse with
effect: GaussianBlur{ radius: 20 }
This creates a gaussian blur of radius 20. The first ellipse was like

and now with the effect becomes
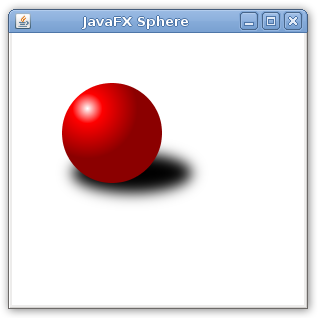
Now we create a radial gradient for the circle appears like a sphere. We do that using the RadialGradient class at
RadialGradient {
   centerX: 75, centerY: 75, radius: 50, proportional: false
   stops: [
      Stop {offset: 0.0 color: Color.WHITE},
      Stop {offset: 0.3 color: Color.RED},
      Stop {offset: 1.0 color: Color.DARKRED},
   ]
}
First lets look at the gradient. It starts with a white color, going to red during the first 30% of the way. The remaining of the way is the color red going to a dark red. It creates a gradient like this one:
![]()
But it is a radial gradient, with center in (75,75) and radius 50. So this radial gradient looks like this:

As we place this radial gradient in our circle, it was like this:

And now is like this:

Now the complete code. I guess it’s simple and also concise.
import javafx.application.*;
import javafx.scene.paint.*;
import javafx.scene.effect.*;
import javafx.scene.geometry.*;

Frame {
    title: "JavaFX Sphere", width: 300, height: 300, visible: true
    stage: Stage {
        content: [
            Ellipse {
                centerX: 120, centerY: 140, radiusX: 60, radiusY: 20
                fill: Color.BLACK
                effect: GaussianBlur{ radius: 20 }
            },
            Circle {
                centerX: 100, centerY: 100, radius: 50
                fill: RadialGradient {
                    centerX: 75, centerY: 75, radius: 50, proportional: false
                    stops: [
                        Stop {offset: 0.0 color: Color.WHITE},
                        Stop {offset: 0.3 color: Color.RED},
                        Stop {offset: 1.0 color: Color.DARKRED},
                    ]
                }
            }
        ]
    }
}
Here is the final screenshot:


Nice job!
Hi Silveira, great to see you exploring and sharing your work with JavaFX. A great way to get people interested. Keep up the good work!
[…] Source […]
Just great ! … Maybe you can add some bindings (ex: changing the color, shadow angle …etc) to it and also provide a WebStart link to play with it …
Please put up more such simple but brilliant JavaFX demos
El Cy, it’s a good idea, maybe in a continuation post, do keep this one simple. 🙂
[…] Silveira Neto describes on your blog an interesting JavaFX demo and its graphics potentialities. […]
fine.Can u suggest a tutorial for Javafx.
Pratap Chowdary, take a look at http://www.javapassion.com/javafx
Nice and informative site. Keep up the good work.