First, check if you have Java installed:
$ java -version
java version “1.6.0_10-rc”
Java(TM) SE Runtime Environment (build 1.6.0_10-rc-b28)
Java HotSpot(TM) Client VM (build 11.0-b15, mixed mode, sharing)
Now download the last version of Glassfish application server, I’m using Glassfish V2 for Linux. It’s a jar package. Execute it.
$ java -Xmx256m -jar glassfish-installer-v2ur2-b04-linux.jar
You be asked about the license agreement (CDDL+GPL).

Files will be decompressed in a directory named glassfish.
$ cd glassfish
Now we need to continue the installation. You can have Ant installed in your system or, like I’m doing, use a version that comes the Glassfish package.
$ chmod +x -R lib/ant/bin
$ lib/ant/bin/ant -f setup.xml
Tip: if you have more servers and want to create a cluster for load balancing, see this documentation. After ajust the setup-cluster.xml file you just need to run ant on it.
Let’s execute the server:
$ bin/asadmin start-domain
The default instance port is 8080. Try it on http://localhost:8080.

The default administrator port is 4848. Try it on http://localhost:4848.

The default user is admin and password is adminadmin. Log in.
Tip: you be asked for register your version. This register is not mandatory and not doing it will not limit the features of your Glassfish. It’s just a way they use to track the number of users. Aditionaly can have acess to newsletters, tutorials, screencasts, services and support. If you already have a SDN (Sun Developer Network) or Sun Online account you can use it for registration. If you simply doesn’t want to, you can skip this step.
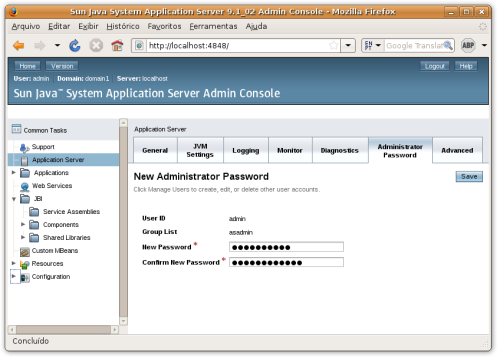
For security reassons, click in the Application Server icon on the left sidebar and so in the Adminstrator Password tab. Chose a new password and click Save.

Let’s deploy a application. Download the file http://glassfish.dev.java.net/downloads/quickstart/hello.war.
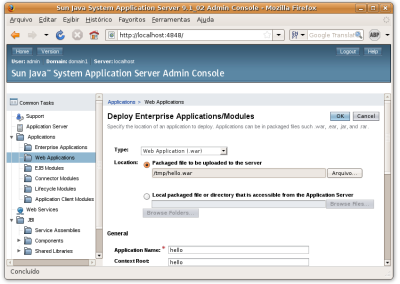
Go to Applications → Web Applications on the sidebar.

No application will be there. Click on the Deploy button.
In the next screen, on Location select the .war that you downloaded. Click Ok.

Your application is now deployed.

Try the application on http://localhost:8080/hello.

There other ways less easy but more flexible) to deploy your application, you can take a look on this and others topics on Glassfish Quick Start Guide.
Try to explore the Glassfish admin interface. It’s very easy and intuitive.
Thanks a bunch, Silveira — I have put it in the Student/Contest blog site.
Hi,
My name is Varun Nischal and I’m the NetBeans Community Docs Contribution Coordinator. Your blog entry would make a fantastic tutorial for our Community Docs wiki (http://wiki.netbeans.org/CommunityDocs).
Would you be willing to contribute it? If you need any help or have any questions, please contact me at nvarun AT netbeans DOT org
I look forward to hearing from you.
Thanks,
Varun Nischal
http://nb-community-docs.blogspot.com/
—
“You must do the things you think you cannot do.”
Great resource dude!!
Thanks a bunch.
I hope this will be helpful to all the CA’s
You could even give a demo on SFD.
[…] Glassfish has no dependencies with any IDE and perfectly works by alone. If you need I wrote this post explaining how to install and deploy a application on Glassfish from […]
Olá Silveira, fiz a instalação do glassfish no linux fedora 10 e de uma aplicação web, essa aplicação deveria se conectar ao site da receita federal para algumas validações, só que isso não acontece. Existe alguma configuração para liberar no glassfish o acesso da minha aplicação a web?
desde já agradeço,
Wesley Torres
Wesley, muitas coisas podem estar acontecendo mas o mais provável é que você esteja passando por um problema de proxy ou firewall que não permite que você acesse as portas onde esses serviços estão rodando na receita federal.