This is the Mortal Kombat Arcade Cabinet from Arcade1UP. It’s a complete arcade machine with a smaller size for someone who’s tired of playing ios games for money. Out of the box (and after assembly) this machine can play 3 original Mortal Kombat games:
Mortal Kombat (1992)
Mortal Kombat II (1993)
Ultimate Mortal Kombat 3 (1995)
It comes with everything you need to play the games. It has joysticks for 2 players, embedded screen and sound. It’s powered by a regular power outlet.
Dimensions: This unit (with the raiser at the bottom) weight 58.5 lbs (26.5 kg) and have height of 45.8†(116.33 cm), length of 22.75†(58.78 cm), and width 19″ (48.26 cm). It is said that Arcade1UP machines are 3/4 of the size of a regular arcade cabinet. The riser has length of 20.5″ (52.07 cm), width of 19.75″ (50.17 cm) and height of 13.25″ (33.65 cm). With the raiser, it has a perfect size for me with controls and monitors at the right height. Seating at the stool makes it even more comfortable.
This machine has the Raiden painted on it’s side just like the original MK2 machine. This is probably my favorite thing about this cabinet.
Dog for size comparison. Dog not included.
Gameplay
While this is not an original Midway arcade system board, all gameplay is executed through some form of emulation. You don’t have to deal with any artifacts of emulation or even have to think about it. The machine just works. You turn it on and you are playing Mortal Kombat in a few seconds. No coins. No charging gamepads batteries. No software updates. No DLCs. No cables. No wifi. No where is the TV remote. Just Mortal Kombat one simple power button away from you.
All games are working perfectly. I could not notice any flaws. I’m sure some arcade hard-core enthusiast will find some minor obscure detail that is different from an original coin operated vintage machine but I could not notice any difference.
The emulation is straight forward, there are no filters, no settings, no save states.
This of course uses LCD screen and not a big CRT monitor. The screen is 17″ which is a great size. As everything else, you can’t change brightness, contrasts, or anything. However, I have no problems with the default configurations it came with.
light up marquee
Control deck
The control deck can support up to 2 players. Each player has 7 buttons and a joystick. The start button is wired to the start input and the coin input. So by pressing start is the same as inserting a coin and pressing start. There is a power switch for the whole machine. There is a volume switch with 3 states: mute, medium and high.
The buttons are not great but usable and functional. They have a cheap feeling and don’t make a characteristic click when you press them. However, they work, they submit the input and have the proper size.
The joystick also is functional, clicky and usable but could be of better quality. I like that they use a bat top handle which I find preferable for fight games and is the same type used in the original MK machines.
This one comes with the transparent deck protector to avoid scratches in the deck paint.
It’s a okay control deck. Keep in mind that arcade controls is a whole field for hobbyists with many different brands of joysticks, buttons, and setups. All with very broad price ranges.
Mortal Kombat custom stool
Stool
The Mortal Kombat custom stool is great. I would probably never buy this one by itself but I’m glad I have it now. It has a glossy finish that looks great. It feels great, it’s comfortable and while you cannot adjust the height I found it just perfect for this machine.
Marquee light
This is a great addition to this machine. It really enhances the look and feel of an arcade machine. That is something that I definitely would add to any Arcade1UP machine. It’s just a plastic piece with a light behind it. My only criticism is that the colors of the marquee are a little bit desaturated.
Pricing
I bought this bundle at Costco and it set me back US$ 350. All prices mentioned here are without taxes, fees and shipping. This bundle includes the machine and a custom stool, light up marquee, custom riser, and the arcade cabinet.
These are some current prices for everything individually.
MK custom stool: I found it at GameStop for US$ 80.
MK light up marquee: I found one at Amazon for US$ 60.
MK Arcade1up: you can find it at Walmart for US$ 299.
Deck protector: Arcade1UP sell them for around US$ 12.50.
MK custom riser: it seems to be exclusive at the moment but you can buy a standard riser at Walmart for US$ 49 and a set stickers at eBay US$ 55 (total US$ 104) or buy a bundle of arcade and riser at Walmart for US$ 379.
Therefore, right now to replicate this Costco bundle elsewhere it would cost US$ 531.50, i.e. US$ 181.50 more than Costco.
However, these prices fluctuate. These units are heavy and large (45.8â€H x 22.75â€L x 19â€W), therefore occupying a lot of shelf space and they are expensive to ship too. So it’s been common to see the prices of them getting lower (examples) and it’s predictable that during Black Friday and holidays they will go lower again. However, in my personal experience these deals sell fast and I have made several unsuccessful trips trying to get one for a lower price.
Also, let’s keep some things in perspective here for price. First, a real Mortal Kombat II arcade machine is much more expensive, starting from around US $1000. Second, Costco is a paid membership based store. If you are comparing prices keep in mind that you can’t buy at Costco without a membership (starting at US$ 60).
Assembly
The pieces themselves are well labeled with codes. However, the boxes didn’t have any labels. After you open all the boxes and found all the pieces, the assembly can go smoothly. The process is almost the same to assemble an IKEA furniture.
These were some of the problems I faced during the assembly:
The pictures for the monitor in the manual did not match the real monitor. That’s because the manual is generic for all machines but machines are slightly different.
One package of screws was mislabeled.
There was misalignment when mounting the screen piece to the cabinet. That was the only hard part of the assembly.
The back panel was missing the screw holes to align to the screw holes inside.
You have to do this when the machine is in demo mode inside one of the games. With Player 1, hold the buttons RUN + BLOCK. With player 2, hold the buttons JUMP (UP) + LOW PUNCH + HIGH KICK + START (player 2). Hold them all for 5 seconds.
You are now in the Test Menu. Here you can run tests and change settings such difficulty and volume. This is not an Arcade1UP menu, it’s the original test menu from the arcade games. This was supposed to be used by the arcade owner (and not the arcade player) to change settings, reset high scores, see statistics and change prices.
Conclusion
This product has a limited scope and great execution. It’s a simple machine that does one thing and it does it well: retro arcade Mortal Kombat. It has a sweet point of compromise between an humongous original arcade and a convenient little console while keeping all the characteristics that it feel like an original arcade experience.
Arcade1UP machinesDimensions and size comparison
Arcade1UP has a great product but they are iterating very well. They started with older titles and are now expanding for some other franchises. They are also experimenting with different arcade types. I hope they keep improving the quality of their products.
While there are ports or emulation of MK 1-3 on pc and modern devices you just can’t emulate the feeling of playing with an arcade machine with all colors, lights, and size. This is a device for someone for is seeking this feeling.
And while I like Mortal Kombat and this machine, the main reason I bought it was to use it as base for further enhancements and modifications. I’m replacing all button, joysticks, lights, computer, and who knows what more. I will transform this machine into a multi-arcade beast with my favorite games.
Learn ALL Hiragana in 1 Hour (JapanesePod101) – Não precisa ser feito em literalmente 1 hora mas uma ótima forma de conhecer os sÃmbolos e sons dos Hiraganas usando ajudas visuais.
Nature’s first green is gold,
Her hardest hue to hold.
Her early leaf’s a flower;
But only so an hour.
Then leaf subsides to leaf.
So Eden sank to grief,
So dawn goes down to day.
Nothing gold can stay.
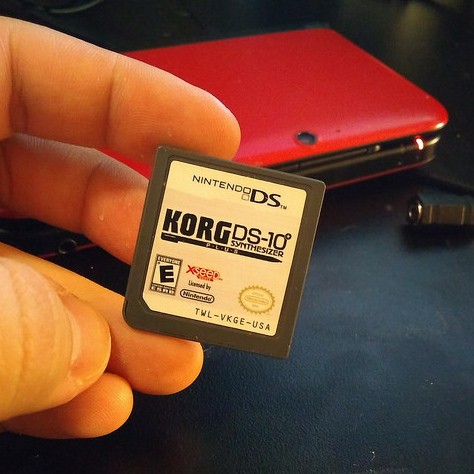
Korg DS-10 Plus is a music applications for the Nintendo DS/DSi/3DS. It’s an updated version of the Korg DS-10 (without “plus” in the name) released in 2008.
You can find the Korg DS-10 Plus as a cartridge. It’s not sold digitally on Nintendo eShop.
These are my ongoing study notes on the Korg DS-10 Plus using a Nintendo 3DS. Fell free to comment corrections and additional information.
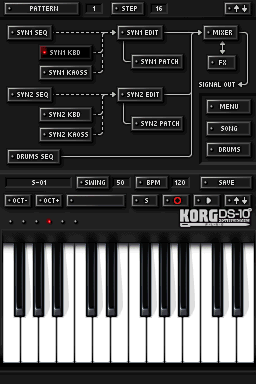
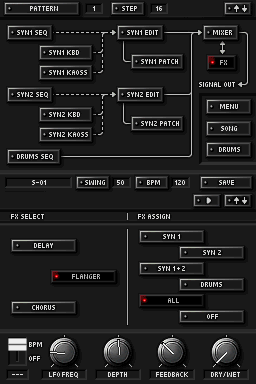
Korg DS-10 Plus Key Concepts
[↑↓] button. The up-down arrow button switch the top screen and the bottom screen, so you can use the stylus pen to interact with the interface. This is the button you will use more often.
[↵] button. This button is usually on the top left corner of the screen. It goes to a next pattern type within a pattern.
[â–º] button. Plays. If you are in a pattern screen, it will play the pattern. If you are in the song screen it will play the song.
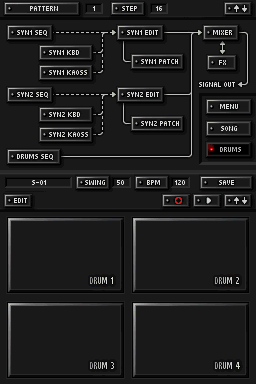
SYN1/SYN2/DRUMS. There are 3 instruments: synthesizer 1 (SYN1), synthesizer 2 (SYN2), and the drums (DRUMS). Both synthesizer are monophonic (only one sound at time). The drums are polyphonic (multiple sounds at the same time). In practice, you can think them as 6 instruments: SYN1, SYN2, DRUM1, DRUM2, DRUM3, DRUM4.
[DRUMS]Â . You can activate each drum (DRUM 1, DRUM2, DRUM 3, DRUM 4). Because each drum is an individual instrument you can have more than one drum producing sound at the same time. The 4 drum configurations belong to a session.
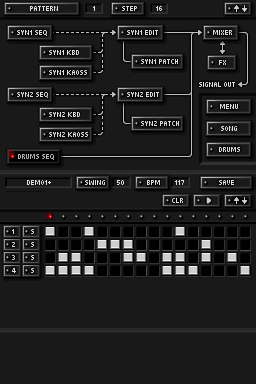
STEP. A step is an programed single invocation of instrument, modifier, or effects. You can program steps using one of the sequence editors or using the [⚬] record button.
SEQ. A sequence is a series of steps. A sequence can have up to 16 steps. The sequence size is determined by the pattern size.
DRUM SEQ. In a drum sequence you can create up to 16 steps for the 4 drums. You can play drums simultaneously.
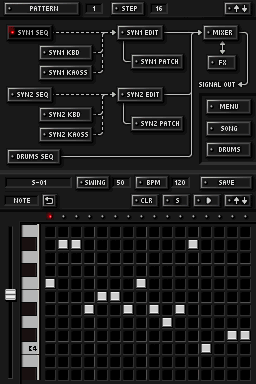
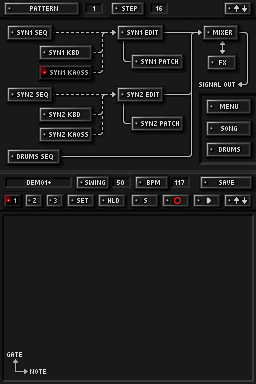
SYN1 SEQ/SYN2 SEQ. In a synthesizer sequence you can create up to 16 NOTE steps for a synthesizer, plus a correspondent sequence of steps for GATE, VOLUME, PAN, KAOSSX, and KAOSSY. You can access the different sequences pressing the [↵].
SYN1 KBD / SYN2 KBD. The keyboards control tones of a synthesizer. You can use it to play live or to record note sequences using the [⚬] record button.
[OCT -] . Lowers one octave. All notes in the keyboard gets one octave lower pitch tones.
[OCT +]. Raises one octave. All notes in the keyboard gets one octave higher pitch tones.
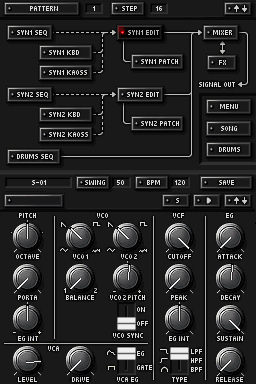
SYN1 EDIT/ SYN2 EDIT.
SYN1 PATCH / SYN2 PATCH.
SYN1 KAOSS / SYN2 KAOSS. Simulates Korg Kaoss Pad like effects on top of the SYN1/SYN2. It uses the X and Y axis as inputs when touching the button screen using the stylus. There are 3 X/Y modes. In mode [1], you control an arpeggiator and gate. Press [SET] to change the key note and scale used for the arpeggiator. The mode [2] you control volume and pan. The mode [3] you can press [SET] to choose what you are controlling on each axis. You can pretty much control any synthesizer configuration from mode [3]. You can use KAOSS live or record a KAOSSX/KAOSSY sequence the [⚬] record button.
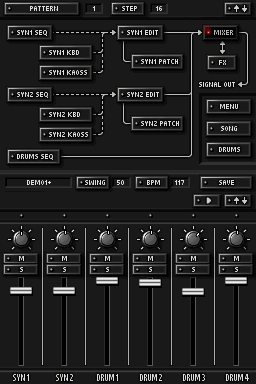
MIXER. Controls the individual volume and balance of each instrument.
FX. Effects for delay, flanger, and Chorus. You an assign an effect to SYN1, SYN2, SYN1+2, DRUMS, ALL, or turn if off.
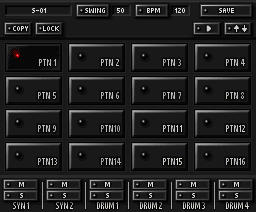
PATTERN. You can have up to 16 patterns in (called PTN1, PTN2… PTN16) in a session.
Each pattern has one whole configuration for the synthesizer 1 and 2, drums, MIXER, FX. It has a SYN1 SEQ, SYN2 SEQ, and DRUMS SEQ. A pattern has a size up to 16 steps. The size of a pattern determines the size of all sequences within that pattern. However as you can have multiple patterns, each one of them can have different sizes.
SONG. A song is:
A sequence of up 100 executions of any of the 16 patterns played one at time.
A sequence of up 100 mutes of any instruments. You can mute multiple instruments at time. Notice you can use this to get more variations from the patterns, e.g. you can execute PTN1 with and without SYN1.
All sequences will use the 4 DRUMS of the current session. You cannot have individual DRUMS configurations for each pattern. Other than that, each pattern can have all it’s configurations (SYN* SEQ, SYN* EDIT, SYN* PATCH, MIXER, FX, etc).
Additionally to that, you have a sequence of mutes. You can access the editor for this sequence clicking in the return button in the song editor. You can mute SYN1, SYN2, DRUM1, DRUM2, DRUM3, and DRUM4 individually and in any combination on a given step of a song sequence (up to 100 steps).
This should cover the basic concepts and should be enough to start playing, creating sounds and musics using the Korg DS-10 Plus.
Korg DS-10 Plus Advanced
Some of more advanced concepts I want to explore in the future and expand in this tutorial.
The Schumacher XP2260 is a portable battery with several builtin capabilities. I have being using it for a few years, it’s portable enough to bring when camping or to have it inside my car for emergencies. It weights 10.84 kg/23.9 lbs. It has a light, 2 12V outlets, 2 120V AC outlets, 1 usb 5V outlet, and built-in air compressor inflator/deflator with pressure gauge, and jump starter cables.
It’s powerful enough to power small appliances up to 200 Watts (it can hold peaks of 1200 Watts) and 1.7 Amps. I have used it for powering laptops, mobile phones, small fans, inflatable beds, etc.
The built-in compressor also comes very handy to inflate tires when needed. I also have used it to inflate and deflate a boat few times.
It takes a little long to fill this battery, around a day, but it lasts really long, months, to go from 100% to 0% capacity with regular usage. I had never used the jump starting capabilities of this device but it’s there in case I ever need it. I’ve tested jumpstarting another car and it worked fine. Here is the instructions of how to jump start a car with a dead battery using a Schumacher XP2260:
Turn off the car, open the hood.
Place the XP2260 somewhere stable with enough room so the cables can reach the battery.
Plug the red clip to the positive terminal of the car battery.
Plug the black clip to the negative terminal of the car battery.
Turn on the jump start switch in the XP2260.
Try to turn on the car. If it fails, wait and try again in a minute. It took me a few times to car to start.
When/if the car starts, turn off the jump start switch in the XP2260. Remove the black clip from the battery. Remove the red clip from the battery. Store the XP2260. Close the hood.
For a more detailed instructions, check the user manual.
Overall, I recommend this product if you are looking for a portable battery that can power regular devices, have an air compressor, and is able to jump start a car. It does takes some space in the trunk, and is a little heavy, but it pays off in functionality. There are other options in the market that are cheaper, lighter, but they don’t store as much energy and usually don’t have the air compressor. I have so far used all the functionalities of this device and I’m very satisfied with it.