Skip to content

Tag: C

Cedilha no Ubuntu 16.04

    çççç
  ççç  ççç 
  ççç  ççç 
  ççç 
  ççç 
  ççç  ççç 
    çççç
     çç
    çç

Fiz esse script (cedilha.sh) pra fazer o c-cedilha (ç) funcionar no Ubuntu 16.04. Como é uma tarefa chata que eu já tive que fazer muitas vezes fica mais fácil pra mim ter um script pra fazer isso e pode ser que seja útil a outras pessoas. Infelizmente é uma solução que exige baixar e executar como root um script da internet. Eu recomendo que você leia o script e entenda o que está acontecendo antes de executá-lo. Esse script altera vários arquivos importantes e ele faz um backup (.bak) desses arquivos.

[bash]wget https://raw.githubusercontent.com/silveira/cedilha.sh/master/cedilha.sh
sudo bash cedilha.sh[/bash]

Por favor, se o script funcionou pra você também, diga nos comentários. Se você não está usando Ubuntu 16.04 e quer testar o script ainda assim, edite o script e remova a verificação no inicio do programa.

C# class properties example

A example of use of C# class properties to convert temperatures in Celsius, Fahrenheit or Kelvin. The temperature is encapsulated and stored in a internal representation, in this example, in Celcius (private double c). Each conversion is accessible by getting or setting a property.

using System;

public class Temperature {
	private double c;

	public double celsius {
		get {
			return c;
		}
		set {
			c = value;
		}
	}

	public double fahrenheit {
		get {
			return (c * 9 / 5) + 32;
		}
		set {
			c = (value - 32) * 5 / 9;
		}
	}

	public double kelvin {
		get {
			return c + 273.15;
		}
		set {
			c = value - 273.15;
		}
	}
}

public class TemperatureExample {
	public static void Main(string[] args) {
		Temperature fortaleza = new Temperature();
		fortaleza.celsius = 26;

		Temperature washington = new Temperature();
		washington.fahrenheit = 32;

		Temperature sun = new Temperature();
		sun.kelvin = 5778;

		Console.WriteLine("Fortaleza {0}°C / {1}°F / {2} K",
			fortaleza.celsius, fortaleza.fahrenheit, fortaleza.kelvin);
		Console.WriteLine("Washington {0}°C / {1}°F / {2} K",
			washington.celsius, washington.fahrenheit, washington.kelvin);
		Console.WriteLine("Sun {0}°C / {1}°F / {2} K",
			sun.celsius, sun.fahrenheit, sun.kelvin);
	}
}

Output:

Fortaleza 26°C / 78.8°F / 299.15 K
Washington 0°C / 32°F / 273.15 K
Sun 5504.85°C / 9940.73°F / 5778 K

There is some good examples of C# class properties at Using Properties (C# Programming Guide) at MSDN.

Atiaia early releases

This was a project that me and Marco Diego created during our graduation for the Computer Graphics course. It is a ray tracing engine build from scratch in C. It was great exercise of experimentation on how implement object-oriented design patterns in ANSI C. Later Marco continued it in his master’s degree thesis implementing more features.

Parts of the sources were lost during a disk failure in the forge we hosted the project. I found some early releases and packed them here for future use. It can be useful for someone studying C or how to implement a ray tracer.

Download: atiaia_sources_by_2006.zip

Enjoy it.

ps: with this project we won the 1st place project of class and maximum grade. 😉

Tiled TMX Map Loader for Pygame

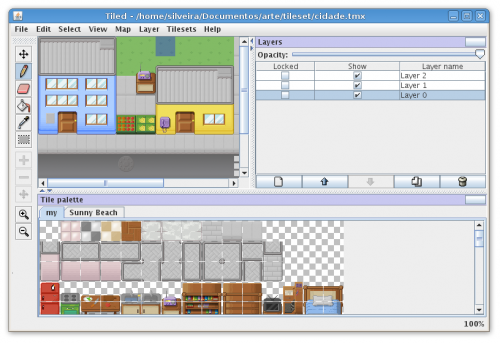
I’m using the Tiled Map Editor for a while, I even wrote that tutorial about it. It’s a general purpose tile map editor, written in Java but now migrating to C++ with Qt, that can be easily used with my set of free pixelart tiles.

map editor tiles tileset game deveopment

A map done with Tiled is stored in a file with TMX extension. It’s just a XML file, easy to understand.

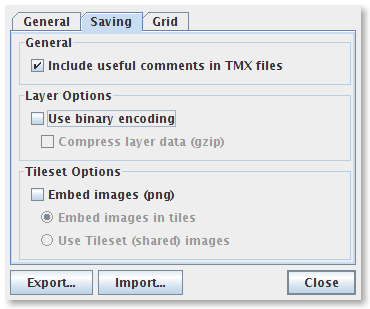
As I’m creating a map loader for my owns purposes, the procedure I’m doing here works we need some simplifications. I’m handling orthogonal maps only. I’m not supporting tile properties as well. I also don’t want to handle base64 and zlib encoding in this version, so in the Tiled editor, go at the menu Edit → Preferences and in the Saving tab unmark the options “Use binary encoding” and “Compress Layer Data (gzip)”, like this:

Tiled Preferences Window

When saving a map it will produce a TMX file like this:


    ...


For processing it on Python I’m using the event oriented SAX approach for XML. So I create a ContentHandler that handles events the start and end of XML elements. In the first element, map, I know enough to create a Pygame surface with the correct size. I’m also storing the map properties so I can use it later for add some logics or effects on the map. After that we create a instance of the Tileset class from where we will get the each tile by an gid number. Each layer has it’s a bunch of gids in the correct order. So it’s enough information to mount and draw a map.

# Author: Silveira Neto
# License: GPLv3
import sys, pygame
from pygame.locals import *
from pygame import Rect
from xml import sax

class Tileset:
    def __init__(self, file, tile_width, tile_height):
        image = pygame.image.load(file).convert_alpha()
        if not image:
            print "Error creating new Tileset: file %s not found" % file
        self.tile_width = tile_width
        self.tile_height = tile_height
        self.tiles = []
        for line in xrange(image.get_height()/self.tile_height):
            for column in xrange(image.get_width()/self.tile_width):
                pos = Rect(
                        column*self.tile_width,
                        line*self.tile_height,
                        self.tile_width,
                        self.tile_height )
                self.tiles.append(image.subsurface(pos))

    def get_tile(self, gid):
        return self.tiles[gid]

class TMXHandler(sax.ContentHandler):
    def __init__(self):
        self.width = 0
        self.height = 0
        self.tile_width = 0
        self.tile_height = 0
        self.columns = 0
        self.lines  = 0
        self.properties = {}
        self.image = None
        self.tileset = None

    def startElement(self, name, attrs):
        # get most general map informations and create a surface
        if name == 'map':
            self.columns = int(attrs.get('width', None))
            self.lines  = int(attrs.get('height', None))
            self.tile_width = int(attrs.get('tilewidth', None))
            self.tile_height = int(attrs.get('tileheight', None))
            self.width = self.columns * self.tile_width
            self.height = self.lines * self.tile_height
            self.image = pygame.Surface([self.width, self.height]).convert()
        # create a tileset
        elif name=="image":
            source = attrs.get('source', None)
            self.tileset = Tileset(source, self.tile_width, self.tile_height)
        # store additional properties.
        elif name == 'property':
            self.properties[attrs.get('name', None)] = attrs.get('value', None)
        # starting counting
        elif name == 'layer':
            self.line = 0
            self.column = 0
        # get information of each tile and put on the surface using the tileset
        elif name == 'tile':
            gid = int(attrs.get('gid', None)) - 1
            if gid <0: gid = 0
            tile = self.tileset.get_tile(gid)
            pos = (self.column*self.tile_width, self.line*self.tile_height)
            self.image.blit(tile, pos)

            self.column += 1
            if(self.column>=self.columns):
                self.column = 0
                self.line += 1

    # just for debugging
    def endDocument(self):
        print self.width, self.height, self.tile_width, self.tile_height
        print self.properties
        print self.image

def main():
    if(len(sys.argv)!=2):
        print 'Usage:\n\t{0} filename'.format(sys.argv[0])
        sys.exit(2)
    pygame.init()
    screen = pygame.display.set_mode((800, 480))
    parser = sax.make_parser()
    tmxhandler = TMXHandler()
    parser.setContentHandler(tmxhandler)
    parser.parse(sys.argv[1])
    while 1:
        for event in pygame.event.get():
            if event.type == QUIT:
                return
            elif event.type == KEYDOWN and event.key == K_ESCAPE:
                return
        screen.fill((255,255,255))
        screen.blit(tmxhandler.image, (0,0))
        pygame.display.flip()
        pygame.time.delay(1000/60)

if __name__ == "__main__": main()

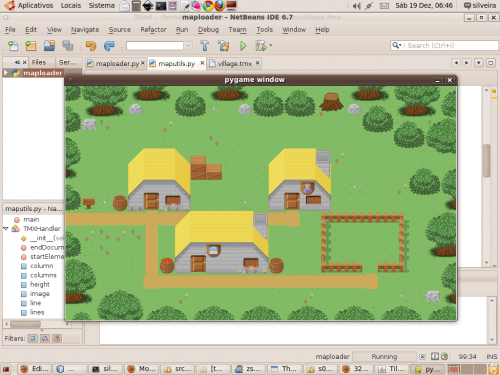
Here is the result for opening a four layers map file:

netbeans python openning map

That’s it. You can get this code and adapt for your game because next versions will be a lot more coupled for my own purposes and not so general.

Download:packagemaploader.tar.bz2 It’s the Netbeans 6.7 (Python EA 2) project file but that can be opened or used with another IDE or without one. Also contains the village.tmx map and the tileset.

OpenCV: adding two images

This is a very simple example of how to open two images and display them added.

I got two pictures at project Commons from Wikimedia that were highlighted on Featured Pictures. I did a crop on both to have the same size, as I’m trying to make this example as simple as possible.

The first one is a photo of our Milky Way, taken at Paranal Observatory by Stéphane Guisard.

milkyway

The second one is a California surfer inside wave, taken by Mila Zinkova.

surfer

In this simple OpenCV code below, we open the images, create a new one to display the result and use cvAdd to add them. We do not save the result or handle more than the ordinary case of two images with the same size.

#include 
#include 
#include 

int main( int argc, char **argv ){
    IplImage *surfer, *milkyway, *result;
    int key = 0;
    CvSize size;

    /* load images, check, get size (both should have the same) */
    surfer = cvLoadImage("surfer.jpg", CV_LOAD_IMAGE_COLOR);
    milkyway = cvLoadImage("milkyway.jpg", CV_LOAD_IMAGE_COLOR);
    if((!surfer)||(!milkyway)){
        printf("Could not open one or more images.");
        exit -1;
    }
    size = cvGetSize(surfer);

    /* create a empty image, same size, depth and channels of others */
    result = cvCreateImage(size, surfer->depth, surfer->nChannels);
    cvZero(result);

    /* result = surfer + milkyway (NULL mask)*/
    cvAdd(surfer, milkyway, result, NULL);
 
    /* create a window, display the result, wait for a key */
    cvNamedWindow("example", CV_WINDOW_AUTOSIZE);
    cvShowImage("example", result);
    cvWaitKey(0);

    /* free memory and get out */
    cvDestroyWindow("example");
    cvReleaseImage(&surfer);
    cvReleaseImage(&milkyway);
    cvReleaseImage(&result);
    return 0;
}

/* gcc add.c -o add `pkg-config opencv --libs --cflags` */

Compile it (on a well configured OpenCV development environment) and run it:

gcc add.c -o add `pkg-config opencv –libs –cflags`
./add

The result got pretty cool, a milky way surfer.

surfer in the milk way

Simple Face Detection Player

Here’s a simple video player that also performs facial detection thought the Open Computer Vision Library.

Here’s a code developed using codes from nashruddin.com and samples from OpenCV, including the haar classifier xml. More detailed explanation on the theory about how the OpenCV face detection algorithm works can be found here.

The code:

#include 
#include 
#include 

CvHaarClassifierCascade *cascade;
CvMemStorage *storage;

int main(int argc, char *argv[]) {
    CvCapture *video = NULL;
    IplImage *frame = NULL;
    int delay = 0, key, i=0;
    char *window_name = "Video";
    char *cascadefile = "haarcascade_frontalface_alt.xml";

    /* check for video file passed by command line */
    if (argc>1) {
        video = cvCaptureFromFile(argv[1]);
    }
    else {
        printf("Usage: %s VIDEO_FILE\n", argv[0]);
        return 1;
    }

    /* check file was correctly opened */
    if (!video) {
        printf("Unable to open \"%s\"\n", argv[1]);
        return 1;
    }

    /* load the classifier */
    cascade = ( CvHaarClassifierCascade* )cvLoad( cascadefile, 0, 0, 0 );
    if(!cascade){
        printf("Error loading the classifier.");
	return 1;
    }

    /* setup the memory buffer for the face detector */
    storage = cvCreateMemStorage( 0 );
    if(!storage){
        printf("Error creating the memory storage.");
	return 1;
    }

    /* create a video window, auto size */
    cvNamedWindow(window_name, CV_WINDOW_AUTOSIZE);

    /* get a frame. Necessary for use the cvGetCaptureProperty */
    frame = cvQueryFrame(video);

    /* calculate the delay between each frame and display video's FPS */
    printf("%2.2f FPS\n", cvGetCaptureProperty(video, CV_CAP_PROP_FPS));
    delay = (int) (1000/cvGetCaptureProperty(video, CV_CAP_PROP_FPS));

    while (frame) {
	/* show loaded frame */
        cvShowImage(window_name, frame);
	
	/* wait delay and check for the quit key */
        key = cvWaitKey(delay);
        if(key=='q') break;
	/* load and check next frame*/
        frame = cvQueryFrame(video);
	if(!frame) {
		printf("error loading frame.\n");
		return 1;
	}

        /* detect faces */
        CvSeq *faces = cvHaarDetectObjects(
            frame, /* image to detect objects in */
            cascade, /* haar classifier cascade */
            storage, /* resultant sequence of the object candidate rectangles */
            1.1, /* increse window by 10% between the subsequent scans*/
            3, /* 3 neighbors makes up an object */
            0 /* flags CV_HAAR_DO_CANNY_PRUNNING */,
            cvSize( 40, 40 ) 
        );

        /* for each face found, draw a red box */
        for( i = 0 ; i < ( faces ? faces->total : 0 ) ; i++ ) {
             CvRect *r = ( CvRect* )cvGetSeqElem( faces, i );
             cvRectangle( frame,
                  cvPoint( r->x, r->y ),
                  cvPoint( r->x + r->width, r->y + r->height ),
                  CV_RGB( 255, 0, 0 ), 1, 8, 0 );
        }
    }
}

Yeah, I know the code needs a few adjustments. ¬¬

To compile it in a well configured OpenCV development environment:

gcc faceplayer.c -o faceplayer `pkg-config opencv ‑‑libs ‑‑cflags`

To run it you have to put in the same directory of the binary the XML classifier (haarcascade_frontalface_alt.xml) that comes with OpenCV sources at OpenCV-2.0.0/data/haarcascades/. And so:

./faceplayer video.avi

The results I got so far is that it works well for faces but sometimes its also detects more than faces. And here a video of it working live.

A example of good result:

rick roll face detection

A example of bad result:

rick roll face detection bad result

Maybe with some adjustments it could performs even better. But was really easy to create it using OpenCV.

Morse Code Translator with Arduino

You write in your computer, sends a message thought USB and Arduino translates it into a Morse code.

Just a Arduino board with a buzzer connected at the digital output 12 (one wire in the ground and the other in the 12).

Arduino

I tried to make the code as general as possible so you can easily adapt it for anthers ways of transmitting a Morse code. To do that you just need to rewrite a few functions.

                                                  +-------------------+
                                                  | 3) Interpretation |
                                                  +-------------------+
                                                  |   2) Translation  |
+-------------------+                             +-------------------+
|     Computer      |<========USB (Serial)=======>|     1) Reading    |
+-------------------+                             +-------------------+

  1. Reads a character from Serial. Main function loop().
  2. Translate a ascii char into a Morse code using a reference table. A letter ‘K’ becomes a string word “-.-“. Function say_char().
  3. Interpret the Morse word as light and sound. Mostly at function say_morse_word(). The Interpretation needs 5 functions to say all Morse words, dot(), dash(), shortgap(), mediumgap() and intragap().

For a more details on Morse code I strongly recommend the English Wikipedia article on it.

int led = 13;                   // LED connected to digital pin 13
int buzzer = 12;                // buzzer connected to digital pin 12
int unit = 50;                  // duration of a pulse

char * morsecode[] = {
    "-----",  // 0
    ".----",  // 1
    "..---",  // 2
    "...--",  // 3
    "....-",  // 4
    ".....",  // 5
    "-....",  // 6 
    "--...",  // 7
    "---..",  // 8
    "----.",  // 9
    "---...", // :
    "-.-.-.", // ;
    "",       // < (there's no morse for this simbol)
    "-...-",  // =
    "",       // > (there's no morse for this simbol)
    "..--..", // ?
    ".--._.", // @
    ".-",     // A
    "-...",   // B
    "-.-.",   // C
    "-..",    // D
    ".",      // E
    "..-.",   // F
    "--.",    // G
    "....",   // H
    "..",     // I
    ".---",   // J
    "-.-",    // K
    ".-..",   // L
    "--",     // M
    "-.",     // N
    "---",    // O
    ".--.",   // P
    "--.-",   // Q
    ".-.",    // R
    "...",    // S
    "-",      // T
    "..-",    // U
    "...-",   // V
    ".--",    // W
    "-..-",   // X
    "-.--",   // Y
    "--.."    // Z
};

void setup() {
  pinMode(led, OUTPUT);
  pinMode(buzzer, OUTPUT);
  Serial.begin(9600);
}

void say_morse_word(char * msg){
  int index = 0;
  while(msg[index]!='\0'){
    // say a dash
    if(msg[index]=='-'){
      dash();
    }
    // say a dot
    if(msg[index]=='.'){
      dot();
    }
    // gap beetween simbols
    intragap();
    index++;
  }
}

// beep
void beep(int time){
  int i;
  int t = 100; // period of the wav. bigger means lower pitch.
  int beepduration = (int)((float)time/t*1800);
  digitalWrite(led, HIGH);
  for(i=0;i='0')&&(letter<='Z')&&(letter!='<')&&(letter!='>')){
    Serial.print(morsecode[letter-'0']);
    Serial.print(' ');
    say_morse_word(morsecode[letter-'0']);
    shortgap();
  } else {
    if(letter==' '){
      Serial.print(" \\ ");
      mediumgap();
    }else{
      Serial.print("X");
    }
  }
}

void loop(){
  if(Serial.available()){
    say_char((char)Serial.read());
  }
}

Additionally you can put another function to say entire strings, like say_string(“HELLO WORLD”)

void say_string(char * asciimsg){
  int index = 0;
  char charac;  
  charac = asciimsg[index];
  while(charac!='\0'){
    say_char(morsecode[charac-'0']);
    Serial.println(morsecode[charac-'0']);
    charac = asciimsg[++index];
    shortgap();
  }
}

You can use the Arduino IDE itself or any other program that talks with the serial port USB.

arduino interface

C Gaussian Elimination Implementation

A simple gaussian elimination implemented in C.

To simplify, I hard coded the linear system

10 x1 + 2 x2 + 3 x3 + 4 x4 = 5
6 x1 + 17 x2 + 8 x3 + 9 x4 = 10
11 x1 + 12 x2 + 23 x3 + 14 x4 = 15
16 x1 + 17 x2 + 18 x3 + 29 x4 = 20

into the AB float matrix.

/* 
 * Description: Solve a hard coded linear system by gaussian elimination
 * Author: Silveira Neto
 * License: Public Domain
 */

#include 
#include 

#define ROWS 4
#define COLS 5

/**
 * Linear System, Ax = B
 *
 * 10*x1 +  2*x2 +  3*x3 +  4*x4 = 5
 *  6*x1 + 17*x2 +  8*x3 +  9*x4 = 10
 * 11*x1 + 12*x2 + 23*x3 + 14*x4 = 15
 * 16*x1 + 17*x2 + 18*x3 + 29*x4 = 20
 */
float AB[ROWS][COLS] = {
    {10,  2,  3,  4,  5},
    { 6, 17,  8,  9, 10},
    {11, 12, 23, 14, 15},
    {16, 17, 18, 29, 20}
};

/* Answer x from Ax=B */
float X[ROWS] = {0,0,0,0};

int main(int argc, char** argv) {
    int row, col, i;

    /* gaussian elimination */
    for (col=0; col

Before the gaugassian elimination, AB is

10  2  3  4  5
 6 17  8  9 10
11 12 23 14 15
16 17 18 29 20

and after it is

10.00000 0.00000 0.00000 0.00000 2.82486 
0.00000 15.80000 0.00000 0.00000 3.92768 
0.00000 0.00000 15.85443 0.00000 3.85164 
0.00000 0.00000 0.00000 14.13174 3.35329 

that corresponds to

10 x1 = 2.82486
15.80000 x2 = 3.92768
15.85443 x3 = 3.85164
14.13174 x4 = 3.35329

The solution vector is X = (x1, x2, x3, x4). We get it by X=B/A.

The program output, X, is

0.28249 0.24859 0.24294 0.23729

Benchmarking:
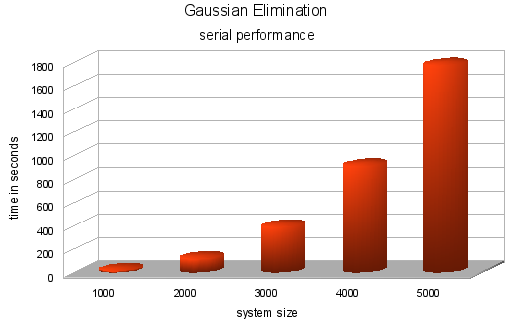
I'm this serial implementation over one node of our cluster, a machine with 4 processors (Intel Xeon 1.8 Ghz) and 1Gb RAM memory. I tried random systems from 1000 to 5000 variables and got the average time.

gaugassian elimination serial

JavaFX, rectangular collision detection

[youtube]NRwRTHPGg6M[/youtube]

In a game I wrote some years ago we handled simple rectangular collisions. Given the points:
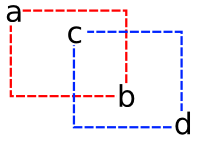
We did:

// returning 0 means collision
int collision(int ax, int ay, int bx, int by, int cx, int cy, int dx, int dy){
	return ((ax > dx)||(bx < cx)||(ay > dy)||(by < cy));
}

I'll show here a little demo about how implement simple rectangular collisions on JavaFX.
First I created a movable rectangle using the same idea of draggable nodes I already had posted before.

import javafx.input.MouseEvent;
import javafx.scene.geometry.Rectangle;

public class MovableRectangle extends Rectangle {
    private attribute startX = 0.0;
    private attribute startY = 0.0;

    public attribute onMove = function(e:MouseEvent):Void {}

    override attribute onMousePressed = function(e:MouseEvent):Void {
        startX = e.getDragX()-translateX;
        startY = e.getDragY()-translateY;
        onMove(e);
    }

    override attribute onMouseDragged = function(e:MouseEvent):Void {
        translateX = e.getDragX()-startX;
        translateY = e.getDragY()-startY;
        onMove(e);
    }
}

In the main code I some important things:

  • colide, a color that represents the collision effect. White means no collision and gray means collision.
  • rec1 and rec2, the two rectangles that can collide.
  • checkcollision() the function that checks and handles a possible collision.

Here is the main code:

import javafx.application.Frame;
import javafx.application.Stage;
import javafx.scene.geometry.Rectangle;
import javafx.scene.paint.Color;
import javafx.input.MouseEvent;

var colide = Color.WHITE;

function checkcollision():Void {
    if (
        (rec1.getBoundsX() > rec2.getBoundsX() + rec2.getWidth()) or
        (rec1.getBoundsX() + rec1.getWidth() < rec2.getBoundsX()) or 
        (rec1.getBoundsY() > rec2.getBoundsY() + rec2.getHeight()) or 
        (rec1.getBoundsY() + rec1.getHeight() < rec2.getBoundsY())
    ) {
        colide = Color.WHITE
    } else {
        colide = Color.LIGHTGRAY
    }
}

var rec1: MovableRectangle = MovableRectangle {
    x: 10, y: 10, width: 50, height: 60, fill: Color.RED
    onMove: function(e:MouseEvent):Void {
        checkcollision()
    }
}

var rec2: MovableRectangle = MovableRectangle {
    x: 100, y: 100, width: 70, height: 30, fill: Color.BLUE
    onMove: function(MouseEvent):Void {
        checkcollision()
    }
}
Frame {
    title: "Rectangular Collisions", width: 300, height: 300
    closeAction: function() { 
        java.lang.System.exit( 0 ); 
    }
    visible: true

    stage: Stage {
        fill: bind colide
        content: [rec1, rec2]
    }
}

Try it via Java Web Start:

Java Web Start

Some considerations:

  • You can use rectangular collisions to create bounding boxes to handle collisions in more complex shapes or sprites. Is a common approach in 2d games to avoid more expensive calculations.
  • There are space for optimizations.
  • In this case I'm using only two objects. Some problems raises when I have N objects to handle.

More generally, we can code:

function collission(ax, ay, bx, by, cx, cy, dx, dy): Boolean {
    return not ((ax > dx)or(bx < cx)or(ay > dy)or(by < cy));
}

function hitnode(a: Node, b:Node): Boolean{
    return (collission(
        a.getBoundsX(), a.getBoundsY(),
        a.getBoundsX() + a.getWidth(), a.getBoundsY() + a.getHeight(),
        b.getX(), b.getY(),
        b.getX() + b.getWidth(), b.getY() + b.getHeight()
    ));
}

This way we can pass just two bounding boxes to hitnode and easily check collision of a node against a list of bounding boxes nodes.
Using the same approach I also wrote this function to test if a Node is inside another Node:

function inside (ax, ay, bx, by, cx, cy, dx, dy):Boolean{
    return ((ax > cx) and (bx < dx) and (ay > cy) and (by < dy));
}

function insidenode(a:Node,b:Node):Boolean{
    return (inside(
        a.getBoundsX(), a.getBoundsY(),
        a.getBoundsX() + a.getWidth(), a.getBoundsY() + a.getHeight(),
        b.getBoundsX(), b.getBoundsY(),
        b.getBoundsX() + b.getWidth(), b.getBoundsY() + b.getHeight()
    ));
}

Soon I'll post game examples showing how to use this method and others collission detection methods.

Downloads:
Anúncio do NetBeans 6.5 Beta

O Netbeans.org anunciou a disponibilidade do NetBeans IDE 6.5 Beta. Abaixo a tradução do anúncio:

O NetBeans IDE 6.5 introduz várias novas funcionalidades, incluindo uma IDE robusta para PHP, deputação de JavaScript para o Firefox e IE, e suporte a Groovy e Grails. Esse lançamento também inclui várias melhorias para o desenvolvimento em Java, Ruby e Rails, e C/C++. Dentre as melhorias no Java destacam-se: suporte nativo ao Hibernate, importação de projetos do Eclipse, e compilação no salvamento.

Links:

Outros destaques:

  • PHP
    • Completação de código
    • Consertos rápidos e checagem semântica
    • Suporte a FTP
    • Depuração com Xdebug
    • Suporte a Web Services populares
  • Ajax/JavaScript
    • Suporte a depuração no Firefox e IE
    • Monitoramento cliente de HTTP
    • Vêm com as bibliotecas mais populares de JavaScript
  • Java
    • Suporte a Groovy/Grails
    • Compilação/Deploy no momento do salvamento
    • Importação e sincronização de projetos do Eclipse
    • Suporte nativo a Hibernate
    • Gerador de CRUD JSF agora com Ajax
  • Banco de Dados
    • Melhorias no editor
  • C/C++
    • Melhorias na completação de código e destaque de erros
    • Desenvolvimento remoto
  • Ruby
    • Suporte aos Testes Ruby
    • Melhoria no suporte a Rake
  • GlassFish V3 “Prelude”
    • Menor tamanho, inicialização e deployment mais rápido
    • Suporte a scripting, inclusive jRuby

O NetBeans IDE 6.5 final está planejado para ser lançado em Outubro de 2008. Como sempre, é bem vindo e nós encorajamos seu feedback sobre sua experiência usando a IDE NetBeans. Visite nossas listas de email ou faça uma postagem no seu blog.