Como prometido, palestra que eu e o Rafael Carneiro fizemos para apresentar no Café com Tapioca desse mês.
Update: O Paulo Jr também fez uma cobertura do evento e da apresentação dele.
Como prometido, palestra que eu e o Rafael Carneiro fizemos para apresentar no Café com Tapioca desse mês.
Update: O Paulo Jr também fez uma cobertura do evento e da apresentação dele.
Yeah. No more workarounds. Download now JavaFX 1.2 for Windows, MacOS X, Linux and OpenSolaris!

\o/
There’s also a lots of improvements in the language and the API. For details on that read this document. Unfortunately, as a side effect of those great changes some JavaFX source codes posted here are now deprecated and need a few changes to compile again but the online preview of them as applet or Java Web Start will continue to work well.
Let’s code.

Footprint is a publisher and distributor of certificates of participation in conferences – signed PDF documents that prove you attended a conference or a course.
This is a little JavaFX application that shows how to create a interface that displays data provided by services. This version uses three services: one that counts the number of users, other that counts the number of events and one that list these events. Check out the source code here. Try the application as a draggable JavaFX applet here.

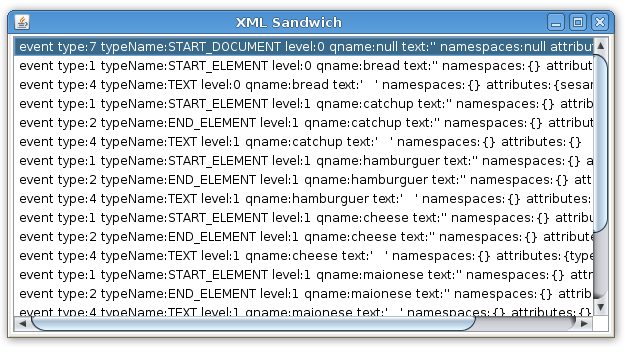
Usuually on JavaFX we grab data using HttpRequest from external resources on formats like JSON or XML. I showed how to get it on the post Reading Twitter with JavaFX and how to parse it using PullParser on the post Parsing a XML sandwich with JavaFX.
Another day I need to grab and interpret some plain results, not in XML nor JSON, while consuming a REST service. In this case we don’t have a well structure data so the PullParser won’t help us.
Example 1: Reading Raw Data
In this example we’ll load a plain text file served in a remote location.
var planetsRequest = HttpRequest {
    location: "http://silveiraneto.net/downloads/planets";
    onInput: function(stream: InputStream) {
        var buff = new BufferedReader(new InputStreamReader(stream));
        var line = "";
        while((line = buff.readLine())!=null){
            println(line);
        }
    }
}
planetsRequest.enqueue();
This will produce the output:
Mercury
Venus
Earth
Mars
Jupiter
Saturn
Uranus
Neptune
Example 2: Discovering your IP Address
In this example we’ll examine how to integrate a request of a remote data in a running graphical program.
The best way to know your real IP address is asking for a remote server to look which IP made that request. It’s like calling for a friend and asking him which number appeared in his mobile. =) This server side Python script prints the IP address of who requested the page.
#!/usr/bin/env python
import os

print "Content-type: text/html"
print
print os.environ['REMOTE_ADDR']
In the client side, with JavaFX, we’ll load the remote value into a local variable. The ip is assigned with the value “…” and later the ipRequest will replace it with a String with the IP. The bind feature will automatically fix the GUI String text.
For the user he will see the ellipsis for a few seconds and so their IP.
import javafx.stage.Stage;
import javafx.scene.Scene;
import javafx.scene.text.Text;
import javafx.io.http.HttpRequest;
import java.io.*;

var ip = "...";

Stage {
    title: "What is my IP?" width: 250 height: 80
    scene: Scene {
        content: Text {
            x: 10, y: 30
            content: bind "My IP is {ip}"
        }
    }
}

var ipRequest = HttpRequest {
    location: "http://silveiraneto.net/scripts/myip.py";
    onInput: function(stream: InputStream) {
        var buff = new BufferedReader(new InputStreamReader(stream));
        ip = buff.readLine();
    }
}
ipRequest.enqueue();
You can try this JavaFX applet here.
Example 3: Reading Integer values
Until now we handled just plain Strings. But in some cases you want to get number as non structured data. In this case you need to know previously which type the data is. In the case of a web service this probably will be described in a WSDL file.
Here I’m writing a very simple service script at Zembly, a great platform for cloud computing. It’s called aplusb, it justs add the first parameter A to the second B.
if ((Parameters.a != null) && (Parameters.b!= 0)) {
return Parameters.a+Parameters.b;
}
The service is published at Zembly here where you can see more details on how to invoke it.
A simple way to invoke it on JavaFX and than getting the value as an Integer:
import java.io.*;
import javafx.io.http.HttpRequest;

var a = 100;
var b = 200;
var result = 0 on replace {
    println(result);
}

var zemblyRequest = HttpRequest {
    location: "http://zembly.net/things/1827f696529d4e6f940c36e8e79bea1c;exec?a={a}&b={b}";
    onInput: function(stream: InputStream) {
        var buff = new BufferedReader(new InputStreamReader(stream));
        result = Integer.valueOf(buff.readLine());
    }
}
zemblyRequest.enqueue();
The output will be:
0
300
The first 0 is from the first assignment on the var result. The 300 is from the webservice itself.
The same approach can be used to convert the ASCII/Unicode result from the stream to the suitable type on a variable.
Download
javafx4linux.tar.bz2 (~ 36Mb).
Installing
1) Extract the javafx4linux.tar.bz2 file. In this example I’m placing it on my Desktop. After the installing process you can remove it.
2) Open your NetBeans 6.5 and go at Tools → Plugins and go to Downloaded tab. In a plain and new NetBeans installation there will be no plugin in this tab yet.
3) Click on the Add Plugins button and head to the directory you extracted the file and select all .nbm files.
4) You will see a list of 22 plugins selected. Click on the Install button.
5) Just keep clicking on the Next button.
6) Check the license agreement accept box.
7) You’ll see a warning because the Linux pluggin is not signed. Don’t worry, just click Continue.
8) Click on Finish to restart NetBeans.
9) Now we can test it. Go at File → New Project, select the JavaFX on Categories and JavaFX Script Application on Projects.
10) Put some code and run it. There is. JavaFX on Linux.
Considerations
This is not a official of JavaFX for Linux! This solution was tested on Ubuntu 9.04 “Jaunty Jackalope” with Java 6 update 13 and NetBeans 6.5.1, but should also work with others Linux distributions and Java versions greater than 5.
Known bugs
As a non official workaround for JavaFX for Linux you may notice some drawbacks. Some parts of the JavaFX runtime rely on native implementations on the specific operational system. You may not use some multimedia capabilities as video playback, JavaFX Mobile emulator and some performance issues in some effects. Despite that, is perfectly possible to develop applications using JavaFX on NetBeans.
Thanks
I’d like to thanks some guys around the world. Weiqi Gao’s original post on JavaFX on Linux, HuaSong Liu article on DZone and Kaesar Alnijres post.
Translation: there’s a English version of this article.
Para algumas classes como o javafx.scene.image.Image é fácil abrir imagens de uma localidade remotada com:
ImageView {
    image: Image {
        url: "http://example.com/minhaFigura.png"
    }
}
ou uma imagem local com a constante __DIR:
ImageView {
    image: Image {
        url: "{__DIR__}/minhaFigura.png"
    }
}
Mas para outras classes abrir recursos internos (de dentro do próprio arquivo jar) não é tão direto. Por exemplo, no artigo Parsing a XML Sandwich with JavaFX eu tive que colocar o arquvio XML dentro de um diretório temporário. Uma maneira mais elegante teria sido:
package handlexml;

import java.io.FileInputStream;
import javafx.data.pull.*;
import javafx.ext.swing.*;
import javafx.scene.Scene;
import javafx.stage.Stage;

class Resource{
    function getUrl(name:String){
        return this.getClass().getResource(name);
    }

    function getStream(name:String){
        return this.getClass().getResourceAsStream(name);
    }
}

var list = SwingList { width: 600, height: 300}

var myparser = PullParser {
    documentType: PullParser.XML;
    onEvent: function (e: Event) {
        var item = SwingListItem {text: "event {e}"};
        insert item into list.items;
    }
    input: Resource{}.getStream("my.xml");
}
myparser.parse();

Stage {
    title: "Map"
    scene: Scene {
        content: list
    }
}
Com um simples arquivo XML chamadovmy.xml dentro do seu pacote.


Referencias:
Tradução: há uma versão em Português desse artigo.
For some classes like javafx.scene.image.Image is easy load an image from a external resource like:
ImageView {
    image: Image {
        url: "http://example.com/myPicture.png"
    }
}
or a resource inside your own Jar file with the __DIR__ constant:
ImageView {
    image: Image {
        url: "{__DIR__}/myPicture.png"
    }
}
But for other classes loading a internal resource (inside your own jarfile) is not so direct. For example, in the article Parsing a XML Sandwich with JavaFX I had to place the XML file in a temp directory. A more elegant way would be:
package handlexml;

import java.io.FileInputStream;
import javafx.data.pull.*;
import javafx.ext.swing.*;
import javafx.scene.Scene;
import javafx.stage.Stage;

class Resource{
    function getUrl(name:String){
        return this.getClass().getResource(name);
    }

    function getStream(name:String){
        return this.getClass().getResourceAsStream(name);
    }
}

var list = SwingList { width: 600, height: 300}

var myparser = PullParser {
    documentType: PullParser.XML;
    onEvent: function (e: Event) {
        var item = SwingListItem {text: "event {e}"};
        insert item into list.items;
    }
    input: Resource{}.getStream("my.xml");
}
myparser.parse();

Stage {
    title: "Map"
    scene: Scene {
        content: list
    }
}
With a simple XML file called my.xml inside your package.


References:

Sang Shin photo, credits by Raymundo Vázquez.
Nosso amigo Sang Shin do Java Passion nos avisa que está para começar a primeira turma do curso de programação de 15 semanas em JavaFX (com paixão!) está começando. O curso é online, gratuito e começa agora dia 30 de Janeiro em 2009.
Para se inscrever envie um email em branco para javafxprogramming-subscribe@googlegroups.com. É um curso mais ou menos como qualquer outro, espera-se que os estudantes façam suas lições de casa depois de estudar as apresentações e fazer alguns laboratórios práticos mas tudo isso gratuito e online.
Também há uma lista onde os estudantes podem perguntar e responder perguntas. Para maiores informações, por favor visite um dos sites abaixo:
Lembrando a todos que os cursos do Java Passion são todos em inglês.
Aproveite essa oportunidade e passe a frente a notÃcia.
Continuing my little JavaFX framework for game development, right now focused on use those tiles I’m drawing and posting here in my blog. This framework will be a group of classes for simplify and hide some complexities of common game development. Right now I wrote just a few of them.
Use
We create a tileset from the files.png file that way
var tileset = Tileset {
    cols: 15 rows: 10 height: 32 width: 32
    image: Image {
        url: "{__DIR__}tiles.png"
    }
}

Tileset are orthogonal, distributed into a grid of cols columns and rows rows. Each tile have dimensions height x width.
A Tileset is used into a Tilemap
var bg = Tilemap {
    set:tileset cols:5 rows:5
    map: [8,8,8,8,8,3,3,3,3,3,3,3,3,3,3,3,3,3,3,3,3,3,3,3,3]
}
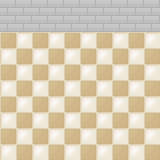
That shows

Each number in the map represents a tile in the tilemap. Number 0 means the first tile at the upper left corner, numbers keep growing from left to right columns, from top to bottom rows.
Another example
var things = Tilemap {
    set:tileset cols:5 rows:5
    map: [80,55,56,145,145,96,71,72,61,62,0,0,0,77,78,122,0,0,93,94,138,0,0,0,0]
}

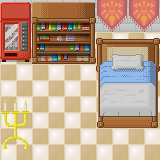
A tilemap can also contains more than one layer
var room = Tilemap {
    set:tileset cols:5 rows:5 layers:2
    map: [
        [8,8,8,8,8,3,3,3,3,3,3,3,3,3,3,3,3,3,3,3,3,3,3,3,3],
        [80,55,56,145,145,96,71,72,61,62,0,0,0,77,78,122,0,0,93,94,138,0,0,0,0]
    ]
}

Implementation
The Tileset class basically stores a Image and a collection of Rectangle2D objects, for be used as viewports in ImageView classes.
import javafx.scene.image.ImageView;
import javafx.scene.image.Image;
import javafx.geometry.Rectangle2D;

public class Tileset {
    public-init var      image: Image;
    public-init var      width: Integer = 32;
    public-init var     height: Integer = 32;
    public-init var       rows: Integer = 10;
    public-init var       cols: Integer = 15;
    protected   var       tile: Rectangle2D[];

    init {
        tile =  for (row in [0..rows]) {
            for (col in [0..cols]) {
                Rectangle2D{
                    minX: col * width, minY: row * height
                    height: width, width: height
                }
            }
        }
    }
}
The Tilemap is a CustomNode with a Group of ImageViews in a grid. The grid is mounted by iterating over the map as many layers was defined.
public class Tilemap extends CustomNode {
    public-init var   rows: Integer = 10;
    public-init var   cols: Integer = 10;
    public-init var    set: Tileset;
    public-init var layers: Integer = 1;
    public-init var    map: Integer[];

    public override function create(): Node {
        var tilesperlayer = rows * cols;
        return Group {
            content:
                for (layer in [0..layers]) {
                    for (row in [0..rows-1]) {
                        for (col in [0..cols-1]) {
                            ImageView {
                                image: set.image x: col * set.width y: row * set.height
                                viewport: set.tile[map[tilesperlayer*layer + row*rows+col]]
                            }
                        }
                    }
                }
        };
    }
}
Next steps
Download