Skip to content

Tag: JavaFX

JavaFX, creating a sphere with shadow

This is a short tutorial about some JavaFX elements like ellipses, circles, effects and gradients.

In the first code we are creating a frame with a ellipse with center in (120,140), 60 pixels of horizontal radius, 20 pixels of vertical radius and color black. We have also a circle with center in (100,100), 50 pixels of radius and color red. The idea is make this circle appears like a sphere and make the ellipse look like a shadow.

import javafx.application.*;
import javafx.scene.paint.*;
import javafx.scene.geometry.*;

Frame {
    title: "JavaFX Sphere", width: 300, height: 300, visible: true
    stage: Stage {
        content: [
            Ellipse {
                 centerX: 120, centerY: 140, radiusX: 60, radiusY: 20
                 fill: Color.BLACK
            },
            Circle { centerX: 100, centerY: 100, radius: 50, fill: Color.RED }
        ]
    }
}
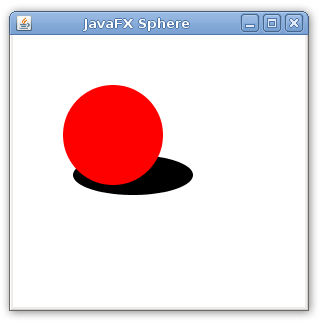
Now we will just add two thing, a effect and a radial gradient.

First we’ll just add javafx.scene.effect.* to our import list and just call the gaussian blur effect in our ellipse with

effect: GaussianBlur{ radius: 20 }

This creates a gaussian blur of radius 20. The first ellipse was like

and now with the effect becomes

Now we create a radial gradient for the circle appears like a sphere. We do that using the RadialGradient class at

RadialGradient {
   centerX: 75, centerY: 75, radius: 50, proportional: false
   stops: [
      Stop {offset: 0.0 color: Color.WHITE},
      Stop {offset: 0.3 color: Color.RED},
      Stop {offset: 1.0 color: Color.DARKRED},
   ]
}

First lets look at the gradient. It starts with a white color, going to red during the first 30% of the way. The remaining of the way is the color red going to a dark red. It creates a gradient like this one:

But it is a radial gradient, with center in (75,75) and radius 50. So this radial gradient looks like this:

As we place this radial gradient in our circle, it was like this:

And now is like this:

Now the complete code. I guess it’s simple and also concise.

import javafx.application.*;
import javafx.scene.paint.*;
import javafx.scene.effect.*;
import javafx.scene.geometry.*;

Frame {
    title: "JavaFX Sphere", width: 300, height: 300, visible: true
    stage: Stage {
        content: [
            Ellipse {
                centerX: 120, centerY: 140, radiusX: 60, radiusY: 20
                fill: Color.BLACK
                effect: GaussianBlur{ radius: 20 }
            },
            Circle {
                centerX: 100, centerY: 100, radius: 50
                fill: RadialGradient {
                    centerX: 75, centerY: 75, radius: 50, proportional: false
                    stops: [
                        Stop {offset: 0.0 color: Color.WHITE},
                        Stop {offset: 0.3 color: Color.RED},
                        Stop {offset: 1.0 color: Color.DARKRED},
                    ]
                }
            }
        ]
    }
}

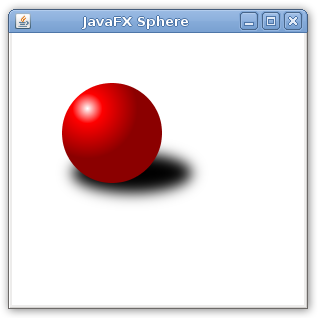
Here is the final screenshot:
JavaFX, handling events with overlapping elements

Here is a problem I faced those days while programming with JavaFX.
When you perform a click in a JavaFX area, mouse events are called to all nodes through that position. You can see this behavior in this video.

Example 1.

Here is the code.

import javafx.application.*;
import javafx.scene.geometry.*;
import javafx.scene.geometry.Rectangle;
import javafx.scene.paint.Color;
import javafx.input.MouseEvent;

Frame {
    width: 200
    height: 200
    visible: true
    stage: Stage {
        content: [
            Rectangle {
                var color1 = Color.BLUE;
                x: 10, y: 10, width: 140, height: 90, fill: bind color1
                onMouseClicked: function( e: MouseEvent ):Void {
                    if (color1==Color.BLUE){
                        color1 = Color.GREEN;
                    } else {
                        color1 = Color.BLUE
                    }
                }
            },
            Circle {
                var color2 = Color.RED
                centerX: 100, centerY: 100, radius: 40, fill: bind color2
                onMouseClicked: function( e: MouseEvent ):Void {
                    if (color2==Color.YELLOW){
                        color2 = Color.RED;
                    } else {
                        color2 = Color.YELLOW
                    }
                }
            }
        ]
    }
}

This is the default behavior. All node are called with a mouse event. Is a expected and robust behavior but sometimes we just don’t want that. We want events called to just one node or a set of nodes.

Example 2.

Is exactly the same code but with blocksMouse: true in the circle node. When blocksMouse is true the mouse event will not be called to others node behind it.

package overlapping;

import javafx.application.*;
import javafx.scene.geometry.*;
import javafx.scene.geometry.Rectangle;
import javafx.scene.paint.Color;
import javafx.input.MouseEvent;

Frame {
    width: 200
    height: 200
    visible: true
    stage: Stage {
        content: [
            Rectangle {
                var color1 = Color.BLUE;
                x: 10, y: 10, width: 140, height: 90, fill: bind color1
                onMouseClicked: function( e: MouseEvent ):Void {
                    if (color1==Color.BLUE){
                        color1 = Color.GREEN;
                    } else {
                        color1 = Color.BLUE
                    }
                }
            },
            Circle {
                var color2 = Color.RED
                centerX: 100, centerY: 100, radius: 40, fill: bind color2
                blocksMouse: true
                onMouseClicked: function( e: MouseEvent ):Void {
                    if (color2==Color.YELLOW){
                        color2 = Color.RED;
                    } else {
                        color2 = Color.YELLOW
                    }
                }
            }
        ]
    }
}

Thanks guys on the OpenJDK user mail list and at OpenJFX Forum, specially this thread.

Script to Installing JavaFX Compiler

Right in this moment you can choose between three options to develop JavaFX:

  • Use the old version of JavaFX, interpreted. Not recommended.
  • Use the JavaFX Milestone 3. Little bit old but more stable.
  • Use the JavaFX Continuous Build. Is more dangerous but give us fresh builds. 🙂

I did this little script to download the last version of JavaFX continuos build and install it for you.

#!/bin/sh
envfile=$HOME/.bash_profile

#download and unpatch the last build of JavaFx
mkdir jfx
cd jfx
wget http://openjfx.java.sun.com/hudson/job/openjfx-compiler/lastBuild/artifact/openjfx-compiler/dist//*zip*/dist.zip
unzip dist.zip
rm dist.zip

#set files at bin folder as executable
chmod +x dist/bin/*

#add those executables to the path
echo "PATH=\$PATH:`pwd`/dist/bin" >> $envfile

Save this script as install_jfx.sh and execute it. Probably you want to execute it at you home directory. If you want to install JavaFX to root change envfile for /root/.bash_profile, if you want to install to all users change for /etc/profile. I tested this script successfully on my Ubuntu 8.04.

After that open a new terminal and try to see if javafx, javafxc and javafxdoc are available. You can test your enviroment with this simple program.

import javafx.ui.*;
import java.lang.*;

Frame {
  visible: true
  content: FlowPanel {
  content: Button {
      var n = 0
      text: bind Integer.toString(n)
      action: function() {
        n++;
      }
    }
  }
}

Save it as Counter.fx, compile with javafxc Counter.fx and so execute it with javafx Counter.fx.

To know more, take a look into the preliminary JavaFX API or in the article Using JavaFX GUI Toolkit.

Ilex Paraguariensis

Chimarrão Gaúcho
Creative Commons image from Flickr.

From days 15 to 20 from April, I’ll be in Porto Alegre. I’ll participate on FISL (an old dream) with the presentation “Netbeans: beyond Java”. I’d like to talk about how you can use Netbeans as a great IDE for languages others than Java like Ruby, PHP, JavaFX, Javascript, Python, etc.

Probably I’ll be able to participate also on two events before FISL (about Opensolaris and Java ME). 🙂

So … how chimarrão tastes?

More books

More books to my shelf.

Livros novos

  • Ruby On Rails, Executando. Desenvolvimento Rápido para a Web. Bruce A. Tate & Curt Hibbs.
  • Ruby, conhecendo a linguagem. Eustáqui Rangel de Oliveira Jr.
  • JavaFX Script. Dynamic Java Scripting for Rich Internet/Clien-Side Applications. James L. Weaver.

First I’ll take a look … JavaFX, of course. 🙂

ps: The JavaFX book I win as a prize for naming the SDN Channel podcast, CampusCast. Thanks Edu that bring it to me from USA. 😉

JavaFX: Side-scrolling

An side-scrolling game attempt.

an plane

I used two images, this mountain background made with Gimp (xcf sources here) and that ship above made with Inkscape (svg sources here).

[youtube]5F4STuluSiM[/youtube]

import javafx.ui.*;
import javafx.ui.canvas.*;

var scroll;
scroll = [1..800] dur 60000 linear continue if true;

var mountains = Clip{
    transform: bind translate(-scroll,0)
    shape: Rect {x:bind scroll, y:0, width:400, height:200}
    content: [ImageView {
            transform: translate(0,0)
            image: Image { url: "http://silveiraneto.net/downloads/mountains.png"}
        },
        ImageView {
            transform: translate(800,0)
            image: Image { url: "http://silveiraneto.net/downloads/mountains.png"}
        }
    ]
};

var h = 50;

var ship = ImageView {
    cursor: HAND
    transform: bind translate(0,h)
    image: Image { url: "http://silveiraneto.net/downloads/jfx_plane.png"}
    onMouseDragged: operation(e) {
        h += e.localDragTranslation.y;
    }
};

Canvas {
    content: [mountains, ship]
}

JavaFX: Color picker

An simple color picker that can be also used as a gadget.

import javafx.ui.*;
import javafx.ui.canvas.*;

var colors = [red:Color, orange:Color, yellow:Color, green:Color,
     cyan:Color,blue:Color, magenta:Color, gray:Color];

var chosenColor: Paint;
chosenColor = black:Color;

var x = 120;
var y = 70;

Canvas{
    content: Group{
        transform: bind translate(x,y)
        content: [Star{
            points: sizeof colors
            rin: 30
            rout: 50
            fill: bind chosenColor
            onMouseDragged: operation(e) {
                x += e.localDragTranslation.x;
                y += e.localDragTranslation.y;
            }
        },
        foreach (i in [1..sizeof colors]) Circle {
            var: self
            transform: [rotate(i*360/sizeof colors,0,0), translate(50,0)]
            radius: 10
            fill: colors[i%sizeof colors]
            onMouseClicked: operation (e){
                chosenColor = self.fill;
            }
        }]
    }
}

Draggable and Growable Ball in JavaFX

Two simple JavaFX code handling onMouseDragged event.

import javafx.ui.*;
import javafx.ui.canvas.*;

Canvas {
    content: Circle {
        var x = 50
        var y = 50
        transform: bind translate(x, y)
        radius: 30
        fill: red
        onMouseDragged: operation(e) {
                x += e.localDragTranslation.x;
                y += e.localDragTranslation.y;

        }
    }
}

import javafx.ui.*;
import javafx.ui.canvas.*;

Canvas {
    content: Circle {
        var x = 50
        var y = 50
        var radius = 30
        transform: bind translate(x, y)
        radius: bind radius
        fill: red
        onMouseDragged: operation(e) {
            if (e.button == 1){
                x += e.localDragTranslation.x;
                y += e.localDragTranslation.y;
            }
            if (e.button == 3) {
                radius += e.localDragTranslation.x;
            }
        }
    }
}

import javafx.ui.*;
import javafx.ui.canvas.*;

Canvas {
    content: [
    Rect {x: 50, y: 50, width: 50, height: 50, fill: orange },
    Circle {
        var x = 50
        var y = 50
        var radius = 30
        var color = red:Color
        transform: bind translate(x, y)
        radius: bind radius
        fill: bind color
        onMouseDragged: operation(e) {
            if (e.button == 1){
                x += e.localDragTranslation.x;
                y += e.localDragTranslation.y;
            }
            if (e.button == 3) {
                radius += e.localDragTranslation.x;
            }
        }
        onMousePressed: operation(e){
            color = Color {blue: 0.0, green: 0.0, red: 1.0, opacity: 0.5};
        }
        onMouseReleased: operation(e){
            color = red:Color;
        }
    }]
}

You can test this examples with thhe JavaFX Pad or using Netbeans with the JavaFX Plugin.

Gato em JavaFX, versão 2

Lembra daquele nosso gato em Java FX? Agora ele move os olhos com cliques em botões.


Código fonte:

import javafx.ui.canvas.*;
import javafx.ui.*;

class Cat extends CompositeNode{
    attribute look: Number; // -1.0 to 1.0
    operation lookLeft();
    operation lookCenter();
    operation lookRight();
}

attribute Cat.look = 0; // 0 = middle

operation Cat.lookLeft(){
    look = [look, look - 0.1 .. -1.0] dur 1000;
}

operation Cat.lookCenter(){
    var step = if look < 0 then 0.1 else -0.1;
    look = [look, look+step .. 0.0] dur 1000;
}

operation Cat.lookRight(){
    look = [look, look + 0.1 .. 1.0] dur 1000;
}

function Cat.composeNode(){
    var head =  Ellipse {cx:100, cy:100, radiusX:100, radiusY:50, fill:black };
    var rightEar =  Arc {x:100, y:10, height:150, width:100,
                       startAngle:-20, length:90, closure:PIE, fill:black};
    var leftEar = Arc {x:000, y:10, height:150, width:100,
                     startAngle:110, length:90, closure:PIE, fill:black};
    var leftEye = Ellipse { cx:60, cy:100, radiusX:30, radiusY:15, fill:white};
    var rightEye = Ellipse { cx:140, cy:100, radiusX:30, radiusY:15, fill:white};
    var nose = Arc { x:85, y:110, height:20, width:30,
                     startAngle:45, length:90, closure:PIE, fill:white};
    
    var rightIris = Ellipse { cx: bind 140+look*20, cy:100,
                     radiusX:5, radiusY:15, fill:black};
    var leftIris = Ellipse { cx: bind 60+look*20, cy:100,
                     radiusX:5, radiusY:15, fill:black};    
    
    return Group{content: [head, rightEar, leftEar, leftEye,
                     leftIris, rightEye, rightIris, nose]};
}

var myCat = Cat{};

var myCatControl = View {
            transform: [translate(0, 150)]
            content: GroupPanel {
                cursor: DEFAULT
                var row = Row {alignment: BASELINE}
                var column1 = Column { }
                var column2 = Column { }
                var column3 = Column { }
                var column4 = Column { }
                var column5 = Column { }
                rows: [row]
                columns: [column1, column2, column3, column4]
                content:
                [SimpleLabel {
                    row: row
                    column: column1
                    text: "Look:"
                },
                Button {
                    row: row
                    column: column2
                    mnemonic: L
                    text: "Left"
                    action: operation() {
                        myCat.lookLeft();
                    }
                },
                Button {
                    row: row
                    column: column3
                    mnemonic: C
                    text: "Center"
                    action: operation() {
                        myCat.lookCenter();
                    }
                },
                Button {
                    row: row
                    column: column4
                    mnemonic: R
                    text: "Right"
                    action: operation() {
                        myCat.lookRight();
                    }
                }]
                }
            };

Canvas {
    content: [myCatControl, myCat]
}

Downloads: