Skip to content

Tag: RIA

JavaFX, creating a sphere with shadow

This is a short tutorial about some JavaFX elements like ellipses, circles, effects and gradients.

In the first code we are creating a frame with a ellipse with center in (120,140), 60 pixels of horizontal radius, 20 pixels of vertical radius and color black. We have also a circle with center in (100,100), 50 pixels of radius and color red. The idea is make this circle appears like a sphere and make the ellipse look like a shadow.

import javafx.application.*;
import javafx.scene.paint.*;
import javafx.scene.geometry.*;

Frame {
    title: "JavaFX Sphere", width: 300, height: 300, visible: true
    stage: Stage {
        content: [
            Ellipse {
                 centerX: 120, centerY: 140, radiusX: 60, radiusY: 20
                 fill: Color.BLACK
            },
            Circle { centerX: 100, centerY: 100, radius: 50, fill: Color.RED }
        ]
    }
}
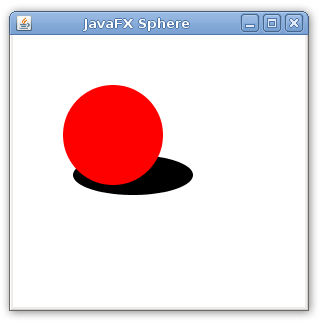
Now we will just add two thing, a effect and a radial gradient.

First we’ll just add javafx.scene.effect.* to our import list and just call the gaussian blur effect in our ellipse with

effect: GaussianBlur{ radius: 20 }

This creates a gaussian blur of radius 20. The first ellipse was like

and now with the effect becomes

Now we create a radial gradient for the circle appears like a sphere. We do that using the RadialGradient class at

RadialGradient {
   centerX: 75, centerY: 75, radius: 50, proportional: false
   stops: [
      Stop {offset: 0.0 color: Color.WHITE},
      Stop {offset: 0.3 color: Color.RED},
      Stop {offset: 1.0 color: Color.DARKRED},
   ]
}

First lets look at the gradient. It starts with a white color, going to red during the first 30% of the way. The remaining of the way is the color red going to a dark red. It creates a gradient like this one:

But it is a radial gradient, with center in (75,75) and radius 50. So this radial gradient looks like this:

As we place this radial gradient in our circle, it was like this:

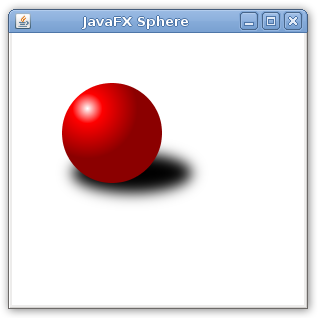
And now is like this:

Now the complete code. I guess it’s simple and also concise.

import javafx.application.*;
import javafx.scene.paint.*;
import javafx.scene.effect.*;
import javafx.scene.geometry.*;

Frame {
    title: "JavaFX Sphere", width: 300, height: 300, visible: true
    stage: Stage {
        content: [
            Ellipse {
                centerX: 120, centerY: 140, radiusX: 60, radiusY: 20
                fill: Color.BLACK
                effect: GaussianBlur{ radius: 20 }
            },
            Circle {
                centerX: 100, centerY: 100, radius: 50
                fill: RadialGradient {
                    centerX: 75, centerY: 75, radius: 50, proportional: false
                    stops: [
                        Stop {offset: 0.0 color: Color.WHITE},
                        Stop {offset: 0.3 color: Color.RED},
                        Stop {offset: 1.0 color: Color.DARKRED},
                    ]
                }
            }
        ]
    }
}

Here is the final screenshot:
JavaFX, handling events with overlapping elements

Here is a problem I faced those days while programming with JavaFX.
When you perform a click in a JavaFX area, mouse events are called to all nodes through that position. You can see this behavior in this video.

Example 1.

Here is the code.

import javafx.application.*;
import javafx.scene.geometry.*;
import javafx.scene.geometry.Rectangle;
import javafx.scene.paint.Color;
import javafx.input.MouseEvent;

Frame {
    width: 200
    height: 200
    visible: true
    stage: Stage {
        content: [
            Rectangle {
                var color1 = Color.BLUE;
                x: 10, y: 10, width: 140, height: 90, fill: bind color1
                onMouseClicked: function( e: MouseEvent ):Void {
                    if (color1==Color.BLUE){
                        color1 = Color.GREEN;
                    } else {
                        color1 = Color.BLUE
                    }
                }
            },
            Circle {
                var color2 = Color.RED
                centerX: 100, centerY: 100, radius: 40, fill: bind color2
                onMouseClicked: function( e: MouseEvent ):Void {
                    if (color2==Color.YELLOW){
                        color2 = Color.RED;
                    } else {
                        color2 = Color.YELLOW
                    }
                }
            }
        ]
    }
}

This is the default behavior. All node are called with a mouse event. Is a expected and robust behavior but sometimes we just don’t want that. We want events called to just one node or a set of nodes.

Example 2.

Is exactly the same code but with blocksMouse: true in the circle node. When blocksMouse is true the mouse event will not be called to others node behind it.

package overlapping;

import javafx.application.*;
import javafx.scene.geometry.*;
import javafx.scene.geometry.Rectangle;
import javafx.scene.paint.Color;
import javafx.input.MouseEvent;

Frame {
    width: 200
    height: 200
    visible: true
    stage: Stage {
        content: [
            Rectangle {
                var color1 = Color.BLUE;
                x: 10, y: 10, width: 140, height: 90, fill: bind color1
                onMouseClicked: function( e: MouseEvent ):Void {
                    if (color1==Color.BLUE){
                        color1 = Color.GREEN;
                    } else {
                        color1 = Color.BLUE
                    }
                }
            },
            Circle {
                var color2 = Color.RED
                centerX: 100, centerY: 100, radius: 40, fill: bind color2
                blocksMouse: true
                onMouseClicked: function( e: MouseEvent ):Void {
                    if (color2==Color.YELLOW){
                        color2 = Color.RED;
                    } else {
                        color2 = Color.YELLOW
                    }
                }
            }
        ]
    }
}

Thanks guys on the OpenJDK user mail list and at OpenJFX Forum, specially this thread.

JavaFX: Side-scrolling

An side-scrolling game attempt.

an plane

I used two images, this mountain background made with Gimp (xcf sources here) and that ship above made with Inkscape (svg sources here).

[youtube]5F4STuluSiM[/youtube]

import javafx.ui.*;
import javafx.ui.canvas.*;

var scroll;
scroll = [1..800] dur 60000 linear continue if true;

var mountains = Clip{
    transform: bind translate(-scroll,0)
    shape: Rect {x:bind scroll, y:0, width:400, height:200}
    content: [ImageView {
            transform: translate(0,0)
            image: Image { url: "http://silveiraneto.net/downloads/mountains.png"}
        },
        ImageView {
            transform: translate(800,0)
            image: Image { url: "http://silveiraneto.net/downloads/mountains.png"}
        }
    ]
};

var h = 50;

var ship = ImageView {
    cursor: HAND
    transform: bind translate(0,h)
    image: Image { url: "http://silveiraneto.net/downloads/jfx_plane.png"}
    onMouseDragged: operation(e) {
        h += e.localDragTranslation.y;
    }
};

Canvas {
    content: [mountains, ship]
}

Gato em JavaFX, versão 2

Lembra daquele nosso gato em Java FX? Agora ele move os olhos com cliques em botões.


Código fonte:

import javafx.ui.canvas.*;
import javafx.ui.*;

class Cat extends CompositeNode{
    attribute look: Number; // -1.0 to 1.0
    operation lookLeft();
    operation lookCenter();
    operation lookRight();
}

attribute Cat.look = 0; // 0 = middle

operation Cat.lookLeft(){
    look = [look, look - 0.1 .. -1.0] dur 1000;
}

operation Cat.lookCenter(){
    var step = if look < 0 then 0.1 else -0.1;
    look = [look, look+step .. 0.0] dur 1000;
}

operation Cat.lookRight(){
    look = [look, look + 0.1 .. 1.0] dur 1000;
}

function Cat.composeNode(){
    var head =  Ellipse {cx:100, cy:100, radiusX:100, radiusY:50, fill:black };
    var rightEar =  Arc {x:100, y:10, height:150, width:100,
                       startAngle:-20, length:90, closure:PIE, fill:black};
    var leftEar = Arc {x:000, y:10, height:150, width:100,
                     startAngle:110, length:90, closure:PIE, fill:black};
    var leftEye = Ellipse { cx:60, cy:100, radiusX:30, radiusY:15, fill:white};
    var rightEye = Ellipse { cx:140, cy:100, radiusX:30, radiusY:15, fill:white};
    var nose = Arc { x:85, y:110, height:20, width:30,
                     startAngle:45, length:90, closure:PIE, fill:white};
    
    var rightIris = Ellipse { cx: bind 140+look*20, cy:100,
                     radiusX:5, radiusY:15, fill:black};
    var leftIris = Ellipse { cx: bind 60+look*20, cy:100,
                     radiusX:5, radiusY:15, fill:black};    
    
    return Group{content: [head, rightEar, leftEar, leftEye,
                     leftIris, rightEye, rightIris, nose]};
}

var myCat = Cat{};

var myCatControl = View {
            transform: [translate(0, 150)]
            content: GroupPanel {
                cursor: DEFAULT
                var row = Row {alignment: BASELINE}
                var column1 = Column { }
                var column2 = Column { }
                var column3 = Column { }
                var column4 = Column { }
                var column5 = Column { }
                rows: [row]
                columns: [column1, column2, column3, column4]
                content:
                [SimpleLabel {
                    row: row
                    column: column1
                    text: "Look:"
                },
                Button {
                    row: row
                    column: column2
                    mnemonic: L
                    text: "Left"
                    action: operation() {
                        myCat.lookLeft();
                    }
                },
                Button {
                    row: row
                    column: column3
                    mnemonic: C
                    text: "Center"
                    action: operation() {
                        myCat.lookCenter();
                    }
                },
                Button {
                    row: row
                    column: column4
                    mnemonic: R
                    text: "Right"
                    action: operation() {
                        myCat.lookRight();
                    }
                }]
                }
            };

Canvas {
    content: [myCatControl, myCat]
}

Downloads:

JavaFX, Exemplos Básicos

Alguns exemplo básicos de JavaFX usando a construção de interfaces de forma declarativa.
Para testa-los eu recomendo o JavaFX Pad ou o plugin JavaFX para Netbeans.

import javafx.ui.*; 

Frame {
    title: "Label JavaFX"
    width:  300
    height: 50
    content: Label {
            text: "Olá Mundo!"
    }
    visible: true   
}

JavaFX label

import javafx.ui.*;
import java.lang.System;

Frame {
    title: "Botão JavaFX"
    width:  300
    height: 100
    content: Button {
           text: "Clique-me"
           action: operation(){
              System.out.println("Botão pressionado");
           }
    }
    visible: true   
}

Botão em JavaFX

import javafx.ui.*;
import java.lang.System;

Frame {
  title: "Menu JavaFX"
  width:  300
  height: 100
  menubar: MenuBar {
    menus: Menu {
      text: "Menu"
      items:  foreach (name in ["Menu1", "Menu2", "Menu3"])  
              MenuItem {
                text: name
                action: operation() {
                  System.out.println("MenuItem: {name}");
                }
             }
     }
  }
    visible: true
}

JavaFX Menu

import javafx.ui.*;
import java.lang.System;

var N = 4;

Frame {
    title: "Tabela JavaFX"
    width:  300
    height: 150
    onClose: operation(){ System.exit(0); }
    content: Table {
        columns: [
        TableColumn {
            text: "numero"
        },
        TableColumn {
            text: "quadrado"
        },
        TableColumn {
            text: "cubo"
        }]
        
        cells: bind foreach(n in [1..N])[
        TableCell {
            text: "{n}"
        },
        TableCell {
            text: bind "{n * n}"
        },
        TableCell {
            text: bind "{n * n * n}"
        },
        ]
    }
    visible: true
}

JavaFX Tabela

import javafx.ui.*;

var selectedTab = 0;

Frame{
    title: "Tab Example"
    width: 300
    height: 120
    content: BorderPanel{
        top: Label { text: bind "Selected tab: {selectedTab + 1}" }
        center: TabbedPane{
            selectedIndex: bind selectedTab
            tabs: foreach(i in [1..5])
            Tab {
                title: "Tab{i}"
                content: Label{ text: "Label{i} "}
            }            
        }
    }
    visible: true
}

JavaFX abas

import javafx.ui.*;

Frame {
    title: "FlowPanel JavaFX"
    width:  300
    height: 100
    content: FlowPanel{
        content: [
        Label{ text: "Label1" },
        Label{ text: "Label2" },
        Label{ text: "Label3" },
        ]
    }
    visible: true
}

JavaFX FlowPanel

import javafx.ui.*;

Frame {
    title: "BorderPanel JavaFX"
    width:  400
    height: 200
    content: BorderPanel{
        top   :  Button{ text: "Topo" }
        center:  Button{ text: "Centro" }
        bottom:  Button{ text: "Fundo" }
        left  :  Button{ text: "Esquerda" }
        right :  Button{ text: "Direita" }
    }
    visible: true
}

JavaFX BorderPanel

Esses exemplos eu retirei da página de exemplos do Wiki do JavaFX (russo). Se você quiser saber mais sobre componentes de interface gráfica em JavaFX veja o tutorial
Learning More About the JavaFX Script Language (for Swing Programmers).