Skip to content

Tag: jfx

JavaFX 1.1 for Linux workaround

Download

javafx4linux.tar.bz2 (~ 36Mb).

Installing

1) Extract the javafx4linux.tar.bz2 file. In this example I’m placing it on my Desktop. After the installing process you can remove it.

javafx linux ubuntu extract

2) Open your NetBeans 6.5 and go at Tools → Plugins and go to Downloaded tab. In a plain and new NetBeans installation there will be no plugin in this tab yet.

netbeans javafx linux step01

netbeans javafx linux step02

netbeans javafx linux step03

3) Click on the Add Plugins button and head to the directory you extracted the file and select all .nbm files.

netbeans javafx linux step 04

4) You will see a list of 22 plugins selected. Click on the Install button.

netbeans javafx linux step 05

5) Just keep clicking on the Next button.

netbeans javafx linux step 6

6) Check the license agreement accept box.

netbeans javafx linux step 7

7) You’ll see a warning because the Linux pluggin is not signed. Don’t worry, just click Continue.

netbeans javafx linux step 8

8) Click on Finish to restart NetBeans.

netbeans javafx linux step 9

9) Now we can test it. Go at File → New Project, select the JavaFX on Categories and JavaFX Script Application on Projects.

netbeans javafx linux step 10

10) Put some code and run it. There is. JavaFX on Linux.

netbeans javafx linux step 11

Considerations

This is not a official of JavaFX for Linux! This solution was tested on Ubuntu 9.04 “Jaunty Jackalope” with Java 6 update 13 and NetBeans 6.5.1, but should also work with others Linux distributions and Java versions greater than 5.

Known bugs

As a non official workaround for JavaFX for Linux you may notice some drawbacks. Some parts of the JavaFX runtime rely on native implementations on the specific operational system. You may not use some multimedia capabilities as video playback, JavaFX Mobile emulator and some performance issues in some effects. Despite that, is perfectly possible to develop applications using JavaFX on NetBeans.

Thanks

I’d like to thanks some guys around the world. Weiqi Gao’s original post on JavaFX on Linux, HuaSong Liu article on DZone and Kaesar Alnijres post.

Reading Twitter with JavaFX

twitter bird

Twitter is a social network and micro-blogging service that allow you to create and read tweets, 140 characters text-based posts. It’s becoming a popular tool to keep in touch with your friends, coworkers, bloggers, etc. Here we’ll create a very simple application that show us tweets related with a given word.

Twitter offers a very simple and powerfull REST API which supports XML, JSON, and the RSS and Atom formats. As we are aiming just to read tweets we’ll use just the Search API.

We do that in three steps:

  1. Query Tweets
  2. Parser the Atom result
  3. Show tweets into a GUI

Let’s see them in the order of dependence beetween them.

Displaying a Tweet

var gradient = LinearGradient {
    startX: 0.0,
    startY: 0.0,
    endX: 0.0,
    endY: 150.0
    proportional: false
    stops: [Stop {offset: 0.0 color: Color.DARKGRAY },
        Stop { offset: 1.0 color: Color.BLACK }]
}

public class Tweet extends CustomNode {
    public var image: Image;
    public var username: String;
    public var message: String;
    public override function create(): Node {
        var txt = Text {
            x: 65  y: 35 wrappingWidth: 150 fill: Color.WHITE
            content: "{message}"
        }
        return Group {
            content: [
                Rectangle {
                    width: 220 height: txt.boundsInLocal.height + 40
                    arcHeight: 10 arcWidth: 10 fill: gradient
                },
                ImageView {
                    x: 5 y: 20 image: image
                },
                Text {
                    x: 65  y: 20 fill: Color.BLACK content: "{username} said"
                },
                txt
            ]
        };
    }
}

For example, this tweet would become:

tweet example

Parsing ATOM result

In my last post about JavaFX I showed how to parse XML documents (and make sandwiches) with JavaFX. Here we’ll use the Atom format, but use any other would be almost the same. Parsing XML or JSON documents with JavaFX is both very simple using the javafx.data.pull.PullParser class.

A query output is a Atom XML document with several information. We are interested only in the fields that holds the avatar image, the message and the user name.

var tweets = VBox {}
def parser = PullParser {
    var avatar;
    var firstname;
    var text;
    documentType: PullParser.XML;

    onEvent: function(event: Event) {
        if(event.type == PullParser.START_ELEMENT){
            if(event.qname.name.equals("link")){
                if(event.getAttributeValue(QName{name: "rel"}) == "image"){
                    avatar = event.getAttributeValue(QName{name:"href"});
                }
            }
        }

        if(event.type == PullParser.END_ELEMENT) {
            if(event.qname.name == "title"){
                    text = event.text;
            }
            if((event.qname.name == "name")and(event.level==3)){
                var names: String[] = event.text.split(" ");
                firstname = names[0];
                insert Tweet {
                        image: Image {
                            url: avatar
                        }
                        message: text
                        username: firstname
                    } into tweets.content;
            }
        }
    }
}

Querying Tweets

We can get Atom results through url queries like that:

Notice that queries should be URL encoded. We will use a additional parameters &rpp=4 to receive only 4 results per page. To know more about search queries read the Search API Documentation. We get these results as InputStreams making asynchronous HTTP requests using the javafx.io.http.HttpRequest class, which it’s perfect to invoke RESTful Web Services.

word = "Beatles";
var request = HttpRequest {
    location: "http://search.twitter.com/search.atom?q={word}&rpp=4";
    onInput: function(stream: java.io.InputStream) {
        parser.input = stream;
        parser.parse();
    }
}
request.enqueue();

Conclusion

Here is the application running for the word “House”.

twitter with javafx

Is not a complete Twitter client, as it’s not intended to be, but can show you how to handle a simple asynchronous call and handle Twitter documents. There’s already a few beta JavaFX Twitter clients like Tweetbox and Twitterfx and certanly others will appears.

Download

Sources and Netbeans project, fxtwitter.tar.bz2.

Parsing a XML Sandwich with JavaFX

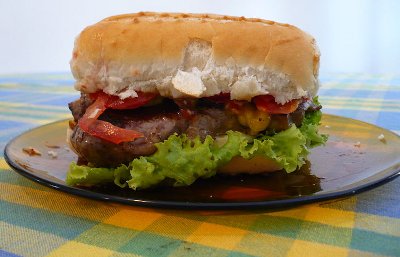
delicious sandwich

Let sandwich.xml be a file at /tmp directory with the content above.


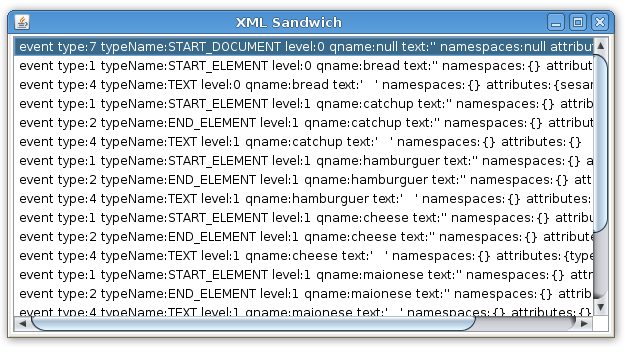
We can open it using java.io.FileInputStream and so use it on a javafx.data.pull.PullParser. A PullParser is a event oriented parser that works with XML and YAML files. Above a general and simple parser with a GUI that show the list of events during the parse process.

import java.io.FileInputStream;
import javafx.data.pull.Event;
import javafx.data.pull.PullParser;
import javafx.ext.swing.SwingList;
import javafx.ext.swing.SwingListItem;
import javafx.scene.Scene;
import javafx.stage.Stage;

var list = SwingList { width: 600 height: 300 }

var myparser = PullParser {
   documentType: PullParser.XML;
   onEvent: function (e: Event) {
      var item = SwingListItem {
         text: "event {e}"
      };
      insert item into list.items;
   }
   input: new FileInputStream("/tmp/sandwich.xml");
}
myparser.parse();

Stage {
   title: "XML Sandwich"
   scene: Scene { content: list }
}

javafx xml sandwich

The XML cheese element produce two the outputs.

type:1 typeName:START_ELEMENT level:1 qname:cheese text:” namespaces:{} attributes:{type=chedar}
type:2 typeName:END_ELEMENT level:1 qname:cheese text:” namespaces:{} attributes:{type=chedar}

Notice that white spaces like tab and escape characters like new line also produced events from type TEXT. We are not interested on them. Above a parser that looks only those events of type START_ELEMENT or END_ELEMENT, look into it’s contents, building a sandwich at runtime based on the XML file.

import java.io.FileInputStream;
import javafx.data.pull.Event;
import javafx.data.pull.PullParser;
import javafx.data.xml.QName;
import javafx.scene.image.Image;
import javafx.scene.image.ImageView;
import javafx.scene.layout.VBox;
import javafx.scene.Scene;
import javafx.stage.Stage;

// my sandwich starts as an empty VBox
var mysandwich = VBox {}

// give a name and returns a ImageView with a png image like the name
function ingredient(name){
   return ImageView {
      image: Image {
         url: "{__DIR__}{name}.png"
      }
   }
}

// basicaly, look the event and put a ingredient at mysandwich
var myparser = PullParser {
   documentType: PullParser.XML;
   onEvent: function (e: Event) {
      // starter xml elements
      if(e.type == PullParser.START_ELEMENT){
         // bread
         if(e.qname.name.equals("bread")){
             insert ingredient("bread_top") into mysandwich.content;
         }

         // hamburguer
         if(e.qname.name.equals("hamburguer")){
             insert ingredient("hamburguer") into mysandwich.content;
         }

         // catchup
         if(e.qname.name.equals("catchup")){
             insert ingredient("catchup") into mysandwich.content;
         }

         // maionese
         if(e.qname.name.equals("maionese")){
             insert ingredient("maionese") into mysandwich.content;
         }

         // lettuce
         if(e.qname.name.equals("lettuce")){
             insert ingredient("lettuce") into mysandwich.content;
         }

         // cheese
         if(e.qname.name.equals("cheese")){
            var type= e.getAttributeValue(QName{name:"type"});
            if(type.equals("cheedar")){
                 insert ingredient("cheedar") into mysandwich.content;
            } else {
                insert ingredient("cheese") into mysandwich.content;
            }
         }
      }

      // ending xml elements (just bread)
      if(e.type == PullParser.END_ELEMENT){
         if(e.qname.name.equals("bread")){
            insert ingredient("bread_botton") into mysandwich.content;
         }
      }
   }
   input: new FileInputStream("/tmp/sandwich.xml");
}
myparser.parse();

Stage {
   title: "XML Sandwich"
   scene: Scene {
      height: 300
      content: mysandwich
   }
}

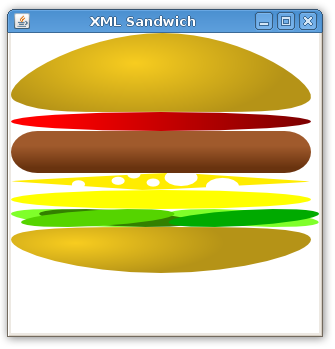
Here’s our sandwich.

sandwich javaFX

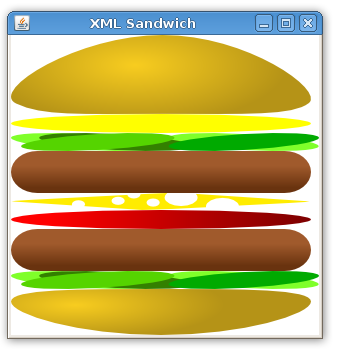
Just changing the XML file you got a new sandwich.


double burguer

Bon appétit.

For more details on XML and JSON parsing see the JavaFX API.

JavaFX, Simple Tile Set

Tile sets are a very simple way to draw scenarios with repeated elements. From simple to complex ones using a very low footprint.

First step, load the png file that stores the tileset into a Image. The file tiles.png shoud be in the same directory of the source code. I adjusted some tiles from those tile set I’ve blogged here before into a grid of 10×10 tiles.

Set of tiles, example

var tileset = Image {
   url: "{__DIR__}tiles.png"
}

Notice that each tile have 32 of height and 32 of width. We will assume this and use theses numbers when performing calculations to find a single tile in our tile set.

def w = 32;
def h = 32;

To display a Image in the screen we use a ImageView node. A ImageView can have a viewport property to create crop or zoom effect. A viewport is just a Rectangle2D, a object with position (minX and minY), height and width. If we want to display the first tile in the tileset we do

first tile

ImageView {
   image: tileset
   viewport: Rectangle2D{
      minX: 0, minY: 0, height: 32, width: 32
   }
}

Notice that the minX determines the column and minY the row in the tileset. The first row is 0*32, the second row is 1*32 and so on. If we want to display the tile at the second line and third column of the tileset we do

another_tile

ImageView {
   image: tileset
   viewport: Rectangle2D{
      minX: 2 * 32 , minY: 1*32, height: 32, width: 32
   }
}

Those properties in a Rectangle2D are for init and read only. So I created a list with all Rectangles I can need for use as a viewport.

def viewports = for (row in [0..9]) {
   for (col in [0..9]) {
       Rectangle2D{
           minX: col * w, minY: row * h, height: w, width: h
       }
   }
}

The scenario map is stored in another list. The first element of the list is 7, that is, the first tile in the scenario is the 7th tile from the tile set.

var map = [
    7,  3,  3,  3,  3,  3,  3,  3,  3,  8,
   19, 26, 40, 41, 24, 13, 13, 23, 24, 19,
   19, 36, 50, 51, 34,  2,  2,  2, 34, 19,
   19,  2,  2,  2,  2,  2,  2,  2, 25, 19,
   19, 57, 58, 44, 45, 46,  2,  2, 35, 19,
   27,  3,  3,  6, 55, 56,  5,  3,  3, 38,
   19, 60, 13, 16, 47, 48, 15, 13, 61, 19,
   19, 70,  1, 33,  1,  1,  1,  1, 71, 19,
   19,  1,  1,  1,  1,  1,  1,  1, 49, 19,
   17,  9,  9,  9,  9,  9,  9,  9,  9, 18,
];

Finally to create a scenario with 100 tiles, 10 per row and with 10 rows, in a list called tiles. Each iteration of this loop creates a ImageView. Each ImageView will store a single tile. We get the tile number in the map list and so use it to index the viewports list.

var tiles =  for (row in [0..9]) {
   for (col in [0..9]) {
      ImageView {
         x: col * w, y: row * h,
         viewport: bind viewports[map[row * 10 + col]]
         image: tileset
      }
   }
}

Additionally I added two things to transform this program also in a (extremely)  simple map editor. At each ImageView I added a callback for onMouseClicked event. When you click on a tile, it changes its map position, ie, the tile. The next tile for the left button and the last tile for any other button.

onMouseClicked: function( e: MouseEvent ):Void {
   var amount = if(e.button == MouseButton.PRIMARY) { 1 } else { -1 };
   map[row * 10 + col] = (map[row * 10 + col] + amount) mod 100;
}

The other thing is to print the map list when the program is over. There is the full program:

package tileeditor;

import javafx.stage.Stage;
import javafx.scene.Scene;
import javafx.scene.image.ImageView;
import javafx.scene.image.Image;
import javafx.scene.CustomNode;
import javafx.scene.Group;
import javafx.scene.Node;
import javafx.geometry.Rectangle2D;
import javafx.scene.input.MouseEvent;
import javafx.scene.input.MouseButton;

def w = 32;
def h = 32;

var map = [
    7,  3,  3,  3,  3,  3,  3,  3,  3,  8,
   19, 26, 40, 41, 24, 13, 13, 23, 24, 19,
   19, 36, 50, 51, 34,  2,  2,  2, 34, 19,
   19,  2,  2,  2,  2,  2,  2,  2, 25, 19,
   19, 57, 58, 44, 45, 46,  2,  2, 35, 19,
   27,  3,  3,  6, 55, 56,  5,  3,  3, 38,
   19, 60, 13, 16, 47, 48, 15, 13, 61, 19,
   19, 70,  1, 33,  1,  1,  1,  1, 71, 19,
   19,  1,  1,  1,  1,  1,  1,  1, 49, 19,
   17,  9,  9,  9,  9,  9,  9,  9,  9, 18,
];

var tileset = Image {
    url: "{__DIR__}tiles.png"
}

def viewports = for (row in [0..9]) {
   for (col in [0..9]) {
       Rectangle2D{
           minX: col * w, minY: row * h, height: w, width: h
       }
   }
}

var tiles =  for (row in [0..9]) {
   for (col in [0..9]) {
      ImageView {
         x: col * w, y: row * h,
         viewport: bind viewports[map[row * 10 + col]]
         image: tileset

         onMouseClicked: function( e: MouseEvent ):Void {
            var amount = if(e.button == MouseButton.PRIMARY) { 1 } else { -1 };
            map[row * 10 + col] = (map[row * 10 + col] + amount) mod 100;
         }
      }
   }
}

Stage {
    title: "JavaFX Simple Tile Editor"
    scene: Scene {
        content: [ tiles ]
    }
    onClose: function() {
        println(map);
    }
}

Here is the result for that map
tlemap javafx

And you can try it yourself in your browser. Play it online now.

Here is a video of it working

[youtube]lxuBEoItB5E[/youtube]

Downloads:

Possibilities

We are using just  a image that can handle 100 tiles, tiles.png with less than 30Kb. The map is also composed with 100 tiles. Each tile we can choose between 100 different tiles, so we can compose 10100 different maps (one googol10 ). Most of them are useless and without any sense, but some are cool. 🙂

JavaFX, how to create a rpg like game

JavaFX 1.0 is out and there are tons of new cool features, specially for game development.trans

I’ll show in this tutorial how to create a very simple demo that shows how to load imtrages, handle sprites, collisions and keyboard events that you can use to create a game with a old school rpg like vision.

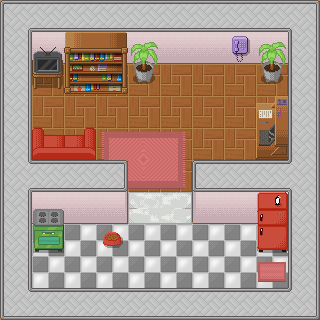
For the background scenario I’m using the house that I drew and we’ll call as house.png.

That we load as a Image and place into a ImageView.

ImageView{
   image: Image {url: "{__DIR__}house.png"}
}

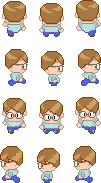
For the character I’m using the last character I drew, the nerdy guy.

To make the animation easier, I spited it into 9 pieces:

down0.png, down1.png and down2.png

left0.png, left1.png and left2.png

right0.png, right1.png and righ2.png

up0.png, up1.png and up2.png

All images I’m using should be in the same directory of source code.

Let’s start loading the scenario and a single character sprite.

import javafx.stage.Stage;
import javafx.scene.Scene;
import javafx.scene.image.*;

Stage {
   title: "RPG-like demo", width: 424, height: 412
   visible: true
   scene: Scene{
      content: [
         ImageView{
         image: Image {url: "{__DIR__}house.png"} },
         ImageView{
            x: 320 y: 80
            image: Image {url: "{__DIR__}down1.png"}
         }
      ]
   }
}

Saved as Game.fx you can compile and run with in your terminal:

$ javafxc Game.fx

$ javafx Game

Hint: You can use NetBeans 6.5 JavaFX plugin to easier the JavaFX development.

To put animation on the character we load all sprites into four lists. Each list for each direction.

// sprites
def up    = for(i in [0..2]) { Image {url: "{__DIR__}up{i}.png"    } }
def right = for(i in [0..2]) { Image {url: "{__DIR__}right{i}.png" } }
def down  = for(i in [0..2]) { Image {url: "{__DIR__}down{i}.png"  } }
def left  = for(i in [0..2]) { Image {url: "{__DIR__}left{i}.png"  } }

And create vars to store the character position and frame of animation.

var frame = 0;
var posx = 320;
var posy = 80;

Also store the house background.

// house background
def house = ImageView{ image: Image {url: "{__DIR__}house.png"} };

I create booleans to store some key states and at each interval of time I see how they are and do something about. You can handle keyboard event with less code but I like this way because keep visual and game logics a little bit more separated.

// keyboard
var    upkey = false;
var rightkey = false;
var  downkey = false;
var  leftkey = false;

// player
var player = ImageView{
   x: bind posx y: bind posy
   image: Image {url: "{__DIR__}down1.png"}
   onKeyPressed: function(e:KeyEvent){
      if (e.code == KeyCode.VK_DOWN) {
      downkey = true;
      } else if (e.code == KeyCode.VK_UP) {
         upkey = true;
      }else if (e.code == KeyCode.VK_LEFT) {
         leftkey = true;
      }else if (e.code == KeyCode.VK_RIGHT) {
         rightkey = true;
      }
   } // onKeyPressed

   onKeyReleased: function(e: KeyEvent){
      if (e.code == KeyCode.VK_DOWN) {
         downkey = false;
      } else if (e.code == KeyCode.VK_UP) {
         upkey = false;
      }else if (e.code == KeyCode.VK_LEFT) {
         leftkey = false;
      }else if (e.code == KeyCode.VK_RIGHT) {
         rightkey = false;
      }
   } // onKeyReleased
}

See a video of the game working so far:

[youtube]Xv5z-9LGuOc[/youtube]

Now we will add collisions. In a previous post I showed some math behind bounding box game collisions. The good news are that you no longer need to worry about that. There are a lot of API improvements in JavaFX 1.0 that do all the hard work for you, specially the new classes on javafx.geometry package, Rectangle2D and Point2D.

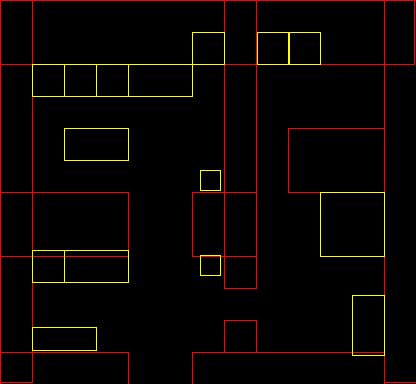
We create rectangles that represent the obstacles in the house.

// collidable obstacles
def obstacles = [
	Rectangle { x:   0 y:   0 width:  32 height: 382 stroke: Color.RED },
	Rectangle { x:   0 y:   0 width: 414 height:  64 stroke: Color.RED },
	Rectangle { x: 384 y:   0 width:  32 height: 382 stroke: Color.RED },
	Rectangle { x:   0 y: 192 width: 128 height:  64 stroke: Color.RED },
	Rectangle { x: 192 y: 192 width:  64 height:  64 stroke: Color.RED },
	Rectangle { x: 224 y:   0 width:  32 height: 288 stroke: Color.RED },
	Rectangle { x: 288 y: 128 width:  96 height:  64 stroke: Color.RED },
	Rectangle { x:   0 y: 352 width: 128 height:  32 stroke: Color.RED },
	Rectangle { x: 192 y: 352 width: 192 height:  32 stroke: Color.RED },
	Rectangle { x: 224 y: 320 width:  32 height:  32 stroke: Color.RED },
	Rectangle { x:  32 y:  64 width: 32 height: 32 stroke: Color.YELLOW },
	Rectangle { x:  64 y:  64 width: 32 height: 32 stroke: Color.YELLOW },
	Rectangle { x:  96 y:  64 width: 32 height: 32 stroke: Color.YELLOW },
	Rectangle { x: 128 y:  64 width: 64 height: 32 stroke: Color.YELLOW },
	Rectangle { x: 192 y:  32 width: 32 height: 32 stroke: Color.YELLOW },
	Rectangle { x:  64 y: 128 width: 64 height: 32 stroke: Color.YELLOW },
	Rectangle { x:  32 y: 250 width: 32 height: 32 stroke: Color.YELLOW },
	Rectangle { x:  64 y: 250 width: 64 height: 32 stroke: Color.YELLOW },
	Rectangle { x: 200 y: 255 width: 20 height: 20 stroke: Color.YELLOW },
	Rectangle { x: 200 y: 170 width: 20 height: 20 stroke: Color.YELLOW },
	Rectangle { x: 257 y:  32 width: 32 height: 32 stroke: Color.YELLOW },
	Rectangle { x: 288 y:  32 width: 32 height: 32 stroke: Color.YELLOW },
	Rectangle { x: 320 y: 192 width: 64 height: 64 stroke: Color.YELLOW },
	Rectangle { x: 352 y: 295 width: 32 height: 60 stroke: Color.YELLOW },
	Rectangle { x:  32 y: 327 width: 64 height: 23 stroke: Color.YELLOW },
];

We just have to change a little bit the game logics in order to handle collisions.

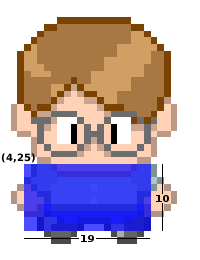
We define a bounding box around the player, it’s a rectangle from (4, 25) at the player coordinates system and with width 19 and height 10. The idea is to prospect where the player will be in the next step, see if it’s bouding box don’t collide with any obstacle and so pass it to the real game position.

// game logics
var gamelogics = Timeline {
   repeatCount: Timeline.INDEFINITE
   keyFrames: KeyFrame {
      time : 1s/8
      action: function() {
         var nextposx = posx;
         var nextposy = posy;
         if(downkey) {
            nextposy += 5;
            player.image = down[++frame mod 3];
         }
         if(upkey) {
            nextposy -= 5;
            player.image = up[++frame mod 3];
         }
         if(rightkey) {
            nextposx += 5;
            player.image = right[++frame mod 3];
         }
         if(leftkey) {
            nextposx -= 5;
            player.image = left[++frame mod 3];
         }
         for(obst in obstacles) {
            if(obst.boundsInLocal.intersects(nextposx + 4, nextposy + 25, 19, 10)) {
               return;
            }
         }
         posx = nextposx;
         posy = nextposy;
      }
   }
}

This is enough to do the trick but I also added a way to smoothly show the obstacles when pressing the space key.

[youtube]k-MHh6irvwE[/youtube]

Here is the complete source code.

package Game; 

import javafx.stage.Stage;
import javafx.scene.*;
import javafx.scene.image.*;
import javafx.scene.input.*;
import javafx.scene.paint.*;
import javafx.scene.shape.*;
import javafx.animation.*;

var frame = 0;
var posx = 320;
var posy = 80;

// sprites
def up    = for(i in [0..2]) { Image {url: "{__DIR__}up{i}.png"    } }
def right = for(i in [0..2]) { Image {url: "{__DIR__}right{i}.png" } }
def down  = for(i in [0..2]) { Image {url: "{__DIR__}down{i}.png"  } }
def left  = for(i in [0..2]) { Image {url: "{__DIR__}left{i}.png"  } }

// house background
def house = ImageView{ image: Image {url: "{__DIR__}house.png"} };

// keyboard
var    upkey = false;
var rightkey = false;
var  downkey = false;
var  leftkey = false;

// player
var player = ImageView{
   x: bind posx y: bind posy image: down[1]
   onKeyPressed: function(e:KeyEvent){
      if (e.code == KeyCode.VK_DOWN) {
         downkey = true;
      } else if (e.code == KeyCode.VK_UP) {
         upkey = true;
      }else if (e.code == KeyCode.VK_LEFT) {
         leftkey = true;
      }else if (e.code == KeyCode.VK_RIGHT) {
         rightkey = true;
      }

		if(e.code == KeyCode.VK_SPACE){
         if(fade==0.0){
         	fadein.playFromStart();
			}
			if(fade==1.0){
				fadeout.playFromStart();
			}
		}
   } // onKeyPressed

   onKeyReleased: function(e: KeyEvent){
      if (e.code == KeyCode.VK_DOWN) {
         downkey = false;
      } else if (e.code == KeyCode.VK_UP) {
         upkey = false;
      }else if (e.code == KeyCode.VK_LEFT) {
         leftkey = false;
      }else if (e.code == KeyCode.VK_RIGHT) {
         rightkey = false;
      }
   } // onKeyReleased
}

// collidable obstacles
def obstacles = [
	Rectangle { x:   0 y:   0 width:  32 height: 382 stroke: Color.RED },
	Rectangle { x:   0 y:   0 width: 414 height:  64 stroke: Color.RED },
	Rectangle { x: 384 y:   0 width:  32 height: 382 stroke: Color.RED },
	Rectangle { x:   0 y: 192 width: 128 height:  64 stroke: Color.RED },
	Rectangle { x: 192 y: 192 width:  64 height:  64 stroke: Color.RED },
	Rectangle { x: 224 y:   0 width:  32 height: 288 stroke: Color.RED },
	Rectangle { x: 288 y: 128 width:  96 height:  64 stroke: Color.RED },
	Rectangle { x:   0 y: 352 width: 128 height:  32 stroke: Color.RED },
	Rectangle { x: 192 y: 352 width: 192 height:  32 stroke: Color.RED },
	Rectangle { x: 224 y: 320 width:  32 height:  32 stroke: Color.RED },
	Rectangle { x:  32 y:  64 width: 32 height: 32 stroke: Color.YELLOW },
	Rectangle { x:  64 y:  64 width: 32 height: 32 stroke: Color.YELLOW },
	Rectangle { x:  96 y:  64 width: 32 height: 32 stroke: Color.YELLOW },
	Rectangle { x: 128 y:  64 width: 64 height: 32 stroke: Color.YELLOW },
	Rectangle { x: 192 y:  32 width: 32 height: 32 stroke: Color.YELLOW },
	Rectangle { x:  64 y: 128 width: 64 height: 32 stroke: Color.YELLOW },
	Rectangle { x:  32 y: 250 width: 32 height: 32 stroke: Color.YELLOW },
	Rectangle { x:  64 y: 250 width: 64 height: 32 stroke: Color.YELLOW },
	Rectangle { x: 200 y: 255 width: 20 height: 20 stroke: Color.YELLOW },
	Rectangle { x: 200 y: 170 width: 20 height: 20 stroke: Color.YELLOW },
	Rectangle { x: 257 y:  32 width: 32 height: 32 stroke: Color.YELLOW },
	Rectangle { x: 288 y:  32 width: 32 height: 32 stroke: Color.YELLOW },
	Rectangle { x: 320 y: 192 width: 64 height: 64 stroke: Color.YELLOW },
	Rectangle { x: 352 y: 295 width: 32 height: 60 stroke: Color.YELLOW },
	Rectangle { x:  32 y: 327 width: 64 height: 23 stroke: Color.YELLOW },
];

// game logics
var gamelogics = Timeline {
   repeatCount: Timeline.INDEFINITE
   keyFrames: KeyFrame {
      time : 1s/8
      action: function() {
         var nextposx = posx;
         var nextposy = posy;
         if(downkey) {
            nextposy += 5;
            player.image = down[++frame mod 3];
         }
         if(upkey) {
            nextposy -= 5;
            player.image = up[++frame mod 3];
         }
         if(rightkey) {
            nextposx += 5;
            player.image = right[++frame mod 3];
         }
         if(leftkey) {
            nextposx -= 5;
            player.image = left[++frame mod 3];
         }
         for(obst in obstacles) {
            if(obst.boundsInLocal.intersects(nextposx + 4, nextposy + 25, 19, 10)) {
               return;
            }
         }
         posx = nextposx;
         posy = nextposy;
      }
   }
}

gamelogics.play();

// obstacles view
var fade = 0.0;

var obstacleslayer = Group {
   opacity: bind fade
   content: [
      Rectangle { x:0 y:0 width:500 height: 500 fill: Color.BLACK },
      obstacles,
      Rectangle {
        x: bind posx + 4 y: bind posy + 25 width: 19 height: 10
        fill: Color.LIME
      }
   ]
}

var fadein = Timeline {
	keyFrames: [
   	at (0s) {fade => 0.0}
   	at (1s) {fade => 1.0}
   ]
}

var fadeout = Timeline {
	keyFrames: [
   	at (0s) {fade => 1.0}
   	at (1s) {fade => 0.0}
   ]
}

// game stage
Stage {
	title: "RPG-like demo", width: 424, height: 412
	visible: true
	scene: Scene{
      fill: Color.BLACK
		content: [house, player, obstacleslayer]
	}
}

Play Through Java Web Start

or click here to play via applet, inside your browser.

update: The applet version and Java Web Start versions should be working now.  The applet version on Linux seems to be having problems with the keyboard handling, use the Java Web Start version while I’m trying to fix it.

Downloads:

JavaFX SDK 1.0 on Linux

JavaFX 1.0 is out and is absolutely amazing. You guys did really a great work on it.

As I really need a working SDK on Linux to continue to study and I don’t have any Windows/Mac near me, I’m using the Weiqi Gao’s workaround. I tried to simplify a little bit more the process for those who need JavaFX SDK working on Linux right now.

Download javafxsdk_linux_unofficial.tar.bz2 (~18Mb).

And then

tar -xjvf javafxsdk_linux_unofficial.tar.bz2
sudo cp javafx /opt/javafx
echo “PATH=\$PATH:/opt/javafx/bin” >> ~/.profile
echo “JAVAFX_HOME=/opt/javafx” >> ~/.profile
source ~/.profile

Now you can call javafx, javafxc, javafxdoc and javafxpackager from your terminal. Don’t forget that you need Java 1.6 or greater installed.

Here’s a video showing the SDK working, I’m compiling and running two sample applications. Remeber that as a temporary unofficial port for Linux, there’s not native video support nor hardware acceleration.

[youtube]ENf5mXEIiD8[/youtube]

JavaFX, rectangular collision detection

[youtube]NRwRTHPGg6M[/youtube]

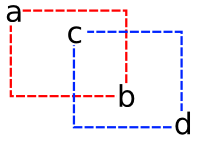
In a game I wrote some years ago we handled simple rectangular collisions. Given the points:

We did:

// returning 0 means collision
int collision(int ax, int ay, int bx, int by, int cx, int cy, int dx, int dy){
	return ((ax > dx)||(bx < cx)||(ay > dy)||(by < cy));
}

I'll show here a little demo about how implement simple rectangular collisions on JavaFX.
First I created a movable rectangle using the same idea of draggable nodes I already had posted before.

import javafx.input.MouseEvent;
import javafx.scene.geometry.Rectangle;

public class MovableRectangle extends Rectangle {
    private attribute startX = 0.0;
    private attribute startY = 0.0;

    public attribute onMove = function(e:MouseEvent):Void {}

    override attribute onMousePressed = function(e:MouseEvent):Void {
        startX = e.getDragX()-translateX;
        startY = e.getDragY()-translateY;
        onMove(e);
    }

    override attribute onMouseDragged = function(e:MouseEvent):Void {
        translateX = e.getDragX()-startX;
        translateY = e.getDragY()-startY;
        onMove(e);
    }
}

In the main code I some important things:

  • colide, a color that represents the collision effect. White means no collision and gray means collision.
  • rec1 and rec2, the two rectangles that can collide.
  • checkcollision() the function that checks and handles a possible collision.

Here is the main code:

import javafx.application.Frame;
import javafx.application.Stage;
import javafx.scene.geometry.Rectangle;
import javafx.scene.paint.Color;
import javafx.input.MouseEvent;

var colide = Color.WHITE;

function checkcollision():Void {
    if (
        (rec1.getBoundsX() > rec2.getBoundsX() + rec2.getWidth()) or
        (rec1.getBoundsX() + rec1.getWidth() < rec2.getBoundsX()) or 
        (rec1.getBoundsY() > rec2.getBoundsY() + rec2.getHeight()) or 
        (rec1.getBoundsY() + rec1.getHeight() < rec2.getBoundsY())
    ) {
        colide = Color.WHITE
    } else {
        colide = Color.LIGHTGRAY
    }
}

var rec1: MovableRectangle = MovableRectangle {
    x: 10, y: 10, width: 50, height: 60, fill: Color.RED
    onMove: function(e:MouseEvent):Void {
        checkcollision()
    }
}

var rec2: MovableRectangle = MovableRectangle {
    x: 100, y: 100, width: 70, height: 30, fill: Color.BLUE
    onMove: function(MouseEvent):Void {
        checkcollision()
    }
}
Frame {
    title: "Rectangular Collisions", width: 300, height: 300
    closeAction: function() { 
        java.lang.System.exit( 0 ); 
    }
    visible: true

    stage: Stage {
        fill: bind colide
        content: [rec1, rec2]
    }
}

Try it via Java Web Start:

Java Web Start

Some considerations:

  • You can use rectangular collisions to create bounding boxes to handle collisions in more complex shapes or sprites. Is a common approach in 2d games to avoid more expensive calculations.
  • There are space for optimizations.
  • In this case I'm using only two objects. Some problems raises when I have N objects to handle.

More generally, we can code:

function collission(ax, ay, bx, by, cx, cy, dx, dy): Boolean {
    return not ((ax > dx)or(bx < cx)or(ay > dy)or(by < cy));
}

function hitnode(a: Node, b:Node): Boolean{
    return (collission(
        a.getBoundsX(), a.getBoundsY(),
        a.getBoundsX() + a.getWidth(), a.getBoundsY() + a.getHeight(),
        b.getX(), b.getY(),
        b.getX() + b.getWidth(), b.getY() + b.getHeight()
    ));
}

This way we can pass just two bounding boxes to hitnode and easily check collision of a node against a list of bounding boxes nodes.
Using the same approach I also wrote this function to test if a Node is inside another Node:

function inside (ax, ay, bx, by, cx, cy, dx, dy):Boolean{
    return ((ax > cx) and (bx < dx) and (ay > cy) and (by < dy));
}

function insidenode(a:Node,b:Node):Boolean{
    return (inside(
        a.getBoundsX(), a.getBoundsY(),
        a.getBoundsX() + a.getWidth(), a.getBoundsY() + a.getHeight(),
        b.getBoundsX(), b.getBoundsY(),
        b.getBoundsX() + b.getWidth(), b.getBoundsY() + b.getHeight()
    ));
}

Soon I'll post game examples showing how to use this method and others collission detection methods.

Downloads:

More books

More books to my shelf.

Livros novos

  • Ruby On Rails, Executando. Desenvolvimento Rápido para a Web. Bruce A. Tate & Curt Hibbs.
  • Ruby, conhecendo a linguagem. Eustáqui Rangel de Oliveira Jr.
  • JavaFX Script. Dynamic Java Scripting for Rich Internet/Clien-Side Applications. James L. Weaver.

First I’ll take a look … JavaFX, of course. 🙂

ps: The JavaFX book I win as a prize for naming the SDN Channel podcast, CampusCast. Thanks Edu that bring it to me from USA. 😉

JavaFX: Side-scrolling

An side-scrolling game attempt.

an plane

I used two images, this mountain background made with Gimp (xcf sources here) and that ship above made with Inkscape (svg sources here).

[youtube]5F4STuluSiM[/youtube]

import javafx.ui.*;
import javafx.ui.canvas.*;

var scroll;
scroll = [1..800] dur 60000 linear continue if true;

var mountains = Clip{
    transform: bind translate(-scroll,0)
    shape: Rect {x:bind scroll, y:0, width:400, height:200}
    content: [ImageView {
            transform: translate(0,0)
            image: Image { url: "http://silveiraneto.net/downloads/mountains.png"}
        },
        ImageView {
            transform: translate(800,0)
            image: Image { url: "http://silveiraneto.net/downloads/mountains.png"}
        }
    ]
};

var h = 50;

var ship = ImageView {
    cursor: HAND
    transform: bind translate(0,h)
    image: Image { url: "http://silveiraneto.net/downloads/jfx_plane.png"}
    onMouseDragged: operation(e) {
        h += e.localDragTranslation.y;
    }
};

Canvas {
    content: [mountains, ship]
}