Skip to content

Tag: Open Source

BumbaBot-1

I got a simple motor from a broken domestic printer. It’s a Mitsumi m355P-9T stepping motor. Any other common stepping motor should fits. You can find one in printers, multifunction machines, copy machines, FAX, and such.

bumbabot v01

With a flexible cap of water bottle with a hole we make a connection between the motor axis and other objects.

bumbabot v01

bumbabot v01

With super glue I attached to the cap a little handcraft clay ox statue.

bumbabot v01

It’s a representation from a Brazilian folkloric character Boi Bumbá. In some traditional parties in Brazil, someone dress a structure-costume and dances in circular patterns interacting with the public.

776513346_c31db6843b_m

2246467684_49164d3397_m
Photos by Marcus Guimarães.

Controlling a stepper motor is not difficult.  There’s a good documentation on how to that on the Arduino Stepper Motor Tutorial. Basically it’s about sending a logical signal for each coil in a circular order (that is also called full step).

full step

Animation from rogercom.com.

stepper motor diagram

You’ll probably also use a driver chip ULN2003A or similar to give to the motor more current than your Arduino can provide and also for protecting it from a power comming back from the motor. It’s a very easy find this tiny chip on electronics or automotive  stores or also from broken printers where you probably found your stepped motor.

Arduino Stepper Motor UNL2003A

With a simple program you can already controlling your motor.

// Simple stepped motor spin
// by Silveira Neto, 2009, under GPLv3 license
// http://silveiraneto.net/2009/03/16/bumbabot-1/
int coil1 = 8;
int coil2 = 9;
int coil3 = 10;
int coil4 = 11;
int step = 0;
int interval = 100;

void setup() {
  pinMode(coil1, OUTPUT);
  pinMode(coil2, OUTPUT);
  pinMode(coil3, OUTPUT);
  pinMode(coil4, OUTPUT);
}

void loop() {
  digitalWrite(coil1, step==0?HIGH:LOW);
  digitalWrite(coil2, step==1?HIGH:LOW);
  digitalWrite(coil3, step==2?HIGH:LOW);
  digitalWrite(coil4, step==3?HIGH:LOW);
  delay(interval);
  step = (step+1)%4;
}


Writing a little bit more generally code we can create function to step forward and step backward.

My motor needs 48 steps to run a complete turn. So 360º/48 steps give us 7,5º per step. Arduino has a simple Stepper Motor Library but it doesn’t worked with me and it’s also oriented to steps and I’d need something oriented to angles instead. So I wrote some routines to do that.

For this first version of BumbaBot I mapped angles with letters to easy the communication between the programs.

motor angle step control

Notice that it’s not the final version and there’s still some bugs!

// Stepped motor control by letters
// by Silveira Neto, 2009, under GPLv3 license
// http://silveiraneto.net/2009/03/16/bumbabot-1/

int coil1 = 8;
int coil2 = 9;
int coil3 = 10;
int coil4 = 11;

int delayTime = 50;
int steps = 48;
int step_counter = 0;

void setup(){
  pinMode(coil1, OUTPUT);
  pinMode(coil2, OUTPUT);
  pinMode(coil3, OUTPUT);
  pinMode(coil4, OUTPUT);
  Serial.begin(9600);
}

// tells motor to move a certain angle
void moveAngle(float angle){
  int i;
  int howmanysteps = angle/stepAngle();
  if(howmanysteps<0){
    howmanysteps = - howmanysteps;
  }
  if(angle>0){
    for(i = 0;i

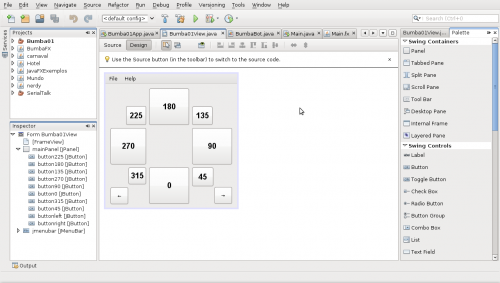
In another post I wrote how create a Java program to talk with Arduino. We'll use this to send messages to Arduino to it moves. 

captura_de_tela-bumba01-netbeans-ide-65

[put final video here]

To be continued... 🙂

Morse Code Translator with Arduino

You write in your computer, sends a message thought USB and Arduino translates it into a Morse code.

Just a Arduino board with a buzzer connected at the digital output 12 (one wire in the ground and the other in the 12).

Arduino

I tried to make the code as general as possible so you can easily adapt it for anthers ways of transmitting a Morse code. To do that you just need to rewrite a few functions.

                                                  +-------------------+
                                                  | 3) Interpretation |
                                                  +-------------------+
                                                  |   2) Translation  |
+-------------------+                             +-------------------+
|     Computer      |<========USB (Serial)=======>|     1) Reading    |
+-------------------+                             +-------------------+

  1. Reads a character from Serial. Main function loop().
  2. Translate a ascii char into a Morse code using a reference table. A letter ‘K’ becomes a string word “-.-“. Function say_char().
  3. Interpret the Morse word as light and sound. Mostly at function say_morse_word(). The Interpretation needs 5 functions to say all Morse words, dot(), dash(), shortgap(), mediumgap() and intragap().

For a more details on Morse code I strongly recommend the English Wikipedia article on it.

int led = 13;                   // LED connected to digital pin 13
int buzzer = 12;                // buzzer connected to digital pin 12
int unit = 50;                  // duration of a pulse

char * morsecode[] = {
    "-----",  // 0
    ".----",  // 1
    "..---",  // 2
    "...--",  // 3
    "....-",  // 4
    ".....",  // 5
    "-....",  // 6 
    "--...",  // 7
    "---..",  // 8
    "----.",  // 9
    "---...", // :
    "-.-.-.", // ;
    "",       // < (there's no morse for this simbol)
    "-...-",  // =
    "",       // > (there's no morse for this simbol)
    "..--..", // ?
    ".--._.", // @
    ".-",     // A
    "-...",   // B
    "-.-.",   // C
    "-..",    // D
    ".",      // E
    "..-.",   // F
    "--.",    // G
    "....",   // H
    "..",     // I
    ".---",   // J
    "-.-",    // K
    ".-..",   // L
    "--",     // M
    "-.",     // N
    "---",    // O
    ".--.",   // P
    "--.-",   // Q
    ".-.",    // R
    "...",    // S
    "-",      // T
    "..-",    // U
    "...-",   // V
    ".--",    // W
    "-..-",   // X
    "-.--",   // Y
    "--.."    // Z
};

void setup() {
  pinMode(led, OUTPUT);
  pinMode(buzzer, OUTPUT);
  Serial.begin(9600);
}

void say_morse_word(char * msg){
  int index = 0;
  while(msg[index]!='\0'){
    // say a dash
    if(msg[index]=='-'){
      dash();
    }
    // say a dot
    if(msg[index]=='.'){
      dot();
    }
    // gap beetween simbols
    intragap();
    index++;
  }
}

// beep
void beep(int time){
  int i;
  int t = 100; // period of the wav. bigger means lower pitch.
  int beepduration = (int)((float)time/t*1800);
  digitalWrite(led, HIGH);
  for(i=0;i='0')&&(letter<='Z')&&(letter!='<')&&(letter!='>')){
    Serial.print(morsecode[letter-'0']);
    Serial.print(' ');
    say_morse_word(morsecode[letter-'0']);
    shortgap();
  } else {
    if(letter==' '){
      Serial.print(" \\ ");
      mediumgap();
    }else{
      Serial.print("X");
    }
  }
}

void loop(){
  if(Serial.available()){
    say_char((char)Serial.read());
  }
}

Additionally you can put another function to say entire strings, like say_string(“HELLO WORLD”)

void say_string(char * asciimsg){
  int index = 0;
  char charac;  
  charac = asciimsg[index];
  while(charac!='\0'){
    say_char(morsecode[charac-'0']);
    Serial.println(morsecode[charac-'0']);
    charac = asciimsg[++index];
    shortgap();
  }
}

You can use the Arduino IDE itself or any other program that talks with the serial port USB.

arduino interface

OpenSolaris at InfoBrasil 2008

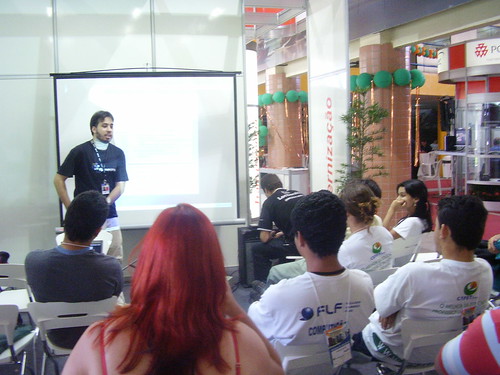
Me and people talking about OpenSolaris

InfoBrasil is a tradicional IT business event in my city. This year we got a space for Open Source and Free Software where I did a presentation about OpenSolaris. I posted our grid yesterday.

That was my first presentation about OpenSolaris so I focused to showing that OpenSolaris 2008.5 is a  GNU/OpenSolaris distribution but you can access features like ZFS, DTrace and Zones. I used those slides that Tirthankar Das, Solaris Cluster Engineering at Sun Microsystems, did for FISL 2008. Most of the audience was composed from students and they showed very impressed with ZFS. In my next OpenSolaris presentation I’ll try to focus more on ZFS demos. 😉 Someone in the audience did a random number generator code live. We used it to prize some OpenSolaris gifts like tshirts and sticks. 😀

OpenSolaris in action

I hope that for now on that we can use better this space and for establish a good dialog between communities, governments and enterprises.

All photos ares avaliable at my personal album for that event.