Skip to content

Tag: programming

Beware the locale

See-ming Lee 李思明 SML Photo

Today I was programming a toString method for a class widely used in a application, using the very useful String.format that provides a C’s like printf formatter.

@Override
public String toString() {
   return String.format("VO[a: %.1f, b: %.1f, c: %.1f]", a, b, a+b);
}

%.1f means a float with one digit precision after the dot separator. The code produces something like:

VO[a: 1.0, b: 2.0, c: 3.0]

The problem arises when running a JUnit test on this method wrote using a regular expression to extract the values from the String to test it correctness. We cannot assume that the dot will be always the separator for displaying a float value, in my locale pt_BR would be a comma. So the output would be:

VO[a: 1,0, b: 2,0, c: 3,0]

For a predictable output we can set a Locale for String.format:

Locale en = new Locale("en");
return String.format(en, "VO[a: %.1f, b: %.1f, c: %.1f]", a, b, a+b);

So it will always use the dot as common separator. Of course you should follow and respect the localization and internationalization efforts in others moments but in this toString case we are using it internally for debug and unitary testing so we can set a English default locale for safety reasons.

Miojo Script

O pre-requisito é o notify-send, um utilitário de linha de comando do libnotify. No Ubuntu:

sudo aptitude install libnotify-bin

E aqui o script em si:

sleep 5m; notify-send "aviso" "tirar o miojo do fogo"

Pronto, depois de cinco minutos isso vai aparecer:

Easily Sortable Date and Time Representation

I was looking for a date and time representation useful for registering stock quotes in a simple plain file.

I found that the standard ISO 8601 is just the answer for this, it’s called “Data elements and interchange formats — Information interchange — Representation of dates and times”. Here is a example:

2010-01-20 22:14:38

There’s this good article from Markus Kuhn, “A summary of the international standard date and time notation”. This notation allow us to using simple lexicographical order the events.

Some examples of how to do this in Python (thanks for the Jochen Voss article “Date and Time Representation in Python”) The first for displaying the current date and time:

from time import strftime
print strftime("%Y-%m-%d %H:%M:%S")
# 2010-01-20 22:34:22

Another possibility is using strftime from datetime object.

from datetime import datetime
now = datetime.datetime.now()
print now.strftime("%Y-%m-%d %H:%M:%S")
# 2010-01-20 22:12:31

Is that. Using this notation in the begging of each line is easy to sort them in any language or using the unix sort.

Java Font List

Here’s a program that lists fonts available in your JVM. You can also set the environment variable JAVA_FONTS to specify the font directory.

import java.awt.GraphicsEnvironment;

public class ListFonts {
	public static void main(String args[]){
		GraphicsEnvironment e = GraphicsEnvironment.getLocalGraphicsEnvironment();
		for(String font:e.getAvailableFontFamilyNames()){
			System.out.println(font);
		}
	}
}

By using pipes you can count how many fonts you have:

java ListFonts|wc -l

On my Ubuntu machine here I got 556 because I use those excellent, free and indispensable Larabie Fonts.

For looking up for a font with “sans” in its name, using a case insensitive grep:

java ListFonts|grep -i “sans”

I get a list like this:

DejaVu Sans
DejaVu Sans Condensed
DejaVu Sans Light
DejaVu Sans Mono
FreeSans

Python Fast XML Parsing

Here is a useful tip on Python XML decoding.

I was extending xml.sax.ContentHandler class in a example to decode maps for a Pygame application when my connection went down and I noticed that the program stop working raising a exception regarded a call to urlib (a module for retrieve resources by url). I noticed that the module was getting the remote DTD schema to validate the XML.


This is not a requirement for my applications and it’s a huge performance overhead when works (almost 1 second for each map loaded) and when the applications is running in a environment without Internet it just waits for almost a minute and then fail with the remain decoding. A dirty workaround is open the XML file and get rid of the line containing the DTD reference.

But the correct way to programming XML decoding when we are not concerned on validate a XML schema is just the xml.parsers.expat. Instead of using a interface you just have to set some callback functions with the behaviors we want. This is a example from the documentation:

import xml.parsers.expat

# 3 handler functions
def start_element(name, attrs):
    print 'Start element:', name, attrs
def end_element(name):
    print 'End element:', name
def char_data(data):
    print 'Character data:', repr(data)

p = xml.parsers.expat.ParserCreate()

p.StartElementHandler = start_element
p.EndElementHandler = end_element
p.CharacterDataHandler = char_data

p.Parse("""
Text goes here
More text
""", 1)

The output:

Start element: parent {'id': 'top'}
Start element: child1 {'name': 'paul'}
Character data: 'Text goes here'
End element: child1
Character data: '\n'
Start element: child2 {'name': 'fred'}
Character data: 'More text'
End element: child2
Character data: '\n'
End element: parent

Pygame: Running Orcs

Here is a Pygame Sprite animation using the approach presented by Joe Wreschnig and Nicolas Crovatti. It’s not yet exactly what I need but is very suitable.

import pygame, random
from pygame.locals import *

class Char(pygame.sprite.Sprite):
	x,y = (100,0)
	def __init__(self, img, frames=1, modes=1, w=32, h=32, fps=3):
		pygame.sprite.Sprite.__init__(self)
		original_width, original_height = img.get_size()
		self._w = w
		self._h = h
		self._framelist = []
		for i in xrange(int(original_width/w)):
			self._framelist.append(img.subsurface((i*w,0,w,h)))
		self.image = self._framelist[0]		
		self._start = pygame.time.get_ticks()
		self._delay = 1000 / fps
		self._last_update = 0
		self._frame = 0
		self.update(pygame.time.get_ticks(), 100, 100)	

	def set_pos(self, x, y):
		self.x = x
		self.y = y

	def get_pos(self):
		return (self.x,self.y)

	def update(self, t, width, height):
		# postion
		self.y+=1
		if(self.y>width):
			self.x = random.randint(0,height-self._w)
			self.y = -self._h

		# animation
		if t - self._last_update > self._delay:
			self._frame += 1
			if self._frame >= len(self._framelist):
				self._frame = 0
			self.image = self._framelist[self._frame]
			self._last_update = t

SCREEN_W, SCREEN_H = (320, 320)

def main():
	pygame.init()
	screen = pygame.display.set_mode((SCREEN_W, SCREEN_H))
	background = pygame.image.load("field.png")
	img_orc = pygame.image.load("orc.png")
	orc = Char(img_orc, 4, 1, 32, 48)
	while pygame.event.poll().type != KEYDOWN:
		screen.blit(background, (0,0))
		screen.blit(orc.image,  orc.get_pos())
		orc.update(pygame.time.get_ticks(), SCREEN_W, SCREEN_H)
		pygame.display.update()
		pygame.time.delay(10)

if __name__ == '__main__': main()

Here is it working:

Uptade: I put this source and images at the OpenPixel project in Github

OpenCV: adding two images

This is a very simple example of how to open two images and display them added.

I got two pictures at project Commons from Wikimedia that were highlighted on Featured Pictures. I did a crop on both to have the same size, as I’m trying to make this example as simple as possible.

The first one is a photo of our Milky Way, taken at Paranal Observatory by Stéphane Guisard.

milkyway

The second one is a California surfer inside wave, taken by Mila Zinkova.

surfer

In this simple OpenCV code below, we open the images, create a new one to display the result and use cvAdd to add them. We do not save the result or handle more than the ordinary case of two images with the same size.

#include 
#include 
#include 

int main( int argc, char **argv ){
    IplImage *surfer, *milkyway, *result;
    int key = 0;
    CvSize size;

    /* load images, check, get size (both should have the same) */
    surfer = cvLoadImage("surfer.jpg", CV_LOAD_IMAGE_COLOR);
    milkyway = cvLoadImage("milkyway.jpg", CV_LOAD_IMAGE_COLOR);
    if((!surfer)||(!milkyway)){
        printf("Could not open one or more images.");
        exit -1;
    }
    size = cvGetSize(surfer);

    /* create a empty image, same size, depth and channels of others */
    result = cvCreateImage(size, surfer->depth, surfer->nChannels);
    cvZero(result);

    /* result = surfer + milkyway (NULL mask)*/
    cvAdd(surfer, milkyway, result, NULL);
 
    /* create a window, display the result, wait for a key */
    cvNamedWindow("example", CV_WINDOW_AUTOSIZE);
    cvShowImage("example", result);
    cvWaitKey(0);

    /* free memory and get out */
    cvDestroyWindow("example");
    cvReleaseImage(&surfer);
    cvReleaseImage(&milkyway);
    cvReleaseImage(&result);
    return 0;
}

/* gcc add.c -o add `pkg-config opencv --libs --cflags` */

Compile it (on a well configured OpenCV development environment) and run it:

gcc add.c -o add `pkg-config opencv –libs –cflags`
./add

The result got pretty cool, a milky way surfer.

surfer in the milk way

Simple Face Detection Player

Here’s a simple video player that also performs facial detection thought the Open Computer Vision Library.

Here’s a code developed using codes from nashruddin.com and samples from OpenCV, including the haar classifier xml. More detailed explanation on the theory about how the OpenCV face detection algorithm works can be found here.

The code:

#include 
#include 
#include 

CvHaarClassifierCascade *cascade;
CvMemStorage *storage;

int main(int argc, char *argv[]) {
    CvCapture *video = NULL;
    IplImage *frame = NULL;
    int delay = 0, key, i=0;
    char *window_name = "Video";
    char *cascadefile = "haarcascade_frontalface_alt.xml";

    /* check for video file passed by command line */
    if (argc>1) {
        video = cvCaptureFromFile(argv[1]);
    }
    else {
        printf("Usage: %s VIDEO_FILE\n", argv[0]);
        return 1;
    }

    /* check file was correctly opened */
    if (!video) {
        printf("Unable to open \"%s\"\n", argv[1]);
        return 1;
    }

    /* load the classifier */
    cascade = ( CvHaarClassifierCascade* )cvLoad( cascadefile, 0, 0, 0 );
    if(!cascade){
        printf("Error loading the classifier.");
	return 1;
    }

    /* setup the memory buffer for the face detector */
    storage = cvCreateMemStorage( 0 );
    if(!storage){
        printf("Error creating the memory storage.");
	return 1;
    }

    /* create a video window, auto size */
    cvNamedWindow(window_name, CV_WINDOW_AUTOSIZE);

    /* get a frame. Necessary for use the cvGetCaptureProperty */
    frame = cvQueryFrame(video);

    /* calculate the delay between each frame and display video's FPS */
    printf("%2.2f FPS\n", cvGetCaptureProperty(video, CV_CAP_PROP_FPS));
    delay = (int) (1000/cvGetCaptureProperty(video, CV_CAP_PROP_FPS));

    while (frame) {
	/* show loaded frame */
        cvShowImage(window_name, frame);
	
	/* wait delay and check for the quit key */
        key = cvWaitKey(delay);
        if(key=='q') break;
	/* load and check next frame*/
        frame = cvQueryFrame(video);
	if(!frame) {
		printf("error loading frame.\n");
		return 1;
	}

        /* detect faces */
        CvSeq *faces = cvHaarDetectObjects(
            frame, /* image to detect objects in */
            cascade, /* haar classifier cascade */
            storage, /* resultant sequence of the object candidate rectangles */
            1.1, /* increse window by 10% between the subsequent scans*/
            3, /* 3 neighbors makes up an object */
            0 /* flags CV_HAAR_DO_CANNY_PRUNNING */,
            cvSize( 40, 40 ) 
        );

        /* for each face found, draw a red box */
        for( i = 0 ; i < ( faces ? faces->total : 0 ) ; i++ ) {
             CvRect *r = ( CvRect* )cvGetSeqElem( faces, i );
             cvRectangle( frame,
                  cvPoint( r->x, r->y ),
                  cvPoint( r->x + r->width, r->y + r->height ),
                  CV_RGB( 255, 0, 0 ), 1, 8, 0 );
        }
    }
}

Yeah, I know the code needs a few adjustments. ¬¬

To compile it in a well configured OpenCV development environment:

gcc faceplayer.c -o faceplayer `pkg-config opencv ‑‑libs ‑‑cflags`

To run it you have to put in the same directory of the binary the XML classifier (haarcascade_frontalface_alt.xml) that comes with OpenCV sources at OpenCV-2.0.0/data/haarcascades/. And so:

./faceplayer video.avi

The results I got so far is that it works well for faces but sometimes its also detects more than faces. And here a video of it working live.

A example of good result:

rick roll face detection

A example of bad result:

rick roll face detection bad result

Maybe with some adjustments it could performs even better. But was really easy to create it using OpenCV.

Jedi Name

lightsaber

A simple Java class that calculates your Jedi name based on your first, last name, mother’s maiden name and the city you grew up.

/*
 Jedi first name: 1st 3 letters of last name + 1st 2 letters of first name
 Jedi last name: 1st 2 letters of mother's maiden name + 1st 3 letters of city you were raised in
 */

public class JediName {
   private static String capitalize(String s){
      return s.substring(0,1).toUpperCase() + s.substring(1,s.length()).toLowerCase();
   }

   private static String sub(String s, int begin, int end){
      return s.substring(begin, (s.length()>=end)?end:s.length());
   }

   public static String generate(String firstName, String lastName, String city, String mother ){
      String jediFirstName = capitalize(sub(lastName, 0, 3) + sub(firstName, 0,2));
      String jediLastName = capitalize(sub(mother,0,2)+ sub(city,0,3));
      return jediFirstName + " " + jediLastName;
   }
}

I used inline conditional expression ()?: to avoid raise a IndexOutOfBoundsException when the string is to small to cut the proper size we want.

And a example of how to use it:

public class JediNameTester {
	public static void main(String args[]){
		String myJediName = JediName.generate("Pedro", "Madeira", "Fortaleza", "Maria");
		System.out.println(myJediName);
	}
}

My jedi name is Siljo Iruba. 🙂

BumbaBot-1

I got a simple motor from a broken domestic printer. It’s a Mitsumi m355P-9T stepping motor. Any other common stepping motor should fits. You can find one in printers, multifunction machines, copy machines, FAX, and such.

bumbabot v01

With a flexible cap of water bottle with a hole we make a connection between the motor axis and other objects.

bumbabot v01

bumbabot v01

With super glue I attached to the cap a little handcraft clay ox statue.

bumbabot v01

It’s a representation from a Brazilian folkloric character Boi Bumbá. In some traditional parties in Brazil, someone dress a structure-costume and dances in circular patterns interacting with the public.

776513346_c31db6843b_m

2246467684_49164d3397_m
Photos by Marcus Guimarães.

Controlling a stepper motor is not difficult.  There’s a good documentation on how to that on the Arduino Stepper Motor Tutorial. Basically it’s about sending a logical signal for each coil in a circular order (that is also called full step).

full step

Animation from rogercom.com.

stepper motor diagram

You’ll probably also use a driver chip ULN2003A or similar to give to the motor more current than your Arduino can provide and also for protecting it from a power comming back from the motor. It’s a very easy find this tiny chip on electronics or automotive  stores or also from broken printers where you probably found your stepped motor.

Arduino Stepper Motor UNL2003A

With a simple program you can already controlling your motor.

// Simple stepped motor spin
// by Silveira Neto, 2009, under GPLv3 license
// http://silveiraneto.net/2009/03/16/bumbabot-1/
int coil1 = 8;
int coil2 = 9;
int coil3 = 10;
int coil4 = 11;
int step = 0;
int interval = 100;

void setup() {
  pinMode(coil1, OUTPUT);
  pinMode(coil2, OUTPUT);
  pinMode(coil3, OUTPUT);
  pinMode(coil4, OUTPUT);
}

void loop() {
  digitalWrite(coil1, step==0?HIGH:LOW);
  digitalWrite(coil2, step==1?HIGH:LOW);
  digitalWrite(coil3, step==2?HIGH:LOW);
  digitalWrite(coil4, step==3?HIGH:LOW);
  delay(interval);
  step = (step+1)%4;
}


Writing a little bit more generally code we can create function to step forward and step backward.

My motor needs 48 steps to run a complete turn. So 360º/48 steps give us 7,5º per step. Arduino has a simple Stepper Motor Library but it doesn’t worked with me and it’s also oriented to steps and I’d need something oriented to angles instead. So I wrote some routines to do that.

For this first version of BumbaBot I mapped angles with letters to easy the communication between the programs.

motor angle step control

Notice that it’s not the final version and there’s still some bugs!

// Stepped motor control by letters
// by Silveira Neto, 2009, under GPLv3 license
// http://silveiraneto.net/2009/03/16/bumbabot-1/

int coil1 = 8;
int coil2 = 9;
int coil3 = 10;
int coil4 = 11;

int delayTime = 50;
int steps = 48;
int step_counter = 0;

void setup(){
  pinMode(coil1, OUTPUT);
  pinMode(coil2, OUTPUT);
  pinMode(coil3, OUTPUT);
  pinMode(coil4, OUTPUT);
  Serial.begin(9600);
}

// tells motor to move a certain angle
void moveAngle(float angle){
  int i;
  int howmanysteps = angle/stepAngle();
  if(howmanysteps<0){
    howmanysteps = - howmanysteps;
  }
  if(angle>0){
    for(i = 0;i

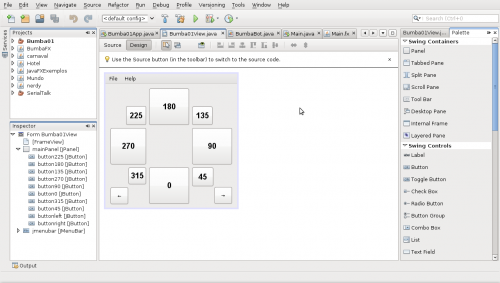
In another post I wrote how create a Java program to talk with Arduino. We'll use this to send messages to Arduino to it moves. 

captura_de_tela-bumba01-netbeans-ide-65

[put final video here]

To be continued... 🙂