Skip to content

Tag: JavaFX

Parsing a XML Sandwich with JavaFX

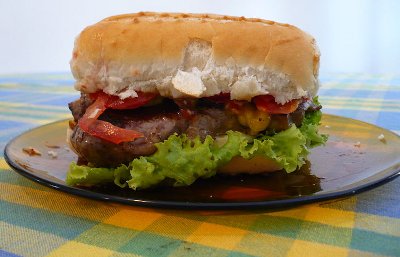
delicious sandwich

Let sandwich.xml be a file at /tmp directory with the content above.


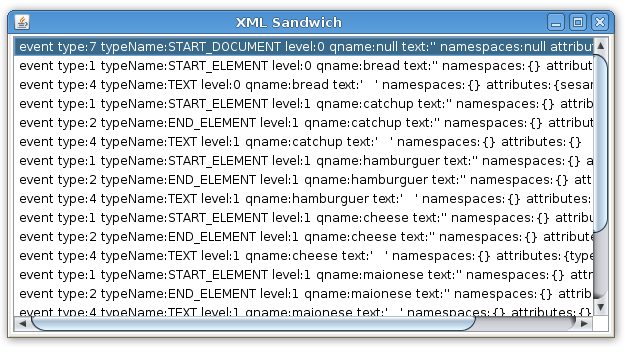
We can open it using java.io.FileInputStream and so use it on a javafx.data.pull.PullParser. A PullParser is a event oriented parser that works with XML and YAML files. Above a general and simple parser with a GUI that show the list of events during the parse process.

import java.io.FileInputStream;
import javafx.data.pull.Event;
import javafx.data.pull.PullParser;
import javafx.ext.swing.SwingList;
import javafx.ext.swing.SwingListItem;
import javafx.scene.Scene;
import javafx.stage.Stage;

var list = SwingList { width: 600 height: 300 }

var myparser = PullParser {
   documentType: PullParser.XML;
   onEvent: function (e: Event) {
      var item = SwingListItem {
         text: "event {e}"
      };
      insert item into list.items;
   }
   input: new FileInputStream("/tmp/sandwich.xml");
}
myparser.parse();

Stage {
   title: "XML Sandwich"
   scene: Scene { content: list }
}
javafx xml sandwich

The XML cheese element produce two the outputs.

type:1 typeName:START_ELEMENT level:1 qname:cheese text:” namespaces:{} attributes:{type=chedar}
type:2 typeName:END_ELEMENT level:1 qname:cheese text:” namespaces:{} attributes:{type=chedar}

Notice that white spaces like tab and escape characters like new line also produced events from type TEXT. We are not interested on them. Above a parser that looks only those events of type START_ELEMENT or END_ELEMENT, look into it’s contents, building a sandwich at runtime based on the XML file.

import java.io.FileInputStream;
import javafx.data.pull.Event;
import javafx.data.pull.PullParser;
import javafx.data.xml.QName;
import javafx.scene.image.Image;
import javafx.scene.image.ImageView;
import javafx.scene.layout.VBox;
import javafx.scene.Scene;
import javafx.stage.Stage;

// my sandwich starts as an empty VBox
var mysandwich = VBox {}

// give a name and returns a ImageView with a png image like the name
function ingredient(name){
   return ImageView {
      image: Image {
         url: "{__DIR__}{name}.png"
      }
   }
}

// basicaly, look the event and put a ingredient at mysandwich
var myparser = PullParser {
   documentType: PullParser.XML;
   onEvent: function (e: Event) {
      // starter xml elements
      if(e.type == PullParser.START_ELEMENT){
         // bread
         if(e.qname.name.equals("bread")){
             insert ingredient("bread_top") into mysandwich.content;
         }

         // hamburguer
         if(e.qname.name.equals("hamburguer")){
             insert ingredient("hamburguer") into mysandwich.content;
         }

         // catchup
         if(e.qname.name.equals("catchup")){
             insert ingredient("catchup") into mysandwich.content;
         }

         // maionese
         if(e.qname.name.equals("maionese")){
             insert ingredient("maionese") into mysandwich.content;
         }

         // lettuce
         if(e.qname.name.equals("lettuce")){
             insert ingredient("lettuce") into mysandwich.content;
         }

         // cheese
         if(e.qname.name.equals("cheese")){
            var type= e.getAttributeValue(QName{name:"type"});
            if(type.equals("cheedar")){
                 insert ingredient("cheedar") into mysandwich.content;
            } else {
                insert ingredient("cheese") into mysandwich.content;
            }
         }
      }

      // ending xml elements (just bread)
      if(e.type == PullParser.END_ELEMENT){
         if(e.qname.name.equals("bread")){
            insert ingredient("bread_botton") into mysandwich.content;
         }
      }
   }
   input: new FileInputStream("/tmp/sandwich.xml");
}
myparser.parse();

Stage {
   title: "XML Sandwich"
   scene: Scene {
      height: 300
      content: mysandwich
   }
}

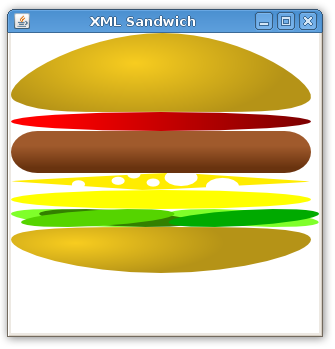
Here’s our sandwich.
sandwich javaFX

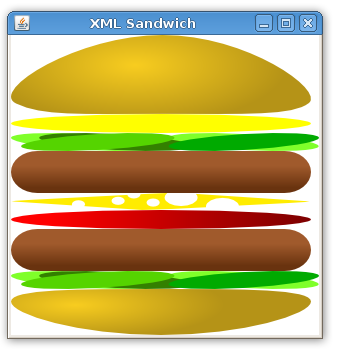
Just changing the XML file you got a new sandwich.


double burguer

Bon appétit.

For more details on XML and JSON parsing see the JavaFX API.

Gravatar with JavaFX

Gravatar is easy way to put global recognized avatar images into any Internet application. Gravatar would stands for globally recognized avatar.

Below,  the Java class that I got from the Gravatar Java reference. Here is a static class called md5 that applies a MD5Sum algorithm over a string. Is a little complex code but all behavior keeps encapsulated and who uses it don’t need to know how it works. Just gives a string and receives a encrypted string. Those two codes are also a good example of how calling Java classes inside a JavaFX code.

package gravatarexample;

import java.security.MessageDigest;
import java.io.UnsupportedEncodingException;
import java.security.NoSuchAlgorithmException;

public class MD5 {
   public static String toHex(String message) {
      try {
         MessageDigest md = MessageDigest.getInstance("MD5");
         byte array[] = md.digest(message.getBytes("CP1252"));
         StringBuffer sb = new StringBuffer();
         for (int i = 0; i < array.length; ++i) {
            sb.append(Integer.toHexString((array[i]&0xFF)|0x100).substring(1, 3));
         }
         return sb.toString();
      } catch (NoSuchAlgorithmException e) {
      } catch (UnsupportedEncodingException e) {
      }
      return null;
   }
}

As a Java class in the same package, any JavaFX (or Java) code can call it without any problem. Just to keep the code more clear I’m importing it explicitly. Is this example I also create some Swing interface to give user the option to put his mail, adjust the image size and get a output direct link or html image tag.

package gravatarexample;

import gravatarexample.MD5;
import javafx.ext.swing.SwingButton;
import javafx.ext.swing.SwingSlider;
import javafx.ext.swing.SwingTextField;
import javafx.scene.image.Image;
import javafx.scene.image.ImageView;
import javafx.scene.layout.VBox;
import javafx.scene.Scene;
import javafx.stage.Stage;

var mail = "Email";
var key = "";

function gravatalize(mail:String, size: Integer): String {
   return "http://www.gravatar.com/avatar/{MD5.toHex(mail)}?s={size}"
}

var inputtxt = SwingTextField {
   columns: 20
   text: mail
}

var slider = SwingSlider {
   minimum: 10
   maximum: 128
   value: 100
   vertical: false
}

var button = SwingButton {
   text: "Get Gravatar"
   action: function() {
      key = gravatalize(inputtxt.text, slider.value);
      directoutput.text = key;
      htmloutput.text = "\"gravatar\"";
      photo.image = Image {
         backgroundLoading: true,
         url: key};
   }
}

var photo:ImageView = ImageView {
   image: null
}

var directoutput = SwingTextField {
   columns: 20
   text: "direct link image"

}

var htmloutput = SwingTextField {
   columns: 20
   text: "html tag image"
}

Stage {
   title: "Gravatar"
   width: 300
   height: 340
   scene: Scene {
      content: [
         VBox {
            spacing: 10
            content: [inputtxt, slider, button, directoutput, htmloutput, photo]
         },
      ]
   }
}

The string itself is assembled in the gravatalize function. You give a mail and it’s returns a Gravatar direct link to the image. There’s many cool ways to use together Gravatar and a JavaFX Internet application.

JavaFX, Simple Tile Set

Tile sets are a very simple way to draw scenarios with repeated elements. From simple to complex ones using a very low footprint.

First step, load the png file that stores the tileset into a Image. The file tiles.png shoud be in the same directory of the source code. I adjusted some tiles from those tile set I’ve blogged here before into a grid of 10×10 tiles.

Set of tiles, example

var tileset = Image {
   url: "{__DIR__}tiles.png"
}

Notice that each tile have 32 of height and 32 of width. We will assume this and use theses numbers when performing calculations to find a single tile in our tile set.

def w = 32;
def h = 32;

To display a Image in the screen we use a ImageView node. A ImageView can have a viewport property to create crop or zoom effect. A viewport is just a Rectangle2D, a object with position (minX and minY), height and width. If we want to display the first tile in the tileset we do

first tile

ImageView {
   image: tileset
   viewport: Rectangle2D{
      minX: 0, minY: 0, height: 32, width: 32
   }
}

Notice that the minX determines the column and minY the row in the tileset. The first row is 0*32, the second row is 1*32 and so on. If we want to display the tile at the second line and third column of the tileset we do

another_tile

ImageView {
   image: tileset
   viewport: Rectangle2D{
      minX: 2 * 32 , minY: 1*32, height: 32, width: 32
   }
}

Those properties in a Rectangle2D are for init and read only. So I created a list with all Rectangles I can need for use as a viewport.

def viewports = for (row in [0..9]) {
   for (col in [0..9]) {
       Rectangle2D{
           minX: col * w, minY: row * h, height: w, width: h
       }
   }
}

The scenario map is stored in another list. The first element of the list is 7, that is, the first tile in the scenario is the 7th tile from the tile set.

var map = [
    7,  3,  3,  3,  3,  3,  3,  3,  3,  8,
   19, 26, 40, 41, 24, 13, 13, 23, 24, 19,
   19, 36, 50, 51, 34,  2,  2,  2, 34, 19,
   19,  2,  2,  2,  2,  2,  2,  2, 25, 19,
   19, 57, 58, 44, 45, 46,  2,  2, 35, 19,
   27,  3,  3,  6, 55, 56,  5,  3,  3, 38,
   19, 60, 13, 16, 47, 48, 15, 13, 61, 19,
   19, 70,  1, 33,  1,  1,  1,  1, 71, 19,
   19,  1,  1,  1,  1,  1,  1,  1, 49, 19,
   17,  9,  9,  9,  9,  9,  9,  9,  9, 18,
];

Finally to create a scenario with 100 tiles, 10 per row and with 10 rows, in a list called tiles. Each iteration of this loop creates a ImageView. Each ImageView will store a single tile. We get the tile number in the map list and so use it to index the viewports list.

var tiles =  for (row in [0..9]) {
   for (col in [0..9]) {
      ImageView {
         x: col * w, y: row * h,
         viewport: bind viewports[map[row * 10 + col]]
         image: tileset
      }
   }
}

Additionally I added two things to transform this program also in a (extremely)  simple map editor. At each ImageView I added a callback for onMouseClicked event. When you click on a tile, it changes its map position, ie, the tile. The next tile for the left button and the last tile for any other button.

onMouseClicked: function( e: MouseEvent ):Void {
   var amount = if(e.button == MouseButton.PRIMARY) { 1 } else { -1 };
   map[row * 10 + col] = (map[row * 10 + col] + amount) mod 100;
}

The other thing is to print the map list when the program is over. There is the full program:

package tileeditor;

import javafx.stage.Stage;
import javafx.scene.Scene;
import javafx.scene.image.ImageView;
import javafx.scene.image.Image;
import javafx.scene.CustomNode;
import javafx.scene.Group;
import javafx.scene.Node;
import javafx.geometry.Rectangle2D;
import javafx.scene.input.MouseEvent;
import javafx.scene.input.MouseButton;

def w = 32;
def h = 32;

var map = [
    7,  3,  3,  3,  3,  3,  3,  3,  3,  8,
   19, 26, 40, 41, 24, 13, 13, 23, 24, 19,
   19, 36, 50, 51, 34,  2,  2,  2, 34, 19,
   19,  2,  2,  2,  2,  2,  2,  2, 25, 19,
   19, 57, 58, 44, 45, 46,  2,  2, 35, 19,
   27,  3,  3,  6, 55, 56,  5,  3,  3, 38,
   19, 60, 13, 16, 47, 48, 15, 13, 61, 19,
   19, 70,  1, 33,  1,  1,  1,  1, 71, 19,
   19,  1,  1,  1,  1,  1,  1,  1, 49, 19,
   17,  9,  9,  9,  9,  9,  9,  9,  9, 18,
];

var tileset = Image {
    url: "{__DIR__}tiles.png"
}

def viewports = for (row in [0..9]) {
   for (col in [0..9]) {
       Rectangle2D{
           minX: col * w, minY: row * h, height: w, width: h
       }
   }
}

var tiles =  for (row in [0..9]) {
   for (col in [0..9]) {
      ImageView {
         x: col * w, y: row * h,
         viewport: bind viewports[map[row * 10 + col]]
         image: tileset

         onMouseClicked: function( e: MouseEvent ):Void {
            var amount = if(e.button == MouseButton.PRIMARY) { 1 } else { -1 };
            map[row * 10 + col] = (map[row * 10 + col] + amount) mod 100;
         }
      }
   }
}

Stage {
    title: "JavaFX Simple Tile Editor"
    scene: Scene {
        content: [ tiles ]
    }
    onClose: function() {
        println(map);
    }
}

Here is the result for that map

tlemap javafx

And you can try it yourself in your browser. Play it online now.

Here is a video of it working

[youtube]lxuBEoItB5E[/youtube]

Downloads:

Possibilities

We are using just  a image that can handle 100 tiles, tiles.png with less than 30Kb. The map is also composed with 100 tiles. Each tile we can choose between 100 different tiles, so we can compose 10100 different maps (one googol10 ). Most of them are useless and without any sense, but some are cool. 🙂

JavaFX, how to create a rpg like game

JavaFX 1.0 is out and there are tons of new cool features, specially for game development.trans

I’ll show in this tutorial how to create a very simple demo that shows how to load imtrages, handle sprites, collisions and keyboard events that you can use to create a game with a old school rpg like vision.

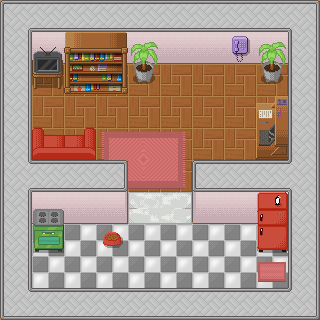
For the background scenario I’m using the house that I drew and we’ll call as house.png.

That we load as a Image and place into a ImageView.

ImageView{
   image: Image {url: "{__DIR__}house.png"}
}

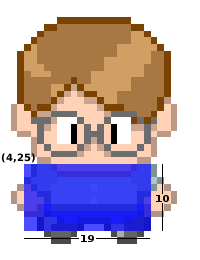
For the character I’m using the last character I drew, the nerdy guy.

To make the animation easier, I spited it into 9 pieces:

down0.png, down1.png and down2.png

left0.png, left1.png and left2.png

right0.png, right1.png and righ2.png

up0.png, up1.png and up2.png

All images I’m using should be in the same directory of source code.

Let’s start loading the scenario and a single character sprite.

import javafx.stage.Stage;
import javafx.scene.Scene;
import javafx.scene.image.*;

Stage {
   title: "RPG-like demo", width: 424, height: 412
   visible: true
   scene: Scene{
      content: [
         ImageView{
         image: Image {url: "{__DIR__}house.png"} },
         ImageView{
            x: 320 y: 80
            image: Image {url: "{__DIR__}down1.png"}
         }
      ]
   }
}

Saved as Game.fx you can compile and run with in your terminal:

$ javafxc Game.fx

$ javafx Game

Hint: You can use NetBeans 6.5 JavaFX plugin to easier the JavaFX development.

To put animation on the character we load all sprites into four lists. Each list for each direction.

// sprites
def up    = for(i in [0..2]) { Image {url: "{__DIR__}up{i}.png"    } }
def right = for(i in [0..2]) { Image {url: "{__DIR__}right{i}.png" } }
def down  = for(i in [0..2]) { Image {url: "{__DIR__}down{i}.png"  } }
def left  = for(i in [0..2]) { Image {url: "{__DIR__}left{i}.png"  } }

And create vars to store the character position and frame of animation.

var frame = 0;
var posx = 320;
var posy = 80;

Also store the house background.

// house background
def house = ImageView{ image: Image {url: "{__DIR__}house.png"} };

I create booleans to store some key states and at each interval of time I see how they are and do something about. You can handle keyboard event with less code but I like this way because keep visual and game logics a little bit more separated.

// keyboard
var    upkey = false;
var rightkey = false;
var  downkey = false;
var  leftkey = false;

// player
var player = ImageView{
   x: bind posx y: bind posy
   image: Image {url: "{__DIR__}down1.png"}
   onKeyPressed: function(e:KeyEvent){
      if (e.code == KeyCode.VK_DOWN) {
      downkey = true;
      } else if (e.code == KeyCode.VK_UP) {
         upkey = true;
      }else if (e.code == KeyCode.VK_LEFT) {
         leftkey = true;
      }else if (e.code == KeyCode.VK_RIGHT) {
         rightkey = true;
      }
   } // onKeyPressed

   onKeyReleased: function(e: KeyEvent){
      if (e.code == KeyCode.VK_DOWN) {
         downkey = false;
      } else if (e.code == KeyCode.VK_UP) {
         upkey = false;
      }else if (e.code == KeyCode.VK_LEFT) {
         leftkey = false;
      }else if (e.code == KeyCode.VK_RIGHT) {
         rightkey = false;
      }
   } // onKeyReleased
}

See a video of the game working so far:

[youtube]Xv5z-9LGuOc[/youtube]

Now we will add collisions. In a previous post I showed some math behind bounding box game collisions. The good news are that you no longer need to worry about that. There are a lot of API improvements in JavaFX 1.0 that do all the hard work for you, specially the new classes on javafx.geometry package, Rectangle2D and Point2D.

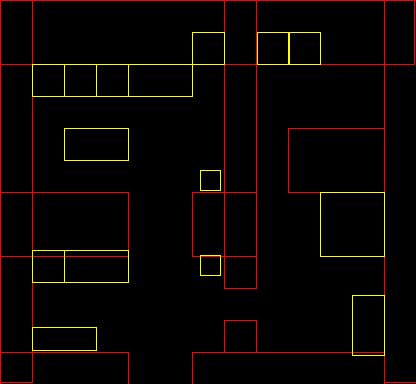
We create rectangles that represent the obstacles in the house.

// collidable obstacles
def obstacles = [
	Rectangle { x:   0 y:   0 width:  32 height: 382 stroke: Color.RED },
	Rectangle { x:   0 y:   0 width: 414 height:  64 stroke: Color.RED },
	Rectangle { x: 384 y:   0 width:  32 height: 382 stroke: Color.RED },
	Rectangle { x:   0 y: 192 width: 128 height:  64 stroke: Color.RED },
	Rectangle { x: 192 y: 192 width:  64 height:  64 stroke: Color.RED },
	Rectangle { x: 224 y:   0 width:  32 height: 288 stroke: Color.RED },
	Rectangle { x: 288 y: 128 width:  96 height:  64 stroke: Color.RED },
	Rectangle { x:   0 y: 352 width: 128 height:  32 stroke: Color.RED },
	Rectangle { x: 192 y: 352 width: 192 height:  32 stroke: Color.RED },
	Rectangle { x: 224 y: 320 width:  32 height:  32 stroke: Color.RED },
	Rectangle { x:  32 y:  64 width: 32 height: 32 stroke: Color.YELLOW },
	Rectangle { x:  64 y:  64 width: 32 height: 32 stroke: Color.YELLOW },
	Rectangle { x:  96 y:  64 width: 32 height: 32 stroke: Color.YELLOW },
	Rectangle { x: 128 y:  64 width: 64 height: 32 stroke: Color.YELLOW },
	Rectangle { x: 192 y:  32 width: 32 height: 32 stroke: Color.YELLOW },
	Rectangle { x:  64 y: 128 width: 64 height: 32 stroke: Color.YELLOW },
	Rectangle { x:  32 y: 250 width: 32 height: 32 stroke: Color.YELLOW },
	Rectangle { x:  64 y: 250 width: 64 height: 32 stroke: Color.YELLOW },
	Rectangle { x: 200 y: 255 width: 20 height: 20 stroke: Color.YELLOW },
	Rectangle { x: 200 y: 170 width: 20 height: 20 stroke: Color.YELLOW },
	Rectangle { x: 257 y:  32 width: 32 height: 32 stroke: Color.YELLOW },
	Rectangle { x: 288 y:  32 width: 32 height: 32 stroke: Color.YELLOW },
	Rectangle { x: 320 y: 192 width: 64 height: 64 stroke: Color.YELLOW },
	Rectangle { x: 352 y: 295 width: 32 height: 60 stroke: Color.YELLOW },
	Rectangle { x:  32 y: 327 width: 64 height: 23 stroke: Color.YELLOW },
];

We just have to change a little bit the game logics in order to handle collisions.

We define a bounding box around the player, it’s a rectangle from (4, 25) at the player coordinates system and with width 19 and height 10. The idea is to prospect where the player will be in the next step, see if it’s bouding box don’t collide with any obstacle and so pass it to the real game position.

// game logics
var gamelogics = Timeline {
   repeatCount: Timeline.INDEFINITE
   keyFrames: KeyFrame {
      time : 1s/8
      action: function() {
         var nextposx = posx;
         var nextposy = posy;
         if(downkey) {
            nextposy += 5;
            player.image = down[++frame mod 3];
         }
         if(upkey) {
            nextposy -= 5;
            player.image = up[++frame mod 3];
         }
         if(rightkey) {
            nextposx += 5;
            player.image = right[++frame mod 3];
         }
         if(leftkey) {
            nextposx -= 5;
            player.image = left[++frame mod 3];
         }
         for(obst in obstacles) {
            if(obst.boundsInLocal.intersects(nextposx + 4, nextposy + 25, 19, 10)) {
               return;
            }
         }
         posx = nextposx;
         posy = nextposy;
      }
   }
}

This is enough to do the trick but I also added a way to smoothly show the obstacles when pressing the space key.

[youtube]k-MHh6irvwE[/youtube]

Here is the complete source code.

package Game; 

import javafx.stage.Stage;
import javafx.scene.*;
import javafx.scene.image.*;
import javafx.scene.input.*;
import javafx.scene.paint.*;
import javafx.scene.shape.*;
import javafx.animation.*;

var frame = 0;
var posx = 320;
var posy = 80;

// sprites
def up    = for(i in [0..2]) { Image {url: "{__DIR__}up{i}.png"    } }
def right = for(i in [0..2]) { Image {url: "{__DIR__}right{i}.png" } }
def down  = for(i in [0..2]) { Image {url: "{__DIR__}down{i}.png"  } }
def left  = for(i in [0..2]) { Image {url: "{__DIR__}left{i}.png"  } }

// house background
def house = ImageView{ image: Image {url: "{__DIR__}house.png"} };

// keyboard
var    upkey = false;
var rightkey = false;
var  downkey = false;
var  leftkey = false;

// player
var player = ImageView{
   x: bind posx y: bind posy image: down[1]
   onKeyPressed: function(e:KeyEvent){
      if (e.code == KeyCode.VK_DOWN) {
         downkey = true;
      } else if (e.code == KeyCode.VK_UP) {
         upkey = true;
      }else if (e.code == KeyCode.VK_LEFT) {
         leftkey = true;
      }else if (e.code == KeyCode.VK_RIGHT) {
         rightkey = true;
      }

		if(e.code == KeyCode.VK_SPACE){
         if(fade==0.0){
         	fadein.playFromStart();
			}
			if(fade==1.0){
				fadeout.playFromStart();
			}
		}
   } // onKeyPressed

   onKeyReleased: function(e: KeyEvent){
      if (e.code == KeyCode.VK_DOWN) {
         downkey = false;
      } else if (e.code == KeyCode.VK_UP) {
         upkey = false;
      }else if (e.code == KeyCode.VK_LEFT) {
         leftkey = false;
      }else if (e.code == KeyCode.VK_RIGHT) {
         rightkey = false;
      }
   } // onKeyReleased
}

// collidable obstacles
def obstacles = [
	Rectangle { x:   0 y:   0 width:  32 height: 382 stroke: Color.RED },
	Rectangle { x:   0 y:   0 width: 414 height:  64 stroke: Color.RED },
	Rectangle { x: 384 y:   0 width:  32 height: 382 stroke: Color.RED },
	Rectangle { x:   0 y: 192 width: 128 height:  64 stroke: Color.RED },
	Rectangle { x: 192 y: 192 width:  64 height:  64 stroke: Color.RED },
	Rectangle { x: 224 y:   0 width:  32 height: 288 stroke: Color.RED },
	Rectangle { x: 288 y: 128 width:  96 height:  64 stroke: Color.RED },
	Rectangle { x:   0 y: 352 width: 128 height:  32 stroke: Color.RED },
	Rectangle { x: 192 y: 352 width: 192 height:  32 stroke: Color.RED },
	Rectangle { x: 224 y: 320 width:  32 height:  32 stroke: Color.RED },
	Rectangle { x:  32 y:  64 width: 32 height: 32 stroke: Color.YELLOW },
	Rectangle { x:  64 y:  64 width: 32 height: 32 stroke: Color.YELLOW },
	Rectangle { x:  96 y:  64 width: 32 height: 32 stroke: Color.YELLOW },
	Rectangle { x: 128 y:  64 width: 64 height: 32 stroke: Color.YELLOW },
	Rectangle { x: 192 y:  32 width: 32 height: 32 stroke: Color.YELLOW },
	Rectangle { x:  64 y: 128 width: 64 height: 32 stroke: Color.YELLOW },
	Rectangle { x:  32 y: 250 width: 32 height: 32 stroke: Color.YELLOW },
	Rectangle { x:  64 y: 250 width: 64 height: 32 stroke: Color.YELLOW },
	Rectangle { x: 200 y: 255 width: 20 height: 20 stroke: Color.YELLOW },
	Rectangle { x: 200 y: 170 width: 20 height: 20 stroke: Color.YELLOW },
	Rectangle { x: 257 y:  32 width: 32 height: 32 stroke: Color.YELLOW },
	Rectangle { x: 288 y:  32 width: 32 height: 32 stroke: Color.YELLOW },
	Rectangle { x: 320 y: 192 width: 64 height: 64 stroke: Color.YELLOW },
	Rectangle { x: 352 y: 295 width: 32 height: 60 stroke: Color.YELLOW },
	Rectangle { x:  32 y: 327 width: 64 height: 23 stroke: Color.YELLOW },
];

// game logics
var gamelogics = Timeline {
   repeatCount: Timeline.INDEFINITE
   keyFrames: KeyFrame {
      time : 1s/8
      action: function() {
         var nextposx = posx;
         var nextposy = posy;
         if(downkey) {
            nextposy += 5;
            player.image = down[++frame mod 3];
         }
         if(upkey) {
            nextposy -= 5;
            player.image = up[++frame mod 3];
         }
         if(rightkey) {
            nextposx += 5;
            player.image = right[++frame mod 3];
         }
         if(leftkey) {
            nextposx -= 5;
            player.image = left[++frame mod 3];
         }
         for(obst in obstacles) {
            if(obst.boundsInLocal.intersects(nextposx + 4, nextposy + 25, 19, 10)) {
               return;
            }
         }
         posx = nextposx;
         posy = nextposy;
      }
   }
}

gamelogics.play();

// obstacles view
var fade = 0.0;

var obstacleslayer = Group {
   opacity: bind fade
   content: [
      Rectangle { x:0 y:0 width:500 height: 500 fill: Color.BLACK },
      obstacles,
      Rectangle {
        x: bind posx + 4 y: bind posy + 25 width: 19 height: 10
        fill: Color.LIME
      }
   ]
}

var fadein = Timeline {
	keyFrames: [
   	at (0s) {fade => 0.0}
   	at (1s) {fade => 1.0}
   ]
}

var fadeout = Timeline {
	keyFrames: [
   	at (0s) {fade => 1.0}
   	at (1s) {fade => 0.0}
   ]
}

// game stage
Stage {
	title: "RPG-like demo", width: 424, height: 412
	visible: true
	scene: Scene{
      fill: Color.BLACK
		content: [house, player, obstacleslayer]
	}
}

Play Through Java Web Start

or click here to play via applet, inside your browser.

update: The applet version and Java Web Start versions should be working now.  The applet version on Linux seems to be having problems with the keyboard handling, use the Java Web Start version while I’m trying to fix it.

Downloads:

JavaFX SDK 1.0 on Linux

JavaFX 1.0 is out and is absolutely amazing. You guys did really a great work on it.

As I really need a working SDK on Linux to continue to study and I don’t have any Windows/Mac near me, I’m using the Weiqi Gao’s workaround. I tried to simplify a little bit more the process for those who need JavaFX SDK working on Linux right now.

Download javafxsdk_linux_unofficial.tar.bz2 (~18Mb).

And then

tar -xjvf javafxsdk_linux_unofficial.tar.bz2
sudo cp javafx /opt/javafx
echo “PATH=\$PATH:/opt/javafx/bin” >> ~/.profile
echo “JAVAFX_HOME=/opt/javafx” >> ~/.profile
source ~/.profile

Now you can call javafx, javafxc, javafxdoc and javafxpackager from your terminal. Don’t forget that you need Java 1.6 or greater installed.

Here’s a video showing the SDK working, I’m compiling and running two sample applications. Remeber that as a temporary unofficial port for Linux, there’s not native video support nor hardware acceleration.

[youtube]ENf5mXEIiD8[/youtube]

Buzz on JavaFX and Inkscape


At November, 26, on the main page of java.sun.com at the section From The Blogosfere

Thanks for all comments, suggestions and feedback on the post Inkscape and JavaFX working together. The JavaFX guru James Weaver posted about on his blog and it also figured out on java.sun.com on the From The Blogosfere section.

Bob said that there are build binaries of Inkscape for Windows, so we can already see it 0.46-devel working without compiling yourself yours.

\o/

And hey, Project Xort won a second place prize at the MySQL and GlassFish Student Reviews Contest. A lot of guys here from Brazil were prized, congractulations guys!

Inkscape and JavaFX working together

Inkscape is a open source cross-platform vector graphics editor application that I use daily to create draws.

When Project Nile was launched, me and some others guys complained about lack of open source alternatives in the workflow of creation with JavaFX. So we developed a module inside Inkscape that converts your SVG drawings to JavaFX code.

Features

  • Both are free and open source technologies, providing more tools on a powerful workflow for programmers and designers to develop Rich Internet Applications.
  • Comes natively with Inkscape. Install Inkscape an have JavaFX exporting out-of-the-box. No needing to install external plugins.
  • Provides a way to Inkscape users to make RIA applications reusing their work at drawing tool.
  • Provides a way to JavaFX programmers a tool for designers their graphics and interfaces.
  • Keep separated the JavaFX programming logic from the graphics resources but also provide a way to connect them.
  • They work on Windows, Mac OS, Linux, OpenSolaris and FreeBSD.

Workflow Example

I’ll show here step by step how would be a designer-developer workflow from designing graphical elements, such interfaces, to integrating it to a JavaFX Script code in NetBeans. In this example I’m using Inkscape 0.46-devel, build from the unstable sources and NetBeans 6.1 with the JavaFX module. See here how to build Inkscape from sources and here how to do some optimizations on the build.

Here’s a artwork (a modified version from another one I did in another post) made with Inkscape.

Doesn’t matter the complexity of the drawing it is made of discrete elements such circles, rectangles, paths and others. What the exporting module does is converting these SVG elements into JavaFX Scene Graph API elements.

To do that just click on File → Save As… or Shift+Ctrl+S.

Select JavaFx as the output format.

And chose a name. I’m saving the drawing as Girl.fx.

Now the drawing is a JavaFX class that extends from CustomNode. Once in your classpath (in this case the same directory of your main code) you can call it.

Girl{}

Another example, the famous SVG tiger.

Tiger{}

Actually, you can get the elements of your drawing as attributes nodes of the main node. We use the name you gave to your object to name the attributes.

import javafx.scene.paint.Color;
var girl = Girl{}
girl.rightiris.fill = Color.LIME;
girl.fringe.fill = Color.WHITE;
girl.backhair.fill = Color.DARKGRAY;
girl.hair.fill = Color.GRAY;

import javafx.scene.paint.Color;
var girl = Girl{}
girl.rightiris.fill = Color.GREEN;
girl.backhair.fill = Color.DARKRED;
girl.hair.fill = Color.RED;

You can also put event handling by code.

import javafx.input.MouseEvent;
var p = Player{}
p.x.onMouseClicked = function( e: MouseEvent ):Void {
java.lang.System.exit(0);
}

As a ordinary JavaFX Node, you can do whatever you do with a Node, like using it inside a application or applying effects or transformations.

import javafx.application.Frame;
import javafx.application.Stage;
import javafx.scene.effect.SepiaTone;

var girl = Girl{
   scaleX: 0.5
   scaleY: 0.5
   effect: SepiaTone{}
}

Frame {
   visible: true
   stage: Stage {
      content: [girl]
   }
}

Using this approach you can have the reference and total control under all those elements that compose your drawing. You can design complete interfaces and attach event handling by code.

Source code

The module is already on the main Inkscape dev tree and working properly. I guess it will be officially released to all users in the next Inkscape release.

Still to do

  • Fix some problems with strokes.
  • Fix some problems in the gradients.
  • Use Zlib to create jfd files when the structure is too big.
  • Provide a dynamic method like getElementById in JavaScript.
  • Convert effects like blur to JavaFX effects.
  • There are some i18n errors in the module to be fixed.
  • Finish the adaption from Paths to SVGPaths.
  • Finish the adaption to the new JavaFX 1.0 syntax (coming December, 2).

Thanks!

Thanks for all guys that worked on this module and also on the projects Inkscape and JavaFX. Specially thanks for Bob Jamison, Jim Clarke, Joshua Marinacci and others. That’s my first contribution to a big free software, I’m very glad and I want to do much more. 😀

JavaFX, Defuse the Bomb

I continue to develop simple games demos to feel better the strengths and weakness of JavaFX for game development.

Preview:

[youtube]hR2LiKiBUgE[/youtube]

Click to play via Java Web Start:

There’s a little JavaFX game demo where you have to transport a bomb to a defuse point without touching in the walls. I’m using the collision detection methods I described early in this post to detect when the bomb hits a wall and then explode or when a bomb is inside the defuse point and the game ends. As it’s only a demo, it’s just one single level, but adding more levels would be easy.

Basically we have this four images:


bomb.png


goal.png


floor.png


wall.png

The code is petty simple. A little bit more than 300 lines with even with all comments and declarations. I transform the bomb image into a draggable node, create a list of collidable nodes and a especial node, the goal. I check the collisions when the bomb is dragged by mouse, if it hits something, it blows up.

I use extensively the TimeLine class from the animation framework (javafx.animation) to create chained animations and even to control some game logic.

As I focused in the simplicity, I don’t declared any classes to after instantiate their objects. I just was using common classes from JavaFX and putting logic on ir throught event and binding to external variables.

import javafx.application.Frame;
import javafx.application.Stage;
import javafx.animation.Timeline;
import javafx.animation.KeyFrame;
import javafx.animation.Interpolator;
import javafx.scene.image.ImageView;
import javafx.scene.image.Image;
import javafx.scene.Group;
import javafx.scene.Node;
import javafx.scene.paint.Color;
import javafx.scene.geometry.Circle;
import javafx.scene.geometry.Rectangle;
import javafx.scene.geometry.Shape;
import javafx.scene.text.Text;
import javafx.scene.Font;
import javafx.scene.FontStyle;
import javafx.input.MouseEvent;

/* Fade variable modified in some animations and used in the fadescreen */
var fade = 0.0;

/* The Bomb */
var lock = false;
var tx = 0.0;
var ty = 0.0;
var bomb:Node = Group{
    opacity: bind bombfade;
    content: [
        ImageView {
            image: Image {
                url: "{__DIR__}/bomb.png"
            }
        },
        Circle {
            centerX: 45, centerY: 21, radius: 7, fill: Color.LIME
            opacity: bind led
        },
        Circle {
            centerX: 30, centerY: 30, fill: Color.WHITE
            radius: bind fireradius
        },
    ],
    var startX = 0.0;
    var startY = 0.0;
    translateX: bind tx
    translateY: bind ty

    onMousePressed: function( e: MouseEvent ):Void {
        if (lock) {return;}
        startX = e.getDragX() - tx;
        startY = e.getDragY() - ty;
    }

    onMouseDragged: function(e:MouseEvent):Void {
        if (lock) {return;}
        tx = e.getDragX() - startX;
        ty = e.getDragY() - startY;
        checkcollissions();
    }
}

/* Big rectangle that covers all the screen (bomb explosion or game end) */
var fadescreen = Rectangle {
    x: 0, y: 0, width: 640, height: 480, fill: Color.WHITE
    opacity: bind fade
}

/* The wood floor image for the scenario. */
var floor = ImageView {
    image: Image {
        url: "{__DIR__}/floor.png"
    }
}

/* The goal image where the bomb should be placed. */
var goal = ImageView {
    x: 470, y: 360
    image: Image {
        url: "{__DIR__}/goal.png"
    }
}

/* List of obstacles nodes that the bomb can collide with. */
var obstacles = [
    Rectangle { x: 120, y: 0, width: 100, height: 300, fill: Color.BLACK},
    Rectangle { x: 350, y: 200, width: 100, height: 300, fill: Color.BLACK},
    Rectangle { x: 370, y: 50, width: 50, height: 50, fill: Color.BLACK},
    Rectangle {
        x: 250, y: 120, translateX: bind move, width: 100, height: 50
        fill: Color.BLACK
    },
];

/* Visible representations of obstacles */
var wallimage = Image {
    url: "{__DIR__}/wall.png"
}
var walls = for(obs in obstacles){
    ImageView {
        x: obs.x, y: obs.y, translateX: bind obs.translateX
        clip: obs, image: wallimage
    }
}

/* Animation for a blinking green led */
var led = 0.0;
var bombclock = Timeline {
    repeatCount: Timeline.INDEFINITE
    autoReverse: true
    keyFrames : [
        KeyFrame {
            time : 0s
            values : led => 0.0 tween Interpolator.LINEAR
        },
        KeyFrame {
            time : 1s
            values : led => 1.0 tween Interpolator.LINEAR
        }
    ]
}

/* Animation for the bomb explosion and game reset */
var fireradius = 0.0;
var explosion:Timeline = Timeline {
    repeatCount: 1
    keyFrames : [
        KeyFrame {
            time : 0s
            values : [
                fireradius => 0.0,
                fade => 0.0
            ]
        },
        KeyFrame {
            time : 2s
            values : [
                fireradius => 200.0 tween Interpolator.LINEAR,
                fade => 1.0 tween Interpolator.LINEAR
            ]
            action: gamereset
        },
        KeyFrame {
            time : 3s
            values: fade => 0.0 tween Interpolator.LINEAR
        },
    ]
}

/* Reset variables for initial values */
function gamereset(){
    lock = false;
    fireradius = 0.0;
    tx = 0.0;
    ty = 0.0;
    bombfade = 1.0;

    moveblock.start();
    specialcollison.start();
    bombclock.start();
}

/* Animation when the bomb reaches the goal. Bomb disapear. */
var bombfade = 1.0;
var bomdisapear = Timeline {
    repeatCount: 1
    keyFrames : [
        KeyFrame {
            time : 1s
            values: [
                        bombfade => 0.0 tween Interpolator.EASEBOTH,
                        fade => 0.0
            ]
        },
        KeyFrame {
            time : 2s
            values:
                    fade => 1.0 tween Interpolator.LINEAR;
            action: gamereset
        },
        KeyFrame {
            time : 3s
            values:
                    fade => 0.0 tween Interpolator.LINEAR;
        },
    ]
}

/* Animation for a moving block. */
var move = 0.0;
var moveblock = Timeline {
    repeatCount: Timeline.INDEFINITE
    autoReverse: true
    keyFrames : [
        KeyFrame {
            time : 0s
            values :
                    move => 0.0
        },
        KeyFrame {
            time : 3s
            values :
                    move => 200.0 tween Interpolator.EASEBOTH
        },
    ]
}

/* Check and handle possible collisions. */
function checkcollissions(): Void {
    if(checkobstacles()){
        lock = true;
        specialcollison.stop();
        moveblock.stop();
        explosion.start();
    }

    if (insidenode(bomb,goal)) {
        lock = true;
        moveblock.stop();
        bomdisapear.start();
    }
}

/* There was a bug, when the bomb is stopped, not been gragged, in front of
the moving block, it could pass through it because checkcollissions() was
only called on mouse moving. This make sure checking this special case. */
var specialcollison:Timeline = Timeline {
    repeatCount: Timeline.INDEFINITE
    keyFrames : [
        KeyFrame {
            time : 1s/5
            action: function(){
                if(hitnode(obstacles[sizeof obstacles-1], bomb)){
                    lock = true;
                    moveblock.stop();
                    explosion.start();
                    specialcollison.stop();
                }
            }
        }
    ]
}

/*
* The next four functions are for collision detection.
* @See http://silveiraneto.net/2008/10/30/javafx-rectangular-collision-detection/
*/

/*
 * Check collision between two rectangles.
 */
function collission(ax, ay, bx, by, cx, cy, dx, dy): Boolean {
    return not ((ax > dx)or(bx < cx)or(ay > dy)or(by < cy));
}

/*
 * Check if the first rectangle are inside the second.
 */
function inside (ax, ay, bx, by, cx, cy, dx, dy):Boolean{
    return ((ax > cx) and (bx < dx) and (ay > cy) and (by < dy));
}

function hitnode(a: Node, b:Node): Boolean {
    return (collission(
        a.getBoundsX(), a.getBoundsY(),
        a.getBoundsX() + a.getWidth(), a.getBoundsY() + a.getHeight(),
        b.getBoundsX(), b.getBoundsY(),
        b.getBoundsX() + b.getWidth(), b.getBoundsY() + b.getHeight()
    ));
}

function insidenode(a:Node,b:Node):Boolean {
    return (inside(
        a.getBoundsX(), a.getBoundsY(),
        a.getBoundsX() + a.getWidth(), a.getBoundsY() + a.getHeight(),
        b.getBoundsX(), b.getBoundsY(),
        b.getBoundsX() + b.getWidth(), b.getBoundsY() + b.getHeight()
    ));
}

/*
* Check collision of bomb against each obstacle.
*/
function checkobstacles(): Boolean{
    for(obst in obstacles){
        if (hitnode(obst, bomb)){
            return true;
        }
    }
    return false;
}

/* Pack visual game elements in a Frame's Stage, unresizable. */
Frame {
    title: "Defuse the Bomb"
    width: 640
    height: 480
    resizable: false
    closeAction: function() {
        java.lang.System.exit( 0 );
    }
    visible: true

    stage: Stage {
        content: bind [floor, goal, walls, bomb, fadescreen]
    }
}

/* Call gamereset to set initial values and start animations */
gamereset();

Downloads: